Hello stampers and happy Monday to you. Today I am sharing some Waves of the Ocean suite cards with you. I have been noticeably absent this past week, or at least I hope it was noticed! My oldest daughter and her family moved in with me temporarily until they get possession of their new house. I was in full mom and oma mode and it has been wonderful! Now it is a new week, March break is over, school has begun and so has their regular work routine. Let’s take a look at my Waves of the Ocean cards.
Waves of the Ocean Cards
For the month of March I have been doing a video tutorial each Tuesday on YouTube and Facebook at 10am EST. I pair this with something I call “Parcels in the Post”. This is a collection of cardstock, patterned paper, embellishments and ribbon that gives you enough to play with but doesn’t break the bank. If you want one, click here.
When you read this, I will still have two of these cards to share in my Tuesday tutorials. I hope that you will find me on YouTube and subscribe to my channel! It really is one of the best ways to see what I am doing quite literally.
Embossing on Blue Foils
Yes, you CAN emboss on our foil paper. You have to be careful to stop as soon as all the powder is “set”. If you “cook” it too long, then the foil will start to bubble or delaminate. Embossing in white on those gorgeous blues is really quite stunning. The wave image is really a gorgeous stamp.
Bejeweled Waves
Magic happens when you layer the stamped wave with the die cut waves. One wave is cut from our blue foils paper and the other is cut from our Supple Shimmer paper. The wave was stamped twice and spritzed to get this great effect. You can see it all in action in my video tutorials.
Masked Cloudy Skies
For this card I used the Basic Borders dies to make a mask which I then moved around after sponging on ink with my Blending Brushes. Both the wave and the pelican stamps were inked and spritzed to get a softer look.
Crazy Times!
I don’t quite know whether I am coming or going these days. My household has grown from one person to five people, including two littles and a dog! Last week was also March break which meant no school and no daycare, but it also meant lots of oma snuggles and precious memories. I pre-recorded some of the videos for these Waves of the Ocean cards, so some are already up on my YouTube channel and some will be going up in the next two weeks. Please follow me on YouTube and subscribe to my channel. Videos are going to be the main way that I connect with my stamping audience, all other things are secondary.
Just Until the end of the Month
Please be aware that a lot of the products in the Waves of the Ocean suite are only available until March 31. Only the stamp set and dies will carry over into the new annual catalog. The rhinestone waves gems are stunning and the patterned paper is beautiful too. It’s all fabulous!!
Thanks for joining me today, I hope you have a fabulous day. See you here on Wednesday again.
Hello stampers and happy Monday to you. Today I am sharing a card that I call Dragonfly Garden: The Magic of Mist. Truth be told there was a reason this stamp set had not seen ink for almost a year! I didn’t love it, largely because of the patterned paper that was included in the suite. It didn’t appeal to me, so this bundle sat on the shelf. Today it has been transformed and I like a lot more!! Simply by adding a little mist, these stamps were softened and transformed into a work of art that I love. Let’s take a look.
Dragonfly Dreams
For this card I used two very important products: the stamparatus and shimmery white cardstock. Without those two things you will have limited success. I Inked up the floral image with retiring In Colour Stampin’ Write Markers: Just Jade, Misty Moonlight, Bumblebee, Cinnamon Cider and Magenta Madness. Before stamping I would lightly mist or spritz the inked stamp. Be sure to wipe off with your shammy in between inking up again and stamping multiple times.
I did end up using the grass stamp from Wildflower Path to fill in the bottom of my scene. Did you notice that I used all the retiring In Colours? This was a happy coincidence but also a timely reminder to check your supplies in these colours. Make sure you have enough cardstock and ink refills and of course the markers!
Video Tutorial
I love watching a video to see how a card is made, it is much easier than reading a written description. Be sure to click on the left hand corner of the video that says “watch on YouTube”.
No Blog on Monday!
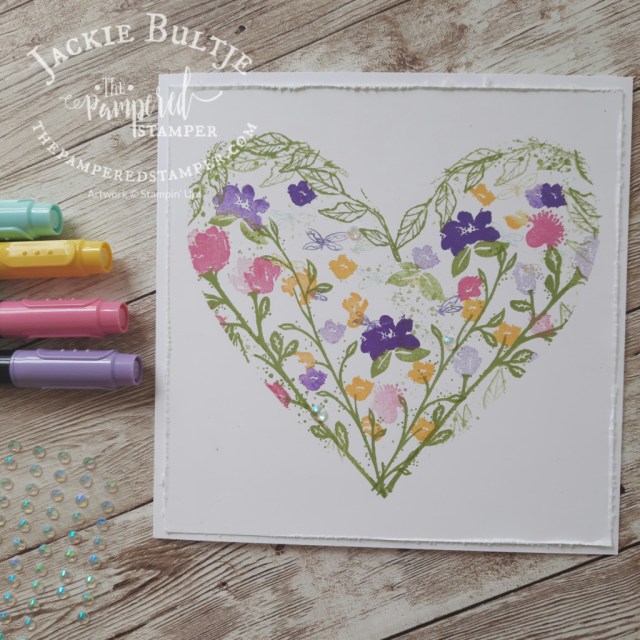
Since I will not be blogging on Monday as it is March Break and the littles will have moved in with me, I am going to make this an extra long blog post. I want to share some similar cards also using Wildflower Path. For these cards I did not use “the magic of mist” but I did use my stamparatus!! I used grid paper to create a heart mask. My exclusive video tutorial for these cards is on my Prime Time group. This is a very affordable private group that you are welcome to join! It’s only $10 a month, the price of a fancy drink and a treat. You also get a free monthly 16 project pdf tutorial that is worth $20 so you are getting double the value and then some for your investment. I must be crazy!! Click here to join.
Heart Mask Collage Stamping
For my flowers I used the following markers: highland heather, daffodil delight, polished pink and gorgeous grape. The leaves and stems were stamped in pear pizzazz. The question is, do we like it better plain or with a sentiment?
Here you can see the card with two different sentiments. The long skinny one is from Waves of the Ocean. The die from the other card is also from Waves of the Ocean bundle.
Here you can see the gorgeous detail in this closeup of the heart collage card.
A Little Addicted!
I think I may be a little addicted to this technique. A special thanks to Gez Carpenter for sharing this on the Demonstrator Planning Place on Facebook. You can find her blog here.
I made this last card using a very beloved stamp, Free as a Bird. What do you think? This time I used Pool Party and Balmy Blue Blends to colour the birds.
Thank you!
That’s it for today, it should give you lots of ideas for inspiration. I hope you have a super day and don’t forget to get the great deal on the mini die cutting machine! I used it last night to do some embossing and it was such a pleasure to work with. (just a heads up the natural tones Blends are backordered until April 4- bummer!)
Hello stampers and happy Wednesday to you. Today I am going to share some Happy Mail in Holland contest cards with you. I had a bit of an internal debate because these two cards do not use current product. They are beautiful cards though and I am guessing that you might still have some of these great products lying around from saleabration too. I am not going to do the homework of finding out the names of everything as it doesn’t help. You either have it or you don’t and you can’t buy it any more!
Elfie Kron’s Card
Elfie’s card was actually the first card I received and it made me very, very happy. I met Elfie at a Stampin’Up! event. I believe it was a half day business building seminar in Mississauga and we all went out for supper afterwards. Elfie has a big smile and a hearty laugh and I love her spirit. Her home town of Guelph is where I went to middle school for four years (grade 7 though 10) Emmanuel Christian High School on Sussex Street. That was an exciting time of my life, especially since it wasn’t common for grade seven and eight to be combined with high school. The first two years the school went up to grade 12 but then the community could no longer afford it.
The flowers were cut from what I believe was called Flowering Foils paper and they are coloured with Calypso Coral and Petal Pink Blends. Elfie used a decorative mask to make the background and the butterfly was cut with a die and vellum that was also sponged or coloured with Blends and the blinged up with Wink of Stella. Thanks so much Elfie!!
Sandy Allman’s Happy Mail in Holland Card
Sandy’s card is made from the beautiful butterfly paper that was also either a free saleabration item or a saleabration coordination product. I love the colour combination of blushing bride and basic black. So many pretty details on this card including the pearls that were coloured with Blends. Sandy is from the beautiful city of Prince George British Columbia and is also a regular contributor to my card contests. I love it!!! If you want to read more about Prince George and see Sandy’s other creations, check out this blog post. There is actually a link in that blog post that will take you to another blog post that has the actual pictures of Prince George.
I love the layout of your card Sandy! You definitely pay attention to all the little details. Here is a shot of the inside of the card.
The final finishing touch (other than the patterned paper on the envelope flap) is this cute signature on the back of the card. The recipient definitely knows that they are receiving a work of art. Doesn’t she just have the most beautiful handwriting?
#itallaboutthetreats video
I thought it would be fitting to share a video of my favourite Dutch bakery here. It would be so wonderful to be able to share these amazing treats with all of you. Not only are their gebakjes (pastries) divine, their bread is also great and of course they make simply the best krentenbollen (raisin buns).
Thanks!
Thanks so much to everyone who is participating in my Happy Mail in Holland contest, it warms my heart. So nice to read all of your messages inside your beautiful cards. It seems that now it is only taking a week for a card to get here so that is great news. Don’t forget about the Bonus Days! Until July 31 you will get a $6 bonus coupon to spend in August when the Holiday catalog goes live. If you want a Paper Pumpkin for July, let me know, I have a few extra and I also have someone who can put one out on the porch for you. Have a super day!!
Hello stampers and happy Wednesday. I am actually writing this on a Monday night knowing that I will hopefully be traveling on Wednesday but not wanting you to miss out on a post. We had so much fun making these cards today during my Facebook live! That hedgehog from Walk in the Woods is just so very cute. I have now done two Facebook lives featuring this cute critter from Walk in the Woods. Today I also used the glycerine technique for background sponging.
Masking with Walk in the Woods
The cute little hedgehog looks best when he is masked because then it looks like he is nestled in the woods amidst the grass and the toadstools. This is such a gratifying technique that elicits a wow from beginners and avid crafters alike.
The images on this card were coloured using watercolour pencils and a blender pen. “Everything will be okay” has been embossed in white on early espresso cardstock.
Here is the video showing how I coloured this cute hedgehog.
Glycerine Sponging
In my Facebook live video you can see how wonderful it is to mix your ink with a little glycerine before sponging. The glycerine makes the ink sponge on so, so smoothly for a beautiful suede like finish.
I love the card without a sentiment and simply on a misty moonlight background. The following card is on a very vanilla card base with a real red mat for a totally different look. This time I embossed the toadstools and the grass but the hedgehog was once again masked off so that he is a real part of the scenery.
Emboss Resist with Walk in the Woods
Two of the three cards use the emboss resist technique. Simply put, the images were stamped in versamark on shimmery white cardstock and embossed with white embossing powder and a heat tool. I then used an aqua painter to do a colour wash over the embossed image.
Video Tutorial
Here is the video from my Facebook live showing you how to do the glycerine technique.
Thanks!
Thanks for joining me again today. I am so very excited to be finally traveling to Holland to be reunited with my love. It will be great to share with you all the wonderful things I will experience over there. I hope to do live videos but I am not sure how often they will happen. Stay tuned for the details, I am sure you won’t miss me too much.
Happy Mail in Holland Contest
I really love receiving happy mail in Holland and I also like blogging about the cards I receive. To make it worth your while and also to make it fun, I will once again offer a prize! The winner will get to choose a stamp set worth $30. I will send it anywhere in the world. Here is the address that you can send your cards to: Jackie Bultje, Bloemenlaan 6, 2691 JC s’Gravenzande, the Netherlands. Please mail your cards any time in July. I hope to be in the Netherlands until August 29.
Hello stampers and happy Friday to you. Today I am continuing to share masculine cards from the Happy Mail for Gerard Contest. Both cards today use the fantastic set By The Dock. Can you believe that I haven’t used this set yet? Before we get started on this post, I want to address a possible concern and get your feedback.
Yes or No?
When I share happy mail contest cards that I receive I often share the envelope as well because many of you add special touches or the stamp is eyecatching. It has been brought to my attention that I should be blocking out the addresses because of privacy issues. How do you feel about that?
Here is what was going on in my mind when posting these pictures. Given my blog audience I didn’t think it was an issue to show these addresses. In fact, I thought that these people might even get surprise happy mail from some of you just for fun. So I am asking you, should I block them out or not? If it was your card, would you want your address kept private? From now on, mention it to me in your card if you want me to not show the envelope and I will happily honour your wishes.
By The Dock Cards: Ann-Marie Paré
This card is from Ann-Marie Paré, a darling woman who comes from Lachine, Quebec, just outside of Montreal. I love Ann-Marie’s delicate sponging of her sky and water. She captured the light perfectly! My second favourite thing is how she coloured her dock, it looks so weathered and worn. I can just picture looking at this dock on a foggy morning from a cozy cabin with the man that I love. Thank you so much for your fantastic card! The saying comes from a saleabration stamp set whose name is slipping my mind right now.
Lachine, Quebec
Of course I had to look up Lachine, Quebec, which is Ann-Marie’s hometown. Wow! Looks like the cradle of some amazing history. This is what I read: Lachine, apparently from the French term la Chine , is often said to have been named in 1667, in mockery of its then owner René-Robert Cavelier de La Salle, who explored the interior of North America trying to find a passage to China. When he returned without success, he and his men were derisively named les Chinois (the Chinese). The name was adopted when the parish of Saints-Anges-de-la-Chine was created in 1676, with the form Lachine appearing with the opening of a post office in 1829.
The picture above is from the Fur Trade National Historic site. If you want to read more about it or see some more great pictures, click here.
Terry Hamilton’s Card
I really love how two people can use the same stamp set and get a completely different look. Terry used shimmery white cardstock, she also sponged her background and masked a sun (or a moon). The dock and the boat were stamped on crumb cake with soft suede ink and cut out with the coordinating Dockside Dies. Simple bus striking. Terry used the stitched nested dies for the sentiment which was stamped in early espresso.
If you want to see a great technique for flawless sponging, check out this blog post from last year.
Kelowna, British Columbia
Terry comes from Kelowna, British Columbia. I just looked it up and I want to jump in my car and start driving. Kelowna is a small city in the Okanagan valley which is renowned for its orchards and vineyards. The wines that I have had from the Okanagan valley have been phenomenal!
If you want to read more about it, just click here. A visit to Terry is starting to sound like a great idea! You are so lucky to live in such a beautiful place.
Thank You
Thanks so much for joining me today, I hope you are keeping well with the ongoing COVID-19 pandemic. I am thankful that my business keeps me busy and engaged. The only big difference in my day to day life is that in person classes have stopped and I cannot see my loved ones. That is pretty huge, but I have been super busy, so that helps a lot. Like many of you, I have gone through a lot of flour and yeast baking delicious things and trying new recipes. There is a lot of good to be found in this trying time. Please take the time to comment, it is always so nice to read your thoughts.
Fancy Folds Contest
If you love to make fancy fold cards, please consider sending one to me and you might win the Little Ladybug stamp set. Contest ends May 31. You can send your cards to Jackie Bultje, 81 Delaware Ave, Chatham, Ontario N7L 2W3. Thanks and have a super day.
I forgot to say that if you live in Canada, you can shop with me simply by clicking on the images below in the product list. Now is the perfect time to start a new hobby! Message me if you have any questions. Please.
Hello stampers. It’s a beautiful snowy Tuesday afternoon and this oma’s house is quiet for the first time since Friday! No patter of little feet, no tumbling of towers, no squeals of delight. I’m not going to lie. While I will miss my adorable little man, the quiet is rather sublime!!
Today I am going to do a blog post with Cup of Christmas all stacked up. A big thank you to Annette Koolmees for the inspiration. I shared her card in a previous post which you can see here. Cup of Christmas is also my stamp of the month for December.
My Card
I really like taking a picture with the ink pads so you can see at a glance which colours to use. Here you can see the Cup of Christmas all stacked up. Did you know that this stamp set uses brand new technology that allows you to do reverse stamping with the same stamp? Yes, the cup stamps are totally reversible!!
I took a picture with the Nine Lives stamp set in the background as well so I would remember that the heart stamp came from this set. The aqua painter is in there because I saturated it with old olive ink and then tapped it aggressively to make the background splatter effect.
I used the very same layout as Annette but I wanted to make my card easier so I masked the middle mug and just stamped the other two. None of these mugs have been die cut. The Sweet Christmas Wishes is embossed on vellum and overlaid on the middle mug for added interest. You could stamp it right on the mug if you wanted to, just make sure to emboss so that you don’t see through the sentiment.
Stamp of the Month
Cup of Christmas is the stamp of the month for December. If you purchase the stamp set then you will get the class for free. This will be our second card for that class. Stay tuned for card number three! Class will be on Tuesday December 2. I will do a Facebook live on the cards Tuesday night at 7pm and you can also purchase all three finished cards for $15 plus shipping. I will have today’s cards on my blog post tomorrow with a buy it now button. How awesome is that? Instant gratification.
A personal note
This afternoon I will be putting the finishing touches on my presentation for OnStage this weekend in Toronto. I have big plans!! The cards and projects that I am sharing are so lovely that I am going to be making my first ever pdf so you can recreate all of them yourself at home. This will be a huge task. I will be photographing them all today. That will be the start of it. I am really hoping that I will have the pdf finished before I leave for Toronto, that way everyone can purchase it and be ready to create with all this lovely new product. My first blog post on this will be on Monday, so stay tuned!!


")


")


 Specialty Paper")


")
")


")


")


")


