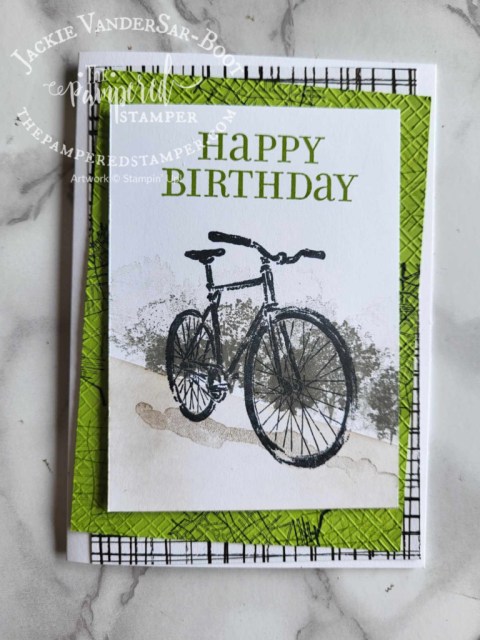
Hello stampers and happy Friday to you. It’s almost the end of August and here are the rest of the Fun on Wheels cards that I have made for my August Sweet Suite Tuesdays video series. Did you know that each month I now offer 20% cash back from the catalog price of the featured bundle? You have until August 30 to take advantage of this deal. In the meantime, take a look at my cards and let me know what you think! Which one is your favourite?
Video Tutorial
Seeing is believing, so check out this video tutorial. If you haven’t already done so, subscribe to my YouTube channel so that you catch these videos every week. To make this particular card, two other stamp sets were used to create the scene. My team member, Caroline van Roestel-Seward designed this card and graciously shared her tips with me. You can see the products that were used in the product list below.
I’m Curious
I’m curious. Are you a one set at a time stamper, or do you like combining different stamp sets to create a complex look? I tend to use just one set a time, but I really do love using several at once too. One of the reasons that I do use one set at a time is that if you are just beginning to stamp it can be overwhelming to need so many supplies to make a nice card.
Anyways, thanks for joining me today. I am grateful for you and I hope that you have a super day.
Hello stampers and happy Tuesday to you. Today I am sharing a gorgeous vintage Abigail Rose card with you. Vintage cards usually have lots of layers and more muted colours as well as distressing, torn and curled edges as well as linen thread or lace trim. My card uses the lovely Abigail Rose paper. For a complete list of the products used just scroll to the bottom of this post to the product list.
More than just a product list
Here is a closeup of the vintage Abigail Rose card. You can see the background stamps in crumb cake. I spritzed the paper with rubbing alcohol and then scrunched it up into a ball. Carefully unscrunch it and then let it dry. You can do the same thing with water but the alcohol will evaporate more quickly. Use your blending brush and crumb cake ink to distress the paper. The ink will gather in all the creases for a great vintage look.
Back to that product list. Did you know that it not only a convenient list for you to see what I have used? If you are a Canadian you can click on these links and you will be automatically transported into my online store. Of course I would be thrilled if you did order from me and then I would send you at least one free tutorial bundle as a thank you.
Free Tutorial Bundles?
Which free tutorial bundles do you get with a purchase? Good question. I am a member of three tutorial teams. The first is the International Create With Us tutorial bundle team. This group has demonstrators from around the world, many of whom have been Artisan team members. These tutorials are free with a $60 purchase but also free to team members. The second team is the Demo Design Dream Team which is mostly Americans with two token Canadians, also free with a $60 purchase. The last one is the Bundle Bonus group which is free with a $35 purchase. Let me know which one you want if your order is close to $60. If it is over $120 you get all three!
Video Tutorial
Here is the video I did showing you how to make this fun card. For your information, the Bundle Bonus group has a tutorial bundle on this bundle for this month! Happy stamping!
Have you subscribed?
If you haven’t subscribed to my channel yet, be sure to do so! If you subscribe, please let me know in the comments here and comment on your favourite video. You will then be entered into a draw for the Eden’s Garden bundle. When I get to 5400 subscribers I will do the draw. Thanks so much for joining me today and have a super day.
Hello stampers and happy Monday to you. Today I have an awesome “collage stamping” card using Ranunculus Romance. Wow, that is a hard word to type!! Did you know that a ranunculus is a bulb? You can read about them here and see how many beautiful colours they come in. Ranunculus Romance is great for vintage cards too. I was inspired to make this card by the talented Gail Ellis.
Ranunculus Romance Card
Here is my Ranunculus Romance card. I figured if I spell it often enough it will get easier! The ranunculus is also called a Persian Buttercup.
I did a video tutorial for this card as well and I fussy cut the flower. Someone watching the video reminded me that there are indeed dies to go with this stamp set, so I looked into it. Indeed, there are dies! The reason that I did not have the dies is not that I forgot. Collage stamping is the primary reason that I got this stamp set and I didn’t think I would utilize the dies enough to justify the cost. You can decide that for yourself!
Video Tutorial
Rather than type out how I made the card, you can just watch the video here. I would be most grateful if you clicked on the bottom right corner of the video where it says “watch on YouTube”. It would be even more awesome if you subscribe to my channel and comment and share the video. This is the modern version of “word of mouth” which is the best form of advertising. Thanks for being a part of my stamping community!!!
Supply List
Did you know that the supply list for my cards is always listed at the bottom of my blog? I also share it in my YouTube videos. There are two little words beneath the description of the video. “Show more”. If you click on that you get a LOT more information including the links to my Stampin’Up! store and to my favourite Amazon products. With this video I used a great little bow maker. Mine came from a friend in the States, but it is much easier for you to get them from Amazon (or find a handy carpenter to make you one, in that case you can use the Amazon image as inspiration!) Click here to see it.
Thanks!
Thanks again for joining me today, I really appreciate you “stopping by”. Happy stamping and have a super day!
Hello stampers and happy Thursday to you. Do you ever miss things in the catalog? You see something beautiful that someone else has made and you say, where did you get that? They say, “Stampin’Up!”. Hmmm. How did I not see that? Well, I have just that hidden gem for you today.
Hidden Gem
Are you curious what this hidden gem is? Turn to page 170 in the annual catalog, you will find it right smack dab in the middle of the page! It is called Pressed Petals Journal and quite truthfully, it doesn’t look like much. Who knew that with a little embellishing it would show its true colours? Who knew that if you opened the cover there would be an inspirational quote on each page? Let’s take a look at what I did with it, but first I want you to see it unadorned.
Pressed Petals Journal
So here is what I did with this pretty plain little journal. I gave one to each of my team members who came to #OnStage2019 in Toronto with me.
Unfortunately those gold wax seals are no longer available but I still had some in my stash and I thought they looked really nice on these vintage journals for my team members. I was one short, so I made the last one last night using only current products so you can reproduce it if you like.
How Did I Do That?
Are you wondering how I got that plain brown book to look like this? I’m guessing you couldn’t even tell that there were embossed or pressed flowers in the cover of this little book. All I did was swipe a merry merlot ink pad across the cover and it looks like antique leather. I added a bit of Pressed Petals paper and Pressed Petals specialty washi tape to make it look pretty.
Yes, that washi tape makes the lovely flower and the centre of the flower is Perennial Essence floral centres which are self adhesive too. On the sentiment I added a little designer element which I had also originally overlooked in the catalog. they come in three metals, antique copper, antique gold and antique silver. There are 36 in a pack and you can find them on page 178 of the annual catalog.
The finishing touch is some braided linen trim that I unraveled on the ends to make it look a little more vintage. All the details combined together make it a pretty lovely and thoughtful gift. I am hoping to make these with lots and lots of people for a fundraiser for our World War 2 veterans and their families. More on that later.
If you want more inspiration online, there are literally tons of ideas out there, just click on this link and see for yourself. You can also click on this link to see some other projects I have made with the Pressed Petals Suite.
Happy Mail Contest
Please don’t forget about the happy mail in Canada for Gerard contest. I am hoping to get lots of cards for him when he comes on March 29. If you participate your name will go in a draw for the masculine stamp set of your choice from the mini catalog. Just send a masculine card to Gerard van der Sar c/o Jackie Bultje, 81 Delaware Avenue, Chatham, Ontario N7L 2W3. I will also blog about your card! This was so much fun and so very meaningful when you did it for me when I was in Holland. Thanks so very much for participating and also for stopping by to read my blog today.
Saleabration in Full Swing
Saleabration is in full swing and several free items are no longer available. Why am I telling you this? I don’t want you to miss out on your favourite freebie. Hosting a private class or workshop is also a fantastic thing to do at this time of year. Everyone has an opportunity to get free stuff and you have a chance to get the Lovely Ladybug stamp set for free with a $375 workshop. Let me know if you want to host a gathering or if you want to do an online party. You can message me with your order as well or even better, use the host code and order online, then it will come straight to your door.
Do you want to see all the cute things made with Little Ladybug? I did a google search and here are the results.
Happy stamping and have a super day!! See you tomorrow.
Hello stampers and happy Tuesday to you. I love vintage, so the vintage feel of the tropical oasis suite really appealed to me, especially the vintage station wagon on the patterned paper. Of course I wanted to use as many of these great images as possible without sabotaging too many of them. I think I came up with quite a good solution without having to fussy cut too many of them. Let’s take a look!
Vintage Station Wagon
I used one of the dies from the So Sentimental bundle to cut out nice shapes that could be the focal point of a card. Each of the frames has a vintage station wagon in it. They face different ways so that will affect where you place your palm trees, but it is fun making each card a little differently. A picture is worth a thousand words so I took one for you.
So you can see that I got five full images, two partial images and a few fussy cut station wagons as well. Now let’s look at it on a card.
Vintage Station Wagon Card
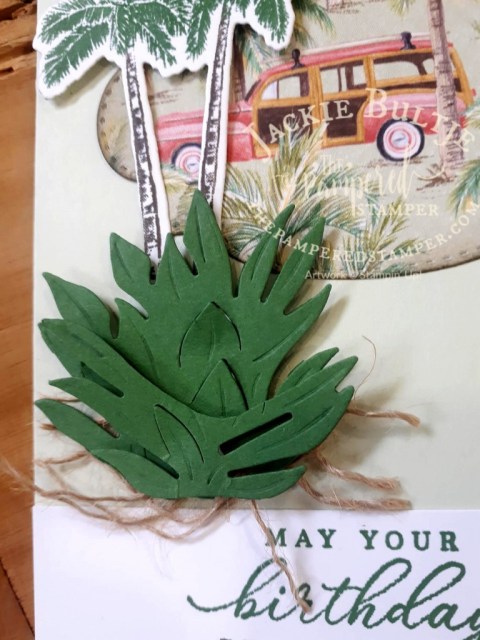
This was the first card I made but there was something about it I just didn’t like. I decided that the braided burlap trim under the bush was just too stiff looking. It felt like it was just put there as filler, so I took it off. I then deconstructed the ribbon and put the loose pieces there instead and that was the look I was after. Yay!!
Truth be told, the card above is not mine, I decided to use Caroline Seward’s card as an example because she stepped it up a notch by making her bush two dimensional. The bush is actually the pineapple top with the bottom cut off. She added the bottom part as an extra layer and I think it looks fantastic. Everyone at coffee and a card class loved making these cards.
During the class Jean Saunders remarked that the label shaped frame actually looks recessed from the card because of the sponging around the edges with the saddle brown StazOn. What a great effect! If you want to see the other cards we made with the Tropical Oasis suite you can check out yesterday’s blog post here.
Colouring on Stamps
Using your markers to colour on stamps is a great way to make your image more beautiful. Just use the broad tip of your marker angled sideways. Do a little healthy huffing after you are done colouring to remoisten the ink before stamping. (that means to simply blow some hot, moist air on it!)
The Next Tutorial
I have enjoyed working with this suite so much that I think it will be the subject of my next tutorial. If you love making cards but hate trying to figure out all the measurements and the techniques involved, these tutorials are perfect for you. They will jump start your own creativity and build your confidence to create beautiful things. Tutorials help you get the most out of your stamping supplies. After you have made ten cards with a product suite you really have your groove on. You can also use the card styles or the techniques to work with other stamp sets. The cost of a tutorial is the same as the cost of an in person class but with a lot more information. I highly recommend them. You can access all of my tutorials at the top of the blog.
Monthly Free Tutorial
Did you know that I belong to an amazing group called the Demo Design Dream Team? Every month we collaborate on a 16 project tutorial which is NOT for sale. Instead we give it away to our team members and to customers who order $50. (that is the Canadian equivalent) If you have ordered from me and I have inadvertently forgotten to send you this free tutorial, please remind me!!
Happy Mail for Gerard
I finally decided to make it Facebook official that I am in in a relationship with Gerard. This isn’t news to you my faithful followers, but it sure did prompt a storm of well wishes that really touched my heart. He is coming to visit me on March 29 and I thought it would be wonderful to surprise him with happy mail. I am offering a draw for a free masculine stamp set of your choice from the mini catalog if you send a card for him. Your card will also be featured on my blog. This was such a fun thing to do when I was in Holland that I thought we could do it again on this side of the ocean. Here is the address if you want to participate: Gerard van der Sar c/o Jackie Bultje 81 Delaware Ave, Chatham, Ontario N7L 2W3.
Some More Vintage Feels
I’m feeling a little nostalgic today with all these vintage cards and that super cute station wagon so I thought I would share a link to a great web page and also this photo. I hope it brings a smile to your face and also some happy memories. We can all use some “warm and fuzzies” once in a while. Thanks for dropping by and have a super day!!
Saleabration Urgency
We are almost two thirds of the way through saleabration and I thought I should exercise due diligence and let you know that some free saleabration items are now running out. If there is something you have your eye on that you would really like for free, be sure to get it before it’s gone. I really hate high pressure sales, so this is not what this is, it is just a gentle reminder that some nice things don’t last. He who hesitates sometimes misses out. The kerchief card kit and the metallic baker’s twine and sequins are both gone now. Now this really is the end of my blog post!
Hello stampers, I’m back!!! So sorry for dropping off the face of the earth with no notice. After an amazing week of true winter vacation including snowshoeing, ice skating and snow tubing I am going to do a blog post on the Tropical Oasis pineapple. Quite the contradiction but it feels good.
Tropical Oasis Pineapple
When I first saw the tropical oasis suite, it was the pineapple die that really caught my attention. There is a separate die for the pineapple fruit and the pineapple greenery which I think is simply fantastic. This arrangement really allows the textures to pop. The pineapple greenery die embosses and cuts at the same time and it also has little slits in it that allow you to “peel” bits of it forward to create depth and texture. Did you know that the pineapple is a symbol of hospitality? That is why it is often featured as an ornate carving on newel posts and on doorways.
Tropical Oasis Suite
The tropical oasis suite has so many great things in it. I don’t know about you, but I am really loving this suite approach from Stampin’Up! Creating is so much fun and also easy when you have so many coordinating products. The following closeup shot will let you see the great texture in the braided burlap trim and the coastal weave 3D embossing folder. Antique bronze trinkets are also available in these fun shapes: pineapple, hibiscus, ukulele and leaf. There are twenty four in a package. One thing that you might not notice right away is that the flower has been stamped in saddle brown Stayzon ink which gives it a great vintage feel. I was very, very impressed with this ink!
A Few Tips and Tricks
After cutting out the pineapple bottom I did a colour wash with it using an aqua painter and crushed curry ink. Just smush the ink pad onto a clear block and then pick the ink up off of that with an aqua painter.
Notice how the braided burlap trim is a little wider at the ends? Yes, you can tease it apart to give even more texture and interest.
After running the very vanilla cardstock through the Big Shot with the coastal weave embossing folder I sponged it with some saddle brown stayzon ink to make it look more vintage.
The flower was stamped off in saddle brown stayzon and then I used an aqua painter with calypso coral ink to colour wash it.
Fluff out the pineapple greenery to make it more lush.
Cards for Coffee and a Card and Facebook Live
Here are all the cards we will be making at coffee and a card tomorrow and I will also be doing a Facebook live at 7pmEST so you can see how I did it. I will blog about the other two cards tomorrow and Wednesday.
Happy Mail for Gerard Contest
Did you know that I am doing another happy mail contest? I love the great energy this creates among the stamping community and even more, I love how much Gerard gets into this. He loved the happy mail in Holland contest and he was even more excited than I was when cards arrived in the mail. I thought it would so wonderful to surprise him with a stack of happy mail from all of you when he comes to visit on March 29. If you would like to participate you can send your masculine card to Gerard van der Sar c/o Jackie Bultje 81 Delaware Avenue, Chatham, Ontario, N7L 2W3. I will blog about your card and you will be entered into a draw for the masculine stamp set of your choice from the Handmade for You mini catalog.
Winner of Blog Candy
Congratulations to Debbie Colquhoun who won the Valentine’s Paper Pumpkin stamp set I’ll Bee Yours. Thanks to everyone who took the time to comment on my blog and share my post on Facebook or Pinterest. You wouldn’t believe how much it means to small business owners when people help share their work.
Thanks so Much!
Thanks so much for stopping by today, I really appreciate you. I had a fantastic time away at a cottage in Huntsville with my kids and grandkids enjoying a real Canadian winter. We had so much fun in the snow! This cottage is available for rent for the rest of the winter, so let me know if you are interested and I will let the owner know. Here are a few pictures so you can appreciate the view and the solitude.
Being here was so soul restoring. The peace, tranquility and serene beauty of nature all around you is balm for the soul. Spending time with family here was priceless. I am so thankful for the opportunity to have been able to do this. It is great to be back, now it is time to get stamping and to organize all the club orders. If you would like to order online please use the current host code available on the right hand side of every blog post! Have a super day.


")
")
")


")


")
 Designer Series Paper")
")
")


 Crinkled Seam Binding Ribbon")


 Braided Linen Trim")


")
")
")

 Braided Burlap Trim")


")


