by Jackie Bultje | Sep 5, 2017 | Year of Cheer Suite |
Hello stampers! We all love happy mail, and participating in a mailed in swap is like happy mail on steroids. You get this huge envelope with 20 cards made by your talented fellow demonstrators. Wow! We all need more joy in our lives, and it never ceases to amaze me how much joy a handmade card can give, especially one that has been mailed. I challenge you to try it. Make a card and pop it in the mail and see what happens.
The swap that I participated in was just for Canadian demonstrators since postage to the States can be too costly. I hope you enjoy all the talent even though the pictures are never as good as the real thing.

The card above by Zahra Premji uses the stamp set Snowflake Sentiments and the matching framelits on page 35 of the holiday mini. I love her colour wash technique in the background.

The card above was made by Jenn Tinline. I love how she used non-traditional paper for the background, it comes from Delightful Daisy designer series paper. The stamp set that Jenn used is called Hearts Come Home from page 39 of the Holiday Catalog.

The card above was made by Selina Merali. I love the patterned paper, it reminds me of a vintage Canadian flannel shirt. The black shimmer ribbon looks fantastic on this card and I had totally overlooked it in the annual catalog. I found it on page 199, but you can just click here to read all about it. Selina used the stamp set Watercolour Christmas.

Lynsay Mahon made the card above using the stamp set Hug in a Mug. It combines very well with the Coffee Cafe suite. I really love how Lynsay used the brown and pink together. See those cute snowflake stars along the left side? She didn’t painstakingly stamp all of those, it’s washi tape!! You can find it on page 195 in the Basics Pack 1 (not an enticing name but very versatile indeed).

This card by Lesley Poper is right up my alley! I do love my glass of wine every day with supper and I also love all the little details that make this card really shine. Lesley used sequins from the mini sequin trim, she used fine tip glue to make the grapes glisten and she clear embossed the wine bottle to give it shine. The wine glasses are stamped multiple times to make a great background paper and then she embossed it with the Hexagon 3D dynamic textured impressions embossing folder. What a mouthful, but it sure is a great embossing folder. The stamp set used is called Half Full.

This beautiful card by Ange Mckay is very rich looking with all the combinations of gold, silver, copper and champagne. The Season’s Greetings is copper embossed, the year of cheer embellishment is silver and the snowflake and the “dotty” border are champagne foil. The background is from the stunning year of cheer specialty designer series paper. You can find all this on page 37 of the holiday catalog, or click here.

This was my card! I also used the Year of Cheer Specialty designer series paper and the foil snowflakes and mini sequin trim. The sentiment is from Half Full. I love snow and winter and of course Christmas. The new Winter Wonder embossing folder is also quite lovely. I liked putting it off to the side so that you could still see it and not have it hidden behind the foil snowflake. I also like that the specialty paper which is more money than the regular can be stretched when you use it in narrow strips like this (1/2″ and 3/4″)

One more card with the Year of Cheer specialty paper. This beauty was made by Christine Dionne. She went with non-traditional Christmas colours, bermuda bay and pool party. Season Like Christmas is a great two-step stamp set. It has a watercolour look to it and also has a great way that you can get two colours in your tree, a brown tree trunk with coloured branches. I love that.
That’s all for now, but I will be sharing more cards later this week, so stay tuned. I have only shared 8 cards out of the 20 that I received, but now it’s time to play a game with my daughter Rachel. This is her last year at home and I want to cherish my time with her.
by Jackie Bultje | Aug 18, 2017 | coffee cafe suite, Embossing Paste, masculine cards, Masking |
What lives in the heart
I grew up on a farm and whenever I am driving through the countryside I always look with longing at the red brick farmhouses. They evoke such happy memories for me. Baking bread with my mom at the kitchen table, eating breakfast at 5:30am with my dad and brothers before going to milk the cows and bundling up in front of the woodstove to go outside and play in the snow. So when I saw the brick wall stencil and the embossing paste in the new catalog, I knew what I wanted to do. I wanted to recreate those beautiful red brick walls and make some cards that bring back those same nostalgic feelings.
To get the perfect look for the bricks I added some cajun craze reinker to a small amount of embossing paste. I smeared some of it over the stencil onto whisper white cardstock. Then I added a drop of early espresso reinker to another small amount of paste and smeared it over and around the cajun craze tinted paste. Perfection! Just the right hue for what I was looking for. Be sure to clean your stencil and your palette knives as soon as you are done so they don’t dry out and harden.


On this card I sponged soft suede in between the bricks to give it less of a stark look. I love the look of an “exposed brick wall” with this Half Full stamp set, just what a wall in a nice wine bar or cafe would look like! The bricks also look better when they are left a little rugged with unfinished edges and also not covering the whole card front. Leaving the top corner unfinished is perfect for placing your sentiment. Remember to let your embossing paste harden before sponging around it or on it. If you have smeared the paste so that it is even with the decorative mask (in other words, thinly) then it takes about an hour to dry. When I made these cards I did all the background first. Then I stamped my images that I needed to fussy cut. Of course there were lots of other “mom” things happening in between too.

I made this masculine card because my Pap had a truck just like this one before I was born! Add that to the fact that the colour of these bricks is exactly the same as the farm house that I grew up in and you have a winner for a card. Did you notice that the windows are black? The reason is that I am covering up a mistake! When I was watercolouring the truck I couldn’t manage to stay within the lines for the windows and it didn’t look nice at all, so I used a black marker to colour the windows in. I think it is rather effective!

The sentiment is from the stamp set Five for All. The truck is from the set Country Livin’.
Using the Decorative Masks with Sponging
While my first instinct was to use these decorative masks with our new embossing paste, they also work great with simple sponging. You can use three tools to accomplish this: stamping sponges, sponge daubers or our sponge brayers. For the next card I used stamping sponges with early espresso ink on cajun craze card stock. The images were stamped in archival black, coloured and then stamped direct to paper with versamark and clear embossed. The images are from Country Livin’.

You wouldn’t know it, but there are three other masks in this set. The brick wall is definitely my favourite, but I also played with the cloud one. The other two are going to have to wait. What a great value they are. Four masks for $8 Canadian. Check out the Pattern Party Decorative Masks on page 201 of the catalogue.

I used the smallest palette knife to make these clouds and give them texture the same way you would with icing on a cake. The sentiment is from a brand new set coming in the Holiday Catalog called Painted Harvest. I used the sponge brayer to make the background. The sand is done with soft suede and the sky is marina mist and island indigo. Card base is island indigo. The lady from Beautiful You is paper piece with real red and crushed curry.

The “cloud nine” card is definitely very textured. In Dutch you would call this a “misbaksel”. In other words, a few things went wrong with this one but I still wanted to show it. I started with a watercolour background which really is quite stunning. Then I decided to sponge the clouds with white craft ink. This was a bit of a mistake. The white just didn’t pop enough. So I decided to add white embossing powder, but some of the powder stuck to my watercoloured background making for a bit of a messy look. No worries, clouds sometimes look like that don’t they? I still think it is a bright and cheerful card and I would be most happy to get one in the mail.

I do love the collage stamping on this masculine card. I used the stamp set Wherever You Go as well as the new background stamp called Post Script. I used embossing paste for the clouds but they kind of disappeared into the busy background. Sponging them with white craft ink after they dried really made them pop. I used sponge daubers to do this without getting white craft ink on the background. You can see that the bottom cloud is a little bit blue. I first sponged over it in blue and didn’t like the look. The craft white couldn’t quite cover that up!

This last card really has a rustic feel to it. Maybe it is because I actually painted with coffee on it! Yes, the brick wall on white was just too stark and I had some cold brew coffee in the fridge to make iced coffees so I thought, why not? I stamped the words repeatedly on the top right corner to give a chalkboard feel. You’ll notice a tinge of bluish green on some of the words, that is because I had done a watercolour background on a previous card and my grid paper was a little messy so some of the ink transferred to this card. I like it, but it would be hard to copy this look again. I have made a video to show how I did some of these cards but for some reason it has failed to upload to Youtube, so you can see it on my Pampered Stamper Facebook page.
Have you had a chance to try out the new embossing paste yet? I am looking forward to using this in my technique club. All clubs start in September and I still have room in technique club, upon request club (at this one the host gets to choose what we do) as well as the man,oh man club where we make exclusively masculine cards. Have a super day!
ps. the video has now uploaded to YouTube, so here you go!
http://https://www.youtube.com/watch?v=E-DausZKQZo
by Jackie Bultje | Aug 2, 2017 | coffee cafe suite |
The Dutch tradition of Coffee and how I built my business around it
Hello stampers! When I saw this new suite in the catalog, Coffee Break, it stole my heart. The reason I fell in love with this suite is that I have literally built my business on my love for coffee. Of course it isn’t just about coffee. It is about gathering together around coffee and home-baked treats. For someone of Dutch descent, there is just no such thing as a “naked” cup of coffee. When you go to any restaurant or cafe in the Netherlands and order a cup of coffee, you will always get a small treat to go with it, even if you have already ordered a piece of cake or pie. Double decadence!
I have always felt the importance of combining card making and scrapbooking with gathering around food and drink, that is why I called myself The Pampered Stamper. We all need a little pampering and we all need a tribe. People that we want to be with, people we can talk to and people we can share our love of stamping with. Fellowship is taken to a whole new level when you sit down together and share food.
Why I love the Coffee Break Suite
What I love so much about this suite is that there are so many options with different textures, patterns and sayings. I love that the coffee cosy framelit just literally falls out without any fussy poking. I love that you can build all kinds of drinks and cups with the different framelits. I feel like a barista! The patterned paper is very vintage too don’t you think? This set also pairs well with some of our other stamp sets, especially Balloon Celebration and Mixed Drinks, Sneak peek alert….there is another coordinating set coming in the new Holiday Catalog that is just darling. I think it is wonderful when framelits can be used with more than one stamp set. Here are some cards that I have made using this suite:

For this card, the patterned paper is all cut at 1 3/4″ wide and either 2″ long or 2 3/4″ long. The early espresso layer is 4″ x 5 1/4″. Card base is soft sky 5 1/2″ by 8 1/2″ scored at 4 1/4″. I love how some of the patterned paper is such a subtle pattern that you can stamp on it.

I love the simplicity of this masculine card. The score line on the far right was actually a mistake, but I really like it! The words come from the set Feather Together.

I cased this card from the talented Lorri Heiling. Doesn’t the awning look great in the striped paper from the Coffee Break designer series paper? The coffee cup on the right is cut out from the paper using a framelit but the coffee carafe and the cup need to be fussy cut. Here is the link to the tutorial that Lorri made for this beautiful card. What a blessing she was to me yesterday.

I love this card, totally a “Jackie original”. I created the gingham piece using the Brushstrokes background stamp with calypso coral.The words are from Balloon Celebrations and from Labeler Alphabet. The lime wedge is from a retired set called Apple of my Eye. The garnishes from Mixed Drinks were just the wrong size. Stamping on vellum is great for an overlay. Here I stamped in versamark and embossed in white for the outline and the ice cubes. The “tequila sunrise” or tropical sangria looks like this when the vellum overlay comes off. I just liked the vellum since it not only softens the image, but it also makes it look like frosted glass and gives you a place to put the pretty straw.


This card uses the emboss resist technique. You emboss with white on white cardstock and then sponge marina mist over top. The vellum is also embossed with white. All the images come from the Coffee Cafe stamp set which is $26 Canadian for a set of 16 photopolymer stamps. Use the hostess code on the side to order and I will send you a great card made with this set.For the month of August the code will be ZBJ972UF.

This card above was totally cased from the talented Juanita Ambida. Here is the link
Here is a closeup to the embossed background as well as the gorgeous detail and texture of the coffee cozy framelit.

I have made a video with some tips and tricks for this suite, but my internet is very slow today and it has not finished loading, so I will add it later. Patience is not my strong suit and I really want to publish this post. I hope you are all having a wonderful day and if not, extra special hugs going your way. Sometimes life does happen and it isn’t always good.
It’s up!! So here you go:
http://https://www.youtube.com/watch?v=CcUBybFs4-w
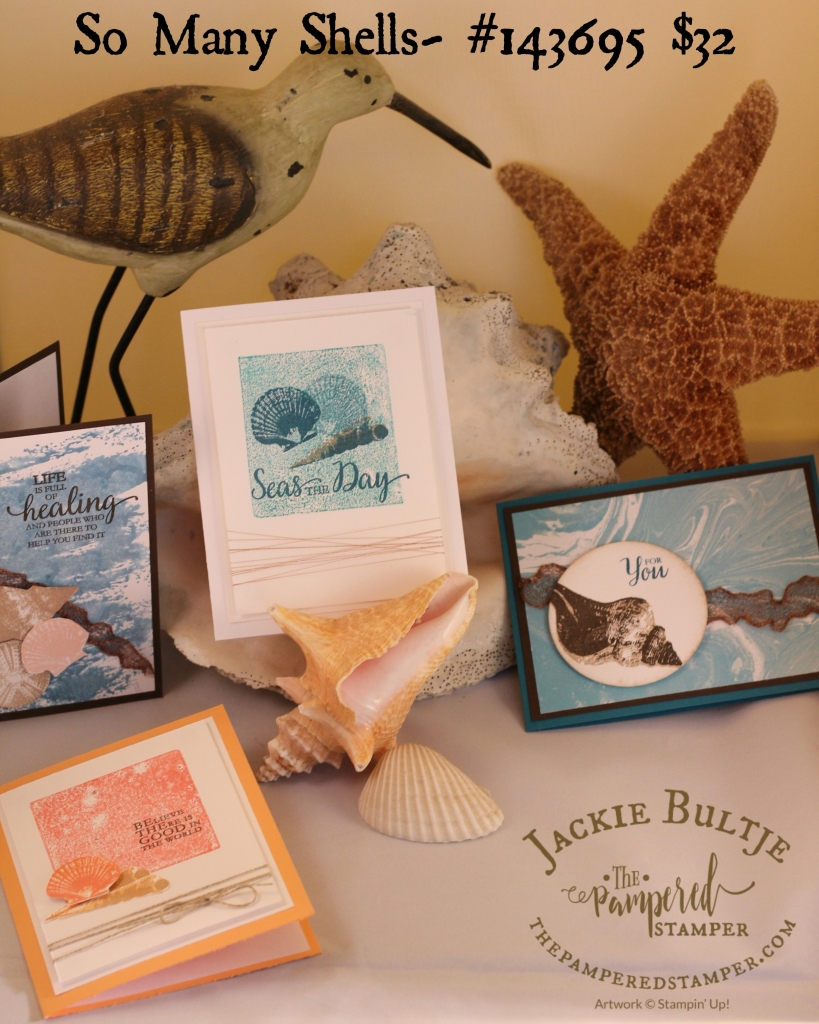
by Jackie Bultje | Jul 31, 2017 | acrylic block stamping, masculine cards, shells, stamping off |
Well hello stampers! It has been way too long since I have posted and I am truly sorry about that. However, “Life is full of healing and people who are there to help you find it.” This is an apt title for my blog post, not only because it is one of the sayings in the beautiful stamp set that I will be featuring, but it also really applies to my life right now.
Big Changes Up Ahead for Me
One of my favourite Bible verses is Jeremiah 29:11 where God says “I know the plans I have for you, declares the Lord, plans to prosper you and not to harm you, plans to give you hope and a future.” Some of you may know that besides being a mom to five kids, a mother-in-law to two and an oma to one, I have also been married to Jeff for 29 years. The sad truth is that my marriage is now ending. The good news is that the decision is mutual and that we are supported by our children. There is no denying that this will be a tough chapter in my life with many difficult decisions to make.
The one thing that will most likely change is that I will be moving away from Chatham next year when Rachel is done high school. I am trusting that doors will open and that my path will be led as to where I should live. My Stampin’Up! business will be even more important to me than it already is because I will be the only one “bringing home the bacon”. I want to be able to provide good service to my current customers but I also want to build up my online business as well as my team.
I would love to have YOU join my team
That being said, today is the last day to get in on an amazing deal on the starter kit. It is called Christmas in July and basically you get a bonus kit worth $94 if you join. The good news is that if you join now you have until January to get your business going! Wow!! Fall is the best time of year for sales because everyone is gearing up for Christmas. Deciding to get the starter kit can seem like a really big deal. It took me a long time to take the plunge and that is most likely because no one told me that it is risk free. Not only is it an amazing deal, it also comes with no strings attached. If you decide that you cannot afford to keep up the minimum requirement of $400 every three month just for your own discount, or that the business you had hoped would take off just isn’t, it really doesn’t matter. You will not get a nasty phone call or email from me or from Stampin’Up! They just want to give you an opportunity to use the kit in the way you want to, either to fund your own hobby or to build a thriving business or anything in between. I can tell you from the bottom of my heart that my Stampin’Up! family has been such a blessing to me, especially in the last few weeks when they were among the first to know about my family situation. I hope that if this resonates with you, that you will have the courage to take this step and just go for it. I would LOVE to help you succeed.

Today is also the last day to earn “bonus bucks”. With every $60 purchase you will receive 6 bonus bucks to use in August. With the new catalog still very fresh in our minds, it should be easy to decide what to get!
Let’s take a look now at the beautiful stamp set So Many Shells. Especially with what I am going through right now, this set really speaks to me with its many lovely and heartfelt sayings. Shells are also a timeless and comforting image that work well not only for many different types of cards, but also for both men and women. The shell images are two step stamps but they also work well on their own. Since it is a photopolymer set it is easy to line the images up for a beautiful detailed and artistic look.

One of things I like most about these cards is the copper trim that can be made to look like netting. A huge thanks to Jini Merck whose card I cased (the one on the far right) and who featured this ribbon trick. So clever. Here is the link to her blog post: http://stampwithjini.com/so-many-shells-tutorial/

We now have a background stamp called Marbled. I don’t have it yet, but I still had some designer series paper from two years ago that was a sale-a-bration freebie. I just had to use it even though it is no longer available. I just love the look but am super happy that there is now a background stamp that you can use over and over and not worry about running out of just the right paper. I used a different background stamp, Watercolor Wash (yes, it is killing me to spell it the American way rather than the Canadian way “watercolour”) on this next card along with the gorgeous saying “Life is full of healing and people who are there to help you find it.” I am finding that to be so true with my church family, my Stampin’Up! family, my Beyond Pampered Team, my friends and my family. It is always true that when we make ourselves vulnerable and share truth it opens the door to more meaningful conversations and relationships.

I used crumb cake and powder pink on the shells as well as marina mist for the background and early espresso for the words.

I try to get into the habit of finishing my cards in the inside as well. Taking that extra step really finishes it off beautifully and if you don’t do it right away you just know you are going to have to dig out that stamp set, figure out the coordinating ink pads and make a mess all over again before you can give the card away. Not my idea of fun stamping. Too much like work.

I just love the simplicity of this next card. No fussy cutting, just inking up an acrylic block, stamping off, misting and then stamping some shells and a saying on top. I got this particular idea from my good friend and mentor Lisa Pretto. Check out her blog post: https://inkbigacademystamps.com/2017/06/5-way-friday-many-shells-stamp-set.html
I just wound some copper thread around the bottom of the top panel multiple times to give it a nautical look. Colours are bermuda bay for the background and island indigo for the shells. The long skinny shell has an overlay of crumb cake.

Well, I hope I have inspired you with So Many Shells, and do remember that whatever you are going through, life is full of healing and people who are there to help you find it. I wish you the courage to make tough choices and also the bravery to have vulnerable and honest conversations with your loved ones.

On a brighter note, it feels really good to be back here again. Stamping is great therapy and I am so glad to have you in my life.
Warm hugs, Jackie aka The Pampered Stamper
by Jackie Bultje | Jul 17, 2017 | color theory suite |
Hello stampers. It is always fun to stamp in unexpected ways, and using your acrylic block as a stamp is a very quick and easy way to make a visually interesting card. You can keep it very plain and simple like I did in this card. No misting with water, no dry brushing, just inking up the block and stamping it on plain whisper white cardstock with a “foamie” underneath. In case you are not familiar with that term, it is what I call my stampin’ pierce mat. Here are my cards:

I used soft sky for inking up the block, old olive for the grass, marina mist for the waves and basic grey for the saying and the birds. One card base is basic grey and the other one is daffodil delight. Here is a video showing how I did it:
http://https://www.youtube.com/watch?v=Rzfefkumybc
For this next card I was inspired by Jane Allmark to use Beautiful You to make a bikini clad girl. I also used the block that is included with the Soft Sayings kit because it has rounded corners. I was going to use the Muskoka chair thinlet for her to rest her arm on, but it the wrong proportions, the chair is too big. I used the envelope punch board to round the corners on my card. It is a fantastic corner rounder punch!

The saying is from the Soft Sayings card kit that will be available starting June 1. I stamped and cut out the bikini girl. Here is the link to Jane Allmark’s tutorial video on how to make this classic beauty. I did spritz the block with water after I inked it up with soft sky for a slightly softer look. The saying is stamped in calypso coral to match the card base and the colour on the bikini. Happy stamping. You probably won’t hear much from me on the blog till the end of July as I am leaving on an epic trip to Europe and then Thailand. I am visiting my daughter Rachel who is on a Rotary exchange to France, then I am visiting family in the Netherlands and from Amsterdam I fly to Thailand. One week will be spent exploring Bangkok and then I will enjoy the free trip that I earned with Stampin’Up! Have I told you how much I love my job? I do not want to have a working vacation, so I know you will be in fine hands until I get back, there are lots of other blogs to check out, but I will miss you!!
Well…..this was supposed to be published while I was gone, but for some odd reason, that didn’t happen. So I am back from my wonderful trip and now I have a blog post all ready to go and that does make me very happy. Enjoy!