by Jackie Bultje | Mar 12, 2019 | Birthday, Let it Ride, masculine cards, Uncategorized |
Hello stampers. This stamp set Let it Ride just makes me want to take a deep breath and smile. Those horses in the meadow just remind me of a breath of fresh air. And yes, spring is in the air here in southern Ontario. The sun is shining and it is still cold outside but every day it gets just a little bit warmer. Sometimes in the afternoon you can leave your coat open!
I grew up on a farm so the expression “live as if someone left the gate open” is very meaningful to me. If you have ever seen cows when they notice that the gate has been left open you will know what I am talking about. The excitement and the enthusiasm is rampant and contagious. When one animal notices it and starts running with abandon towards the open gate, the rest follow. There is unexpected adventure on the horizon. I hope that someone leaves a gate open for you this week and that it brings you great joy and adventure.
Let’s take a look at the cards that I made using both Let it Ride and Country Road. I made these cards for classes so they have to be nice to look at but quick and easy to do. Most of them use Blends and that makes for therapeutic card making.

This first card we made at Blends Club using the crumb cake blends. Very simple technique. Just use the dark bullet point to outline the edges and dark lines and then blend in with the brush tip of the light crumb cake. So simple and everyone can do it. No thinking involved and it always looks great. I frayed the edges of the braided linen thread to give it a more rustic look.

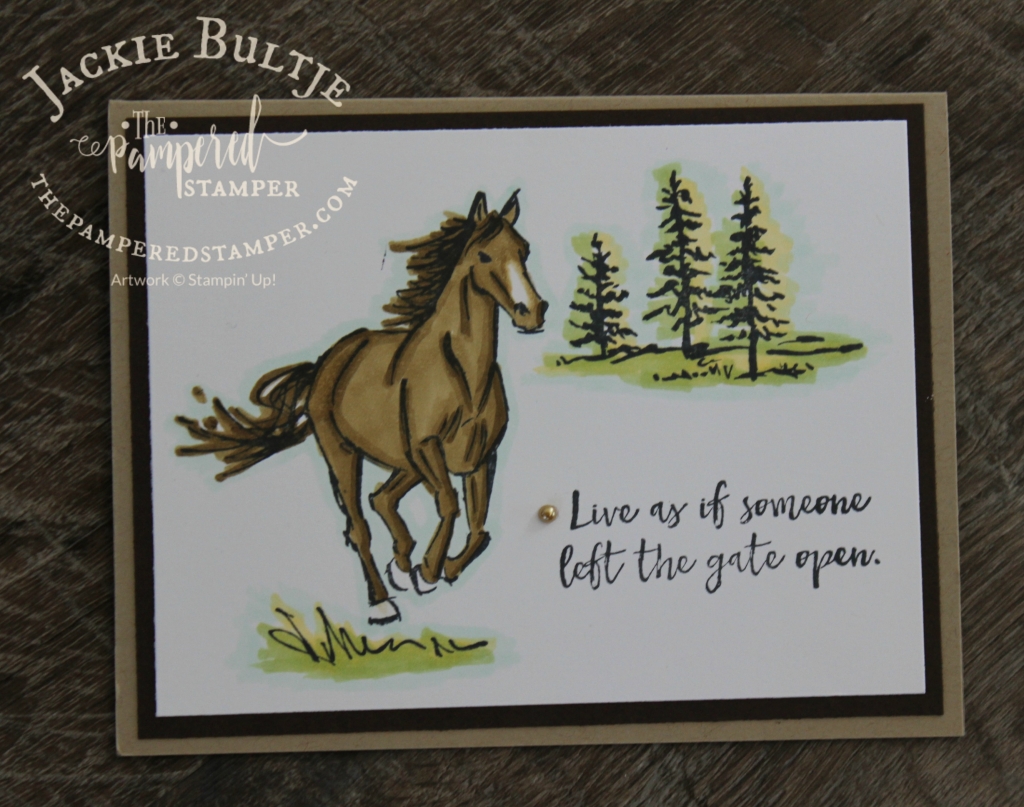
The Wood Textures paper is great as a background to our rustic stamp sets. The base for this card is crumb cake and the mat for the image is early espresso.

This card was made for me by my team member Alison Reid and she cased Gaynor Boyce from the UK. What I love about this card is the colouring. Light Granny Apple Green and Light Daffodil Delight was used on the trees and then all the images were outlined in Light Pool Party to give a great shadow effect. The blaze of white on the horse’s nose is also a great touch.

The lovely line images in this stamp set lend themselves very well to colouring with Blends. It is nice to be able to use the colour lifter to get a third tone of colour. Beginners and more advanced “blenders” all did well with the horses.

I love the simplicity of this card. Great for any occasion or just because. The weather vane was stamped in gray granite after it had already been stamped on grid paper. This makes for a lighter version and is called “stamping off”. If your ink pad is really juicy you may have to stamp off twice before getting this light version. The grass/oats was stamped in mossy meadow, once full strength, once stamped off. The wagon wheel was stamped in early espresso. Here is the inside of the card.

I hope you liked this sampling of cards. If you want more inspiration, the sky is the limit. Just type the stamp set and Stampin’Up in the google search bar and you will be amazed at what comes up. Just like this: Let it Ride Stampin’ Up
I just finished a Facebook Live video explaining how the starter kit is like a Costco membership. When you get the starter kit, not only do you get a great deal (spend only $135 but choose $225 in product) you also open the door to great savings. Right away you get 20% off your purchases. This is good during the quarter that you sign up (First quarter is October through December, second quarter is January through March, third quarter is April through June, and fourth quarter is July through September) and for the next quarter after that. So if you sign up any time during saleabration you have until the end of June to get your 20% discount. If you buy or sell $400 every quarter you get to keep your discount. How awesome is that? You DON’T have to teach classes but you CAN share the free catalogs that you get and share what you love with your friends. The easiest way to do that is with Paper Pumpkin or some of the kits that we have in our catalogs. Just invite them to come and help you make up a kit. Then you can give cards to people you know who could use some happy mail. I would love to have you join my team and get the great deal no matter what you plan to do with it. Here is the link if you want to save lots of money and get lots of stamps, ink and paper.
If you live in Canada and want to shop with me, just click on the images below and if you really want to make me happy and your order is less than $200 then please use the host code as well. It is posted in the side bar. Have a super day!
Product List
by Jackie Bultje | Apr 24, 2018 | Birthday, Picture Perfect Party |
Hello stampers! I love photography. Not that I have the patience or the time to actually read the manual or take a class, but I do love to take pictures. Maybe that’s why I also love the Picture Perfect Party paper. It is paper from Stampin’Up! that is actually photographic on one side and simply patterned on the other. It looks so real it pops! Last year they had paper called Serene Scenery that was also stunning. The Wood Textures paper that is carrying over is in a similar style. The beauty of this type of paper is that you can keep your cards very clean and simple because the paper is the focal point. I love that. I whipped together an entire class in two hours this afternoon, starting from scratch, and I am very happy with the results. So much so in fact that I am offering this class on the day before my very own birthday!! So please join me on Thursday June 7 at either 9:30 am or 7pm to make these great cards. Class is only $25 for six regular cards and four narrow note cards and envelopes, but you save $5 if you order the stamp set and you can save another $5 if you bring someone new. Here are the cards:

I combined Picture Perfect Birthday with Birthday Wit as well as Stitched Shapes framelits and some assorted ribbon that coordinated with the paper and it all came together very easily. Here are some of my raw materials.

Here you can see all the dsp I used (short forms are never really good, dsp stands for designer series paper, which basically means patterned paper that is designed to coordinate with our cardstock and stamp sets)

I found it very helpful to lay out the paper like this on my table so that I could see how many different cards I wanted to make and which patterns I wanted to showcase and which ones would have a “supporting” role. In the next picture you can see which ones ended up being used as pretty liners for my envelopes. It is little details like this that really take your cards over the top. We used to have an envelope liner framelit but I just traced the envelope flap and cut inside the lines making sure that a little envelope adhesive was still exposed so that I could seal the envelope.

Here is a closeup of one of the cards. You can see how pretty the peekaboo peach crinkled seam binding is. My go-to framelits, the stitched shapes are also lovely. They work well all on their own or you can pair them with the layering ovals framelits. For the regular sized cards I used a piece of bermuda bay cardstock 4″ by 5 1/4″ and the patterned paper was cut to 3 3/4″ by 5″.

Another great thing about the Picture Perfect Party designer series paper and the coordinating stamp set is that it doesn’t have to be just for birthdays. This last cards uses the sentiment “celebrate the good stuff”. That can be for anything and I love it!! I am all about celebrating the good stuff. Life is good, even during the tough times, there is always joy to be found.

If you scroll to the end of the post you will find all the products that I used to create these cards. If you click on them you will be taken directly to my store. I see that I forgot to add the peekaboo peach crinkled seam binding ribbon, so here is the link for that.
I would of course love it if you shopped with me anywhere in Canada, providing you don’t already have a demonstrator. I am trying to post a video as well, but the internet seems to be very slow this evening, so I may just edit this post tomorrow and add it later. Most of my videos are on YouTube and on my business Facebook page The Pampered Stamper.
If you look at all the supplies you will see that it soon will add up to well over $135. Did you know that for that amount of money you can put together an order for $165 and pay no tax or shipping? It’s called the starter kit and it comes with no strings or obligations. Message me if you want more details on this amazing deal that few people seem to know about. Have a super day and I will add that video some time tomorrow when the internet for this country girl is better.
http://https://www.youtube.com/watch?v=tdmtiXjUxNY
Product List
by Jackie Bultje | Mar 17, 2018 | Birthday |
Hello stampers. Have you ever skipped over a stamp set in the catalog thinking it wasn’t that special? Then you see some cards that someone else made with it and you wonder, how did you not see that beauty right away? Well. I had that exact thing happen with the stamp set Perennial Birthday. I should have known better. I am an avid gardener and I LOVE perennials. So this one should have been calling my name!
One of my team members, Alison Reid, made a beautiful card with this set for one of our regular stamping events called Fab Four. I loved that first card. Here it is:

Isn’t it beautiful? I just love the colours Alison used here, pool party, berry burst and lemon lime twist. The story gets better. Alison made me four more cards in exchange for an embossing folder. Yes, I think I got the better end of the deal. I was so inspired that I decided to build a class around it.
The date of the class is way far away, not until May 9 with two time slots at 1pm and 7pm. I am offering the class now so that if you order the products needed for the class before March 31 then you will get a free saleabration item. You can even order online and then I will send you all the parts for the cards and a link to a video showing you exactly how to put them together! How awesome is that. There is only one requirement, you have to order with the host code EGVK3DTB. The class will include the Perennial Birthday stamp set and the Perennial Birthday Project kit. This amazing kit includes all the supplies to make 16 birthday cards as well as a beautiful box with dividers to keep your cards organized by category. If you sign up for the class you will only pay for the product but you will get to make the following three cards for free!! I love this idea.

Don’t you just love the colours on this card? Marina Mist and Lemon Lime Twist. It is perfect for spring. The stamparatus will help so much with this card taking all the stress out of lining up those sentiments.

What a lovely clean and simple card. Alison used some of my favourite products on this card: stitched shape framelits, metallic edge berry burst ribbon and Petal Passion paper. Wow!! The flower was stamped in Versamark and then embossed with white embossing powder. Then sponge daubers were used to sponge ink over top of the embossed image. So pretty!

Metallic thread, rhinestones, dimensionals, it’s all in the little details that makes this card shine. Pear pizzazz, melon mambo and whisper white are perfect for spring. The last card will not be included in the class, but you will be able to make this card later at home, especially if you are the winner of the celebrate you thinlets that will be a draw available only to class participants including those ordering online!

There are lots of things happening on this last card. Three different sized circles cut with the stitched shape framelits. The Celebrate You thinlets cut from our silver foil paper and the smoky slate card front run through the Big Shot with the Petal Pair textured impressions embossing folder. Sign up for the class and you might win the framelits or this card!
I am so happy to have discovered that this last card was the brainchild of Selina Merali. Absolutely lovely work Selina. If you want to see her card on her blog, here is the link!
Don’t forget to use the host code 6G3F2TC9 if you order online. Have a super rest of your weekend, I hope you were inspired by Alison’s cards. She received her inspiration from many sources online and from her own very creative brain. I am thankful to have her on my team.
Product List
by Jackie Bultje | Jan 24, 2018 | Birthday, Embossing Paste, Sweet Soiree Suite, watercolouring |
Hello stampers! Try saying that quickly six times in a row!! Seriously though, this suite is pretty sweet. Now I really do hate cake decorating, although I do my best to make a pretty cake. This type of cake decorating is more my style. The image in the catalog is quite luscious isn’t it?

I actually got everything in this suite so that I would not be inhibited in my card making and I wasn’t disappointed. The Berry Burst Metallic edge ribbon is my favourite ribbon so far in the book. It is a gorgeous colour and it also ties beautifully. Take a look at the close-up of this card:

There is a lot going on in this card. I used Wink of Stella to watercolour the cake and that is truly a fantastic technique. The picture cannot capture the beautiful sparkle on this card. The fine tip of the Wink of Stella is ideal for colouring this detailed image. I used marina mist, berry burst and old olive. The background is marina mist with the silver embossing paste and the sweet soiree decorative masks. It worked really well and wasn’t runny or messy. It didn’t take all that long to dry either.

The pretty little dies that I used for the top of the cake come in one unit and you can put two strips of paper behind it for quick cutting too. Take a look:

Watercolouring with Wink of Stella also works well with a black image. With this card I also used rich razzleberry and powder pink.

Here is the complete card. The background was done with a watercolour wash technique that I learned from Billie Moan. I will include a video on part two of this post that I hope to finish tomorrow. I added some candles using the decorative masks and silver embossing paste and I didn’t make quite the elaborate bow that Billie did, but other than that, this is a complete case of her beautiful card. You can check it out here.

This suite also comes with a great embellishment kit that includes some handpainted flowers, some foil accented cakes, vellum and silver leaves and flowers, blue velvet ribbon, white clothespins and some adorable tassels with jump rings as well as a yard of washi tape.

On this card I used the blue velvet scalloped ribbon to anchor the cake.

I thought I would include a closeup of the ribbon so you can see the texture. Everything about this suite is simply luscious.

Here you can see the framelits that are included in this suite. There is just so much to play with here!

Now these framelits look quite delicate, but as long as you use the precision plate, all the little bits come out very easily and there is no fussy poking with “pokey tool” or more properly known as the paper piercing tool.
I realize that I have way too much content for one post, so I will continue this one tomorrow with a few more card samples and a video on how to do the watercolour wash background.
by Jackie Bultje | Sep 13, 2017 | Birthday, masculine cards, Painted Harvest, two-step stamping |
Hello stampers! Have you seen all the amazing cards out there using Painted Harvest? What a beautiful stamp set this is. I have seen so many different versions of the sunflowers, so I decided to make a card with the nuts. Nuts? Yup. There’s an acorn in that set and I don’t think it has been given its due. Using stamps to make pretty background paper is a lot of fun, so that is what I have done with this first card. I used the acorn, the leaves and the stipple stamp to make this nice effect. What do you think?

Another stamp set that pairs well with Painted Harvest is the Burlap background stamp. If you ink up the stamp using a sponge you get a more subtle effect that lends itself to stamping images right on it. The sunflower was stamped with crushed curry and cajun craze with an early espresso centre. The saying is from Cool Treats.

The last card also uses the technique of stamping over a background image. You could use patterned paper, but this is the Sheet Music background stamp. I also used a sponge and crumb cake ink to gently ink up this stamp. I totally cased this card from the talented Linda Dalke from Australia.

I used marina mist and night of navy on this card as well as the new Everyday Label punch from the holiday catalog (page 12)
by Jackie Bultje | May 5, 2017 | Birthday, Birthday Memories Suite, masculine cards |
Hello stampers. I am sure you have seen some amazing twisted pop-up cards on Pinterest. They are just so impressive. It is always a very cool thing to surprise people and that is exactly what this card does. From the outside it looks like a plain, average card. Cute, but nothing super impressive. Well. I’m telling you, they are a lot of fun to make and even more fun to watch people open. It really helps to make a few at a time so that your brain catches on to how to make them, and then it is like riding a bike. You don’t forget.

The Seaside Embossing folder is the perfect match for this card. It was a very special gift to me from Ellie Blake at OnStage in Toronto. A lovely lady and a very lovely card which inspired me to make my own version using the Birthday Memories Suite.

Here is the card that I made using the Birthday Memories Suite.

It really is a surprise when you open this card! How much fun is that both for you and the person you give it to? See the little present? It is cut out with a framelit from our patterned paper in this suite. Should be available June 1.

Finally here is the card I demonstrated in my video. It uses Beautiful You and the stitched framelits. It also combines Floral Boutique paper and delightful dijon cardstock, both of which are retiring. Take note of the host code in the sidebar, please use that when you order online and I will be sure to send you a thank you card. This card was cased from Betsy Rouw.


Here is a close-up of one of the girls. I will probably add a Mother’s Day sentiment to this one and send it to my Mom. She is 85 now and I know for a fact that her life was not always easy. She was married to the love of her life, but she could have had 8 children and ended up with only 4 due to miscarriages and death. She also had to leave all of her family behind and live in poverty for many years. Oh, how I love her!

This picture shows the inside mechanism of the card, I hope it helps. The part with the four panels is 3 3/4″ by 11″ scored at 2 3/4, 5 1/2, and 8 1/4″. The patterned paper pieces are 2 1/2″ by 3 1/2″.

Here is the YouTube video that will show you how this card is put together, hopefully it helps you. There are other tutorials out there, just Google it.
http://https://www.youtube.com/watch?v=U7AHqx4M7rA
Happy stamping. Remember, stamping is cheaper than therapy and way more fun.


 Designer Series Paper")


 Metallic-Edge Ribbon")


