by Jackie Bultje | Apr 11, 2017 | Birthday Memories Suite, Framelits |
Are you ready for more amazing projects from this fabulous suite? The Birthday Delivery stamp set has 23 pieces, the Birthday Friends has ten dies and the Birthday Memories designer series paper has all kinds of images that match the dies: the poodle, the fox, the present, the banner, the balloon, the bunch of flowers and the girl. Here is cute card using the girl die and the image from the paper.

The next card uses the chef image and the neutral paper.

Here is close up of the chef. It is a stamp and is cut out with the framelits.

The Birthday Memories paper is also great for making gifts and cards for teachers or nursery school helpers. What do you think?

When I saw the images on one of the sheets of paper with the animals going to a birthday party I thought it would go perfectly with our hearth and home framelits. Add some clear window sheets and the windows look real!

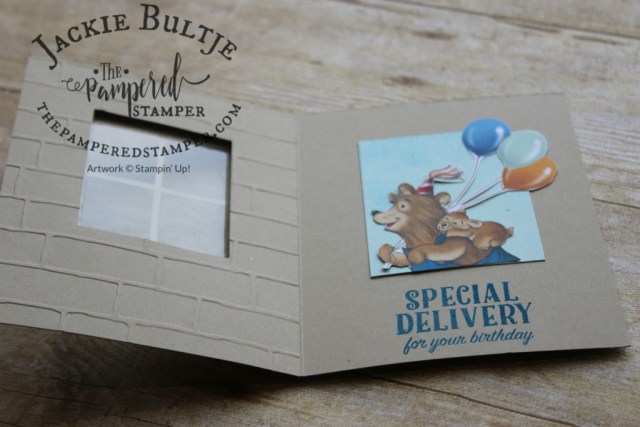
Here is another “window card” this time using the bear image.

Here is a peek at the inside of this card:
Here is a large 6×6 Z-fold card using several images cut out using the framelits as well as patterned paper for a fun kids card.

Here is another view of the big z-fold card- the base is pacific point and the oval is cut using the Stitched Framelits.

Here is another simple card using one inch strips that are 3 1/2 inches long and at the end is a 1″ circle. Add a strip of ribbon and you’re all set.

The patterned paper was also perfect for making a striking 12×12 scrapbook layout. The base is soft sky from the Falling In Love card stock from the Occasions catalog. I used the Large Letters framelits to make the title.

The last project I made with this bundle is a mini album that is all ready to be filled with pictures of my soon to be born grandchild! I used three 8 1/2″ square pieces of white card stock.

Here is the inside of the book, all ready for some 4×4″ pictures and some triangle photos.

So that is the end of the samples I made for #OnStage2017, but I did make one more when I came home, especially since I left my entire box with all my samples and all my free stamp sets from the event in the Allstream Centre. Thank God that they were found by SU staff and were shipped to Utah…hopefully they will ship them to me and I will be reunited with my “children”. Here is a twisted pop-up card. I received one from Ellie Blake and then copied hers using my suite of products.

The magic happens when you open the card! For someone who is mechanically and directionally challenged it was a bit of a stretch to figure out where to put the adhesive so that it would function properly.

Here is a bit of a peek from above so you can see the mechanics of it all. I admit it is a little complicated but once you wrap your mind around it, it is not too difficult. It will be a great card either for Technique Club or a specialty class.

Well, I hope you love this suite as much as I do. Unfortunately it won’t be available to customers until June 1, but if you get the starter kit, you can pre-order on May 1! How amazing is that. You know how much I would love to have you on my team. And if you have been reading this blog or watching my videos, you also know that there is no obligation to be this amazing demonstrator either. You can get the kit just to get your very own discount. Of course, it is much more fun to stamp with a friend, so you would naturally invite some friends to come and stamp with you and before you know it orders for product will come to you and you will be able to at the very least support your own addiction (oops, hobby) Never forget, stamping is cheaper than therapy and way more fun!!
The retirement list was posted yesterday, check it out here. Remember the in-colours usually sell out as does discounted cardstock and paper. Happy shopping.
by Jackie Bultje | Apr 10, 2017 | Big Shot, Birthday, Birthday Memories Suite, Framelits, notecards and envelopes |
Hello stampers! You are a very lucky bunch indeed, because you get a fabulous sneak peek at a brand new suite from the upcoming 2017-2018 annual catalog. It is called Birthday Memories Suite and it is unlike anything Stampin’Up! has ever offered before. What makes it unique is that the framelits in the bundle also cut out the beautiful images from the paper. I can’t share the pictures for the paper, the stamp set or the framelits yet, but I can show you the projects that I made!

I just love the honeycomb embellishments that go with this suite. The colours there match perfectly with the patterned paper. Here is a close-up:

Do you see the girl in the inside of this card? It is a stamp and there is a matching framelit. There is also a girl on the patterned paper that faces the front and it also fits into the framelit.


The patterned paper in this suite that you can make the easiest cards ever just by using a square of it and putting it on the front of the card. I love the nostalgic feel of it and that it works for both boys and girls. Doesn’t it remind you of the beautiful story books that you read as a child?

This is a great card for a dog lover and it simply uses a piece of patterned paper from the Birthday Memories Suite. Here is the inside of the card and it uses the stamp set Here for You.


This suite is great, not only for cards, but also for cute gifts.

This is a petite cafe bag. Did you know that they are poly-lined so that they are safe for treats. Perfect for Easter. I also like to put hazelnut vanilla coffee beans in there. Looks great and smells great too! The next gift is a white treat box that has a clear sleeve around it that has been embellished with a wide banner and a big bow.

If you look closely you can see the clear acetate sleeve around the box. That means the whole embellished beautiful topper comes off so that the gift can be opened and nothing destroyed.

On this baby card I pulled the ribbon apart and it suits the card perfectly. It also combines very well with the That’s The Tag bundle. Here is close up of the fox:

Another image that is from the patterned paper is the cake and it cuts out with a coordinating framelit. Such fun to play with!!

Here is one more cake card and then I am going to save the rest of the projects for another day. This post is getting super long and I am getting super tired!!

This last card uses one of the neutral sheets from the designer series paper in the Birthday Memories Suite. The cake is an image from the paper and the chef is a stamp. Both are cut using framelits, so no fussy cutting. How awesome is that?!
Stay tuned for more amazing projects using this fabulous suite.
by Jackie Bultje | Apr 6, 2017 | butterfly, Framelits, That's the Tag bundle |
Hello stampers! The last time I used That’s The Tag bundle was at OnStage in November in Ottawa. I fell in love with the Occasions catalog there and ordered a LOT of stuff with the intention of using it all at least once in a class. I have fulfilled that resolution. Finally I am using this set and I am especially loving the versatility of the framelits. While they are all nice, my favourite is the one with the flower that you can paper piece. Check it out (thanks to Jan Brown for the inspiration for this striking card)

One of the other framelits is also suited to paper piecing and I used copper foil sheets, basic black and crumb cake with a bit of very vanilla.

I like the way the ovals repeat with the framelit and the embossing folder. It is called Pretty Paisleys but unfortunately it is no longer available. The last card I made uses framelits that focus on the cut-out pieces. You can either paper-piece them or put the solid oval behind so that the colour pops through.

The pretty copper embossed paper is from the Affectionately Yours specialty designer series paper. You can find it on page 45. Check it out here. The embossing folder is one of those bigger square ones, great for adding scrapbook accents as well. It is called Fluttering.
If you want to order any of these products, be sure to use the host code on the side, I try very hard to keep it updated, but you know me, not always the most organized person on the planet!! The interesting thing about this bundle is that it is all about tags, and I haven’t made one tag with it, just cards! Oh the possibilities. I am sure you will agree with me that this is a very versatile set, good for many occasions and for both men and women.
Tomorrow morning I will be on the 6:18 train to Toronto where I will be attending OnStage, a local Stampin’Up! “Convention”. Our first grandchild is also due tomorrow, so lots of excitement in store. My next post will feature the suite I am going to be presenting at OnStage. I can’t wait, I know you will love it as much as I do and I am planning a big event to showcase it. That’s all for now, have a super day.
by Jackie Bultje | Mar 31, 2017 | Big Shot, Birthday, Framelits |
Hello stampers! Do you know which is the cheapest bundle in the Occasions catalog? It is definitely a hidden gem. You can find it on page 11 and it is only $44 for a seven piece stamp set and three framelits. It is called Birthday Blast Bundle and you can see it here. I recently used this set to make congratulations cards for my team members who were celebrating “Stampin’Up!” anniversaries. I was amazed at how quick and easy it was to make a very striking card, especially when you step it up and use our sparkling glimmer paper.

One of the things I like the most about Stampin’Up! is the way their products coordinate to make you look very professional. It takes all the guess work out of card making. The paper matches the card stock which matches the ribbon which matches the ink and voila! A beautiful card with no mental anguish. This stamp set also has nice big sentiments which fill up the page so that with three stamps, a framelit and a piece of ribbon you are done. Anyone would be thrilled to get this card in the mail. It is also good to note that there is no bow tying which makes these great to mail.

Birthday Blast is a great set not only for birthday, but for celebrating all kinds of occasions, or no occasion at all, just the fact that the person you love is in your life! You could also use this as a present topper, as pictured in the catalog, or as a Disney crown for your little one. It would make a great craft to do with the kids at a birthday party, they could all make their own crown.

See the little silver stars around the Happy Birthday? They are left over when you run the star blast edgelit through the Big Shot. It does help to have the Big Shot die brush to get the little bits out very quickly and easily. The stamp set also comes with two different sized stars to add detail.
Here you can see the framelit used as a present topper if you want to be an ultimate gift giver or party planner:

Don’t forget that today is the last day to take advantage of the biggest sale of the year: sale-a-bration. With every $60 purchase you get a free item. Some new items have been added to the available selections:

It is also the last day that you can get the starter kit for an amazing deal plus two free stamp sets. I would love to have you get your own discount (20% every day!) and join my team. If you are interested, simply click here to get the process started. Today only you will get two free extra stamp sets in addition to the $165 worth of product that you can choose and pay only $135 with no tax and no shipping. Almost too good to be true. Also, to celebrate the last day of this great sale, anyone who orders today will be put into a draw for hostess benefits. If you order, comment below what you would like for $20.

by Jackie Bultje | Mar 27, 2017 | butterfly, retreat |
Hello stampers. It has been too long since I have posted on this blog but there is a good reason for it. I was in Tennessee for two weeks, definitely at “new levels” in the mountains. The first week was a true family vacation and the second one was my first ever retreat in the US of A!! I had so much fun hanging out with my American friends and their awesome accents. My favourite quote from “Dixie Sue” after a delicious meal was: “I’m gonna be fussin’ when I get on the scale next week”! How funny is that? I must confess, I have not yet dared get on the scale, but it was worth it.

Can you picture yourself all cozy on the couch discussing how to change your business in simple, manageable ways that will bring you more joy, peace and success? Well, that is what we did, surrounded by breath-taking views and enjoying great food. If you are interested in joining the next retreat, message me and we can make it happen.

We made sure to take time to relax and enjoy the views as well as each other’s company. This lodge was so amazing that we kept having to pinch ourselves to be sure it was reality and not a dream.

One of the highlights of the retreat for me was having Billie Moan come and share a fun technique with us. I posted a video on my Facebook business page and rather than posting it again, just click here and you should be able to view it. Whenever a group of demonstrators get together and really spend time together, amazing things happen. It brings me such joy to facilitate such gatherings, so do stay tuned for the exciting things that are going to happen!

Here is the card we made with Billie. Who knew you could use a butterfly framelit and fun foam to make a great stamp? We hope to use this technique at our club meetings this week.

Here is a close up of the card. We first made a background on watercolour paper with pigment powder and water spritzing. Then we stamped the butterfly (it was made using the framelit and fun foam to make a homemade stamp!!) with black archival ink and cut out with the open butterfly framelit. I added some Wink of Stella to the black lines of the butterfly.

Don’t forget that it is the last week of sale-a-bration and that seven new items have been added to the “freebie” selection. It is also the last week to get the amazing deal on the starter kit. This is what I wrote in my newsletter and I am just going to copy and paste it here to save some time and effort. I really don’t want anyone to miss out:
” It is also the last week to get the best deal ever, yes, the starter kit. I feel like a broken record, but honestly, this is such a great deal, you really should take a good look at it. Some people think it is morally wrong to take advantage of this deal if they do not intend to become a “bona fide” SU demonstrator. Not so. Believe me when I say that MOST demonstrators, including our top award winners bought the kit only because they wanted a good deal.They had no intention of ever doing this for a business. Stampin’Up! knows this, and they want to entice you with a wonderful deal just in case you do fall in love with the opportunity. So here you go:
-pick out your two favourite, most expensive stamp sets in either the annual catalog or the Occasions catalog
-make a wish list of $165
-go here
-make sure you have your credit card and your social insurance number
-then know that for all this (and yes, you also get a Paper Pumpkin kit surprise, from a previous month) and 8 catalogs and 8 mini catalogs and 50 order forms- you will only pay $135
-you pay no shipping and no tax in Ontario- some provinces you do have to pay tax.
-then you will be on my team and you get to come to a free card party once a month, the second Thursday of each month at 7pm. What fun!! You also get the opportunity to attend Stampin’Up! events and you get their Stampin’ Success magazine as well as access to a ton of great videos and card samples. WOW!!!! What are you waiting for? Message me if you have any questions. [email protected]”.