Hello stampers and happy Wednesday to you. Today I have a beautiful tinted embossing paste butterfly card for you. If you have been following me on my YouTube channel, then you might know that I have been a little obsessed with embossing paste. Once you open a jar, you just want to keep playing. Want to see what I made??
Beautiful tinted embossing paste butterfly
First off: a disclaimer. The Butterflies & Flowers layering decorative masks are no longer available. Every year Stampin’Up! “retires” some products and this is one such product. They have different masks available now but this was one I had on hand that would really show off the tinted embossing paste technique.
I first used a blending brush to make a solid butterfly image. Then I used the detailed image at the bottom to use with the embossing paste. Just two drops of pool party reinker were added to about a tablespoon of embossing paste. I put it in a little bowl and stirred it with the smallest palette knife. If you want to see the whole card being made, just watch the YouTube video tutorial at the end of this blog post.
Here you can see how nice the tinted embossing paste looks up close.
Video Tutorial
More Embossing Ideas
Did you know that I am a member of the International Create With Us tutorial bundle team? This month our tutorial bundle features embossing folders. You can get this fifteen card tutorial for free if you order online through me or you can purchase it in the tutorials section of my blog. Below is a sneak peek of our tutorial. PDF tutorials are a great way to jump start your creativity and to become a more talented stamper. Enjoy!!
Thanks for joining me today, I hope you have a super day!
Hello stampers and happy Monday to you. If you follow me on YouTube then you already know that I have been having a lot of fun with embossing paste. In fact, my container is almost empty! The last trick I want to do with it is to tint it with re-inkers. In the meantime, here are two cards that I made with embossing paste. The first one was in my Sweet Suite Tuesday video. Since embossing paste takes a few hours to dry completely, I needed to have an extra one on hand to be able to finish my card during the video.
An Extra Piece for Inspiration
I had the lovely problem of having an extra piece of embossing paste background. If you look closely at the next card you will see that has the same pattern but I turned it sideways. The open space left just enough room to stamp the sentiment. Don’t you think that it makes a very lovely sympathy card?
Here you can see the closeup of this lovely card. Do you see the ribbon? It is frayed because I ripped off the one side to make the pretty bow on the pool party card in this post. You will see how I did it in the video tutorial.
Embossing Paste with the Truck Bundle
A week or so ago I made a trio of cards using the Trucking Along bundle. You can see those cards here.
Video Tutorial
Here is the video tutorial for the embossing paste background card. Maybe you will be inspired to try something new when you see how easy it is.
Curious about the “patterned paper”?
Actually, it isn’t patterned paper, it is a background stamp set called Berry Harvest. I tried colouring it with various combinations of Blends and I made a handy little chart to show you the results. Which colour combination is your favourite?
It was a lot of fun to play with the different colour combinations. There is still one stamped image waiting for me. It is stamped in Stazon so that I can colour it with blender pens and watercolor pencils. Stay tuned for when I finish playing with that.
Thanks for joining me today on my blog. If you don’t already have a Stampin’Up! demonstrator, I would love to be yours if you live in Canada or Europe. Just click on the links below to shop with me in Canada or click here if you live in Europe.
Hello stampers and happy Friday. Today I am sharing a super fun technique with embossing paste. Did YOU know that Stampin’Up! sells embossing paste? My job as a Stampin’Up! demonstrator is to share with you all the hidden gems in our huge annual catalog. Even I forget sometimes about all the amazing products that we have. My embossing paste was hiding in the cupboard for a while too!
Amazing Embossing Paste Trick
A few days ago I created a post sharing my top five videos over the years. One of them was a technique that involved stamping on embossing folders. This inspired me to do something new with an embossing folder and I am sharing the result with you now. Are you curious?
What to do
First you cover your work surface with a piece of grid paper or computer paper. Put your card down and carefully spread embossing paste over your card front or cardstock layer using a palette knife. Set aside on a new clean surface. Clean your palette knife. If you don’t do this right away it will harden and dry making it difficult to clean.
Ink up your embossing folder, either side work for the exposed brick embossing folder. Press the embossing folder into the embossing paste surface of your card. Press down firmly and then carefully peel it away. Watch my video as seeing is believing!
Spritz the back of your cardstock with water so that it doesn’t end up curling. When your embossing paste is dry (this could take a few hours) press it down with a few punches stacked on top of each other. This helps flatten your card.
After the embossing paste is dry and the card is flattened you can add your other elements using either liquid adhesive or dimensionals.
Which is your favourite colour? Cherry cobbler, Pebbled Path or Copper Clay for the embossing paste embossed exposed brick wall?
Video Tutorial
Prime Time With The Pampered Stamper
This video was intended for my private Prime Time group. You can also join this group. It costs $30 for three months. What do you get? First you get a weekly exclusive video tutorial each Thursday at 10am EST. Each Wednesday I post the supply list as well as the dimensions of your paper pieces. Each month you get a free 15 card pdf tutorial which is worth from 15-20 dollars. You can see that your ten dollars a month is a true bargain. Click here to join.
Thanks so much for joining me on my blog today. I love being a Stampin’Up! demonstrator in both Canada and Europe. If you need one, you know where to find me! Have a super day.
Hello stampers and happy Monday to you. Today I am going to be sharing with you a truly spectacular card using Lovely Lily Pad. This card was a gift from Tammy Bendel, a fantastic demonstrator from Sarnia. If you live in the Sarnia area and are looking to attend or host a class, contact Tammy!
Lovely Lily Pad Embossed
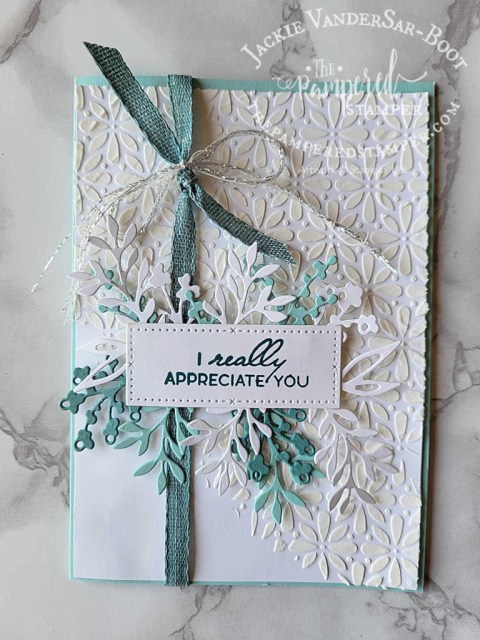
Tammy embossed all the elements in white and then coloured them with Blends for a very striking effect. That is only the beginning of what is all happening on this card. The card has a standard white base, 8 1/2″ by 5 1/2″ scored at 4 1/2″. There is a mango melody rectangle 3 5/8″ by 5″ and a blackberry bliss rectangle that is 3 1/2″ by 4 7/8″. The white rectangle has been cut using the stitched rectangle dies.
The stitched white rectangle has added interest with embossing paste , gold metallic thread, gold rhinestones and a vellum die cut. This would be a super card to make on a lousy weather day when you just want to play and make something special. I love the unusual colour combination!
Timeless Embossing
Embossing really never gets old. It is one of the first “tricks” that I learned as a newbie and I still love it. Have you ever embossed? It is such a simple concept, but truly brilliant. You stamp your image in Versamark which is a sticky watermark ink. After that, sprinkle on embossing powder, tapping off the excess with an aggressive flick of the pointer finger and thumb. Then you use a heat tool or embossing gun to heat set it. What that does is melt the powder which is sticking to the versamark and you get a shiny, raised image that you will really want to run your finger over multiple times!
Embossing Paste
Embossing paste is a whole other element. It comes in a jar which you need to seal tightly when you are finished or it will dry out! Simply place a stencil over your cardstock and using a palette knife (a regular bread and butter knife will work in a pinch too) spread the paste where you want it to go, keeping a firm grip on your stencil. It doesn’t have to be super thick. Carefully lift the stencil straight up when you are done and then let the paste dry for an hour or so. In the meantime, you can assemble the other elements for your card.
Bucket List Item
For years now I have been wanting to see a snowy owl. There have been sightings in Chatham-Kent, but despite numerous lengthy drives throughout the countryside, I was never able to find one. Finally yesterday I got to see this magnificent creature! I went out early in the morning and I saw two different ones. My heart was overflowing with joy. I was positively giddy. I had my binoculars, but I had forgotten my good camera. No worries, I had amazing images forever in my brain.
Twice in One Day
Later on in the day I got a little greedy. What if he was still there? I really wanted to see him again and this time I would take my good camera. Well, guess what? He was still there!!! In my excitement I left my camera on the wrong setting, but I still managed to get some decent shots. Here they are. We have an amazing God who has created such diverse and beautiful creatures. Wow!!
For some reason this owl reminded me of a cat. Just the way he was looking at me and the shape of his body. I think when my mom drew cats she would first draw the body and it was in this shape!
My camera on manual focus so it was really tricky to get a picture when he flew away but at least it captures the magnificence of his big talons and the underparts of his wings. I may just be addicted.
The eyes on this snowy owl are really quite spectacular. It would have been great to have a tripod and my camera on the right setting! It was on landscape instead of the little flower icon. I am totally giving myself away here with my lack of technical terms. Someday I will take a photography course. In the meantime, I am just having a LOT of fun.
Thanks!
Thanks so much for joining me today. If you want to hear me talk about how important it is to share your love of stamping and card making, be sure to check out this video. It was done on a Saturday night with me in my pajamas but I was simply overcome with passion for Paper Pumpkin and with the importance of bringing more joy to people’s lives by sharing what we love. In the end I couldn’t help but mention that if you get the starter kit, then you also get 20% off your Paper Pumpkin subscription and anything else on your wish list. How awesome is that?
If you are ready to do some binge stamping without having to do any measuring, be sure to check out my tutorials section at the top of the page. Right now there are three to choose from but by the end of the month I hope to make that four! If you order from me this month, then you get the amazing February Demo Design Dream Team tutorial for free with 16 projects. It is also a free gift for you if you join my team!
Hello stampers! Try saying that quickly six times in a row!! Seriously though, this suite is pretty sweet. Now I really do hate cake decorating, although I do my best to make a pretty cake. This type of cake decorating is more my style. The image in the catalog is quite luscious isn’t it?
I actually got everything in this suite so that I would not be inhibited in my card making and I wasn’t disappointed. The Berry Burst Metallic edge ribbon is my favourite ribbon so far in the book. It is a gorgeous colour and it also ties beautifully. Take a look at the close-up of this card:
There is a lot going on in this card. I used Wink of Stella to watercolour the cake and that is truly a fantastic technique. The picture cannot capture the beautiful sparkle on this card. The fine tip of the Wink of Stella is ideal for colouring this detailed image. I used marina mist, berry burst and old olive. The background is marina mist with the silver embossing paste and the sweet soiree decorative masks. It worked really well and wasn’t runny or messy. It didn’t take all that long to dry either.
The pretty little dies that I used for the top of the cake come in one unit and you can put two strips of paper behind it for quick cutting too. Take a look:
Watercolouring with Wink of Stella also works well with a black image. With this card I also used rich razzleberry and powder pink.
Here is the complete card. The background was done with a watercolour wash technique that I learned from Billie Moan. I will include a video on part two of this post that I hope to finish tomorrow. I added some candles using the decorative masks and silver embossing paste and I didn’t make quite the elaborate bow that Billie did, but other than that, this is a complete case of her beautiful card. You can check it out here.
This suite also comes with a great embellishment kit that includes some handpainted flowers, some foil accented cakes, vellum and silver leaves and flowers, blue velvet ribbon, white clothespins and some adorable tassels with jump rings as well as a yard of washi tape.
On this card I used the blue velvet scalloped ribbon to anchor the cake.
I thought I would include a closeup of the ribbon so you can see the texture. Everything about this suite is simply luscious.
Here you can see the framelits that are included in this suite. There is just so much to play with here!
Now these framelits look quite delicate, but as long as you use the precision plate, all the little bits come out very easily and there is no fussy poking with “pokey tool” or more properly known as the paper piercing tool.
I realize that I have way too much content for one post, so I will continue this one tomorrow with a few more card samples and a video on how to do the watercolour wash background.
I grew up on a farm and whenever I am driving through the countryside I always look with longing at the red brick farmhouses. They evoke such happy memories for me. Baking bread with my mom at the kitchen table, eating breakfast at 5:30am with my dad and brothers before going to milk the cows and bundling up in front of the woodstove to go outside and play in the snow. So when I saw the brick wall stencil and the embossing paste in the new catalog, I knew what I wanted to do. I wanted to recreate those beautiful red brick walls and make some cards that bring back those same nostalgic feelings.
To get the perfect look for the bricks I added some cajun craze reinker to a small amount of embossing paste. I smeared some of it over the stencil onto whisper white cardstock. Then I added a drop of early espresso reinker to another small amount of paste and smeared it over and around the cajun craze tinted paste. Perfection! Just the right hue for what I was looking for. Be sure to clean your stencil and your palette knives as soon as you are done so they don’t dry out and harden.
On this card I sponged soft suede in between the bricks to give it less of a stark look. I love the look of an “exposed brick wall” with this Half Full stamp set, just what a wall in a nice wine bar or cafe would look like! The bricks also look better when they are left a little rugged with unfinished edges and also not covering the whole card front. Leaving the top corner unfinished is perfect for placing your sentiment. Remember to let your embossing paste harden before sponging around it or on it. If you have smeared the paste so that it is even with the decorative mask (in other words, thinly) then it takes about an hour to dry. When I made these cards I did all the background first. Then I stamped my images that I needed to fussy cut. Of course there were lots of other “mom” things happening in between too.
I made this masculine card because my Pap had a truck just like this one before I was born! Add that to the fact that the colour of these bricks is exactly the same as the farm house that I grew up in and you have a winner for a card. Did you notice that the windows are black? The reason is that I am covering up a mistake! When I was watercolouring the truck I couldn’t manage to stay within the lines for the windows and it didn’t look nice at all, so I used a black marker to colour the windows in. I think it is rather effective!
While my first instinct was to use these decorative masks with our new embossing paste, they also work great with simple sponging. You can use three tools to accomplish this: stamping sponges, sponge daubers or our sponge brayers. For the next card I used stamping sponges with early espresso ink on cajun craze card stock. The images were stamped in archival black, coloured and then stamped direct to paper with versamark and clear embossed. The images are from Country Livin’.
You wouldn’t know it, but there are three other masks in this set. The brick wall is definitely my favourite, but I also played with the cloud one. The other two are going to have to wait. What a great value they are. Four masks for $8 Canadian. Check out the Pattern Party Decorative Masks on page 201 of the catalogue.
I used the smallest palette knife to make these clouds and give them texture the same way you would with icing on a cake. The sentiment is from a brand new set coming in the Holiday Catalog called Painted Harvest. I used the sponge brayer to make the background. The sand is done with soft suede and the sky is marina mist and island indigo. Card base is island indigo. The lady from Beautiful You is paper piece with real red and crushed curry.
The “cloud nine” card is definitely very textured. In Dutch you would call this a “misbaksel”. In other words, a few things went wrong with this one but I still wanted to show it. I started with a watercolour background which really is quite stunning. Then I decided to sponge the clouds with white craft ink. This was a bit of a mistake. The white just didn’t pop enough. So I decided to add white embossing powder, but some of the powder stuck to my watercoloured background making for a bit of a messy look. No worries, clouds sometimes look like that don’t they? I still think it is a bright and cheerful card and I would be most happy to get one in the mail.
I do love the collage stamping on this masculine card. I used the stamp set Wherever You Go as well as the new background stamp called Post Script. I used embossing paste for the clouds but they kind of disappeared into the busy background. Sponging them with white craft ink after they dried really made them pop. I used sponge daubers to do this without getting white craft ink on the background. You can see that the bottom cloud is a little bit blue. I first sponged over it in blue and didn’t like the look. The craft white couldn’t quite cover that up!
This last card really has a rustic feel to it. Maybe it is because I actually painted with coffee on it! Yes, the brick wall on white was just too stark and I had some cold brew coffee in the fridge to make iced coffees so I thought, why not? I stamped the words repeatedly on the top right corner to give a chalkboard feel. You’ll notice a tinge of bluish green on some of the words, that is because I had done a watercolour background on a previous card and my grid paper was a little messy so some of the ink transferred to this card. I like it, but it would be hard to copy this look again. I have made a video to show how I did some of these cards but for some reason it has failed to upload to Youtube, so you can see it on my Pampered Stamper Facebook page.
Have you had a chance to try out the new embossing paste yet? I am looking forward to using this in my technique club. All clubs start in September and I still have room in technique club, upon request club (at this one the host gets to choose what we do) as well as the man,oh man club where we make exclusively masculine cards. Have a super day!
ps. the video has now uploaded to YouTube, so here you go!


 Bordered Ribbon")
 Grosgrain Ribbon")


")

 Metallic Edge Cotton Ribbon")


")


 Circle Punch")


