Well hello and welcome to this fun Totally Techniques Blog hop. This month we are diving into Mirror Stamping. I immediately knew what I wanted to use, the bike stamp from the June Paper Pumpkin, Bikes & Blooms. Why not share my Dutch culture with you and create a scene with some trees, a canal and a bike? Seeing as this is a technique blog hop, I decided to throw in two more techniques for good measure. Any guesses what they might be after looking at my card below??
For my card front I used watercolour paper so that I could use a watercolour wash to make my canal, my grass, and the bike path. The canal was done using Balmy Blue with a slight accent of Azure Afternoon. My grass is Garden Green and the path is Crumb Cake. Next I made my sky using a blending brush, a few drops of glycerine mixed with a few drops of Balmy Blue reinker. This creates a velvety smooth finish! Lastly, I stamped the trees from the retired set Autumn Trees in Garden Green and Pecan Pie, spritzed with a little water. My bicycle was stamped in Early Espresso.
Now the big question is of course, how do you do the Mirror Stamping? It’s so stunningly simple, you might just chuckle. I merely stamped the bike in Early Espresso again on a piece of acetate that comes with our photopolymer stamp sets. After stamping, flip it over and rub onto your card front where you want it to be. I gave it a very light spritz of water after doing this to create a softer watercolour effect. The tree was even easier because it is symmetrical, so I just stamped it upside down under the first tree stamp. This time I gave it a spritz before stamping to give it a watery look.
I struggled a bit with where to place my sentiment before deciding to create a skinny banner to go on the back of the bike. What do you think?
Be sure to hop along and see what our other talented design team members came up with! Remember, we love to read your comments so that we don’t feel all alone in cyberspace. If you live in Canada, you can click on the icons below to shop with me. In the Netherlands, you can use this link. In the UK this link will be better for you. I appreciate you and will send you a free pdf tutorial bundle as a thank you.
Thanks so much for joining me today, I hope you were inspired to create your own card using the Mirror Stamping technique. Have a wonderful day! Stamping hugs, Jackie aka The Pampered Stamper
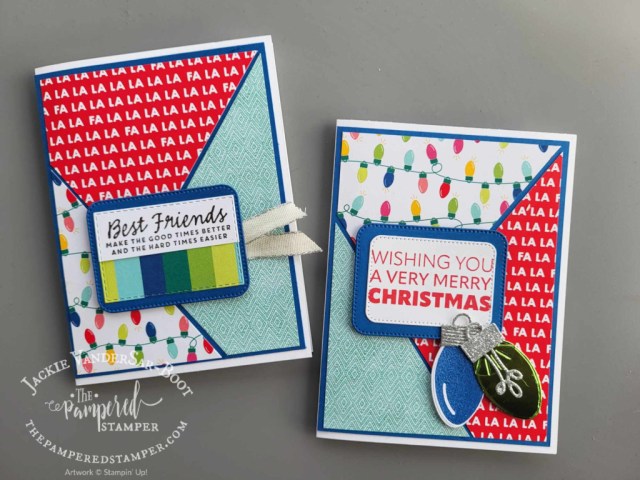
Welcome to the Totally Techniques Blog Hop. My name is Jackie VanderSar-Boot and I am a demonstrator in both Canada and the Netherlands. My business name is The Pampered Stamper.
I have been welcomed as a guest to help out until my fellow Canadian demonstrator Diane Evans is feeling better. What an honour to be here, I hope you enjoy my cards. I was just invited yesterday and I am leaving on Saturday for the Stampin’Up! incentive trip to Alaska, so time is of the essence. Let’s take a look at my cards, I made two different ones because I couldn’t choose between Moonlit Flora or Delicate Dreams designer series paper.
How do you get this look?? Dry embossed and sanded two-tone cardstock is what it is called. A long name for a simple technique.
Well, truthfully, it is so easy that I almost hesitate to call it a technique. Yet, it is a simple and very satisfying technique. You only need three things:
two-tone cardstock because it has a white core.
embossing folder
sanding block or nail file or piece of sandpaper
First, run your piece of two-tone cardstock through the Stampin’ Cut & Emboss machine. Choose whether you want the light side or the dark side. Now you can lightly sand it and the white core will show through. That’s it!
Diagonal Flip Card
I have combined this technique with a really easy designer series paper trick. To see how it’s done, you can check out my YouTube video here. Mixing your embossed and sanded two-tone cardstock with patterned paper is really striking. Another huge benefit of two-tone cardstock is it’s light weight. It has less bulk and will save you on postage!!
Totally Techniques Blog Hop List
I really hope that you hop along and see what all the other amazing demonstrators have done with this simple but effective technique: Dry Embossed and Sanded Two-Tone Cardstock.
Let’s wander. Doesn’t that sound just wonderful?! How often do we take the time to wander?? That is one of the reasons that this stamp set appealed to me so much. Let’s wander where the wifi is weak is one of the sayings. Where the wifi is weak is usually also where it is beautiful and peaceful!! Would you like to see the card that I made with this set?
My Let’s Wander Card
To make this card, I used a fun technique called emboss resist. What that entails is first embossing your image and then adding colour either with blending brushes, daubers or sponges. In this case I used a water painter and diluted ink refills. My colours of choice were Crumb Cake, Lost Lagoon and Pretty Peacock. The die for the sentiment is from Stylish Shapes dies. I spattered a little crumb cake ink with my water painter and the lost lagoon ink that is on there was there from the creative process!!
Video Tutorial for Let’s Wander
Check it out!
If you want to see the stamp set in closer detail, just click on the image in the product list. This list is SO helpful, not just for shopping. The links WILL take you to my Canadian online webshop, but you can also use it as a tool to get more information about the product. Thanks so much for joining me today here on my blog. If you like what you see, please pin my cards so that more people can find out about me. I appreciate you and hope that you have a super day.
Happy Monday stampers. Give it a Whirl dies are another hidden gem from the annual catalog. Not only do they make it super easy to make many styles of an interactive card with a “spin the wheel” feature, they also have lots of adorable stitched dies to use on all your cards!! Let me tell you a secret. I originally bought these dies just for these additional dies. I particularly wanted the stitched clouds!!
Give it a Whirl Dies “Spin the Wheel” card
I got the idea for this card from my British up-upline Michelle Last. What a great idea to use the Let’s Chat stamp set for this type of card.
The “extra” dies
Let’s take a look at the “extra” dies in the Give it a Whirl dies set. My favourites are the stitched hearts and the stitched clouds, but you can also use the “mechanism” opening dies as peekaboo windows.
Getting the kitty-cat just right was a little tricky, so take a look at the back of the card to see how I did it.
Those adorable stitched hearts in action
Here you can see the romantic tags that I made using the stitched hearts from the Give it a Whirl dies set. I am so happy with how it turned out!! This pretty paper is from the Delightfully Eclectic paper on page 129 of the annual catalog. It’s also free with a saleabration purchase for three more days!!! You have until February 29, 2024 to scoop up that deal!
Which will you choose??
Thanks!
Thanks for joining me on my blog today. I hope you also take the opportunity to check out my pdf tutorial section. They are for sale of course, but they are also available for FREE when you order from me online.
I’ll be back in Chatham, Ontario for two classes! March 11 at 7:30pm for a Bingo class and Tuesday April 2 at 1pm and 7:30pm for a Blends class. Message me if you have any questions. Blends class is free with the purchase of five sets of Blends (you choose your favourite colours) Bingo class is $35 and you can etransfer to [email protected].
Hello stampers and happy Monday to you. Today I have a very fun technique to share with you. I call it the Diagonal Stack and Shuffle technique. It was my squirrel friend and fellow Canadian demonstrator Tamara Bertram who first showed me this style of card. What fun!! Just like her. To make it even easier for you I have also made a diagram to show you how and where to cut your patterned paper to make it work. Further on in this blog post you can also watch the YouTube tutorial that I made to make three lovely cards using Winter Meadow designer series paper. Not only is this paper gorgeous for Christmas cards, it is also great for sympathy and get well cards. Shall we take a look??
Here you can see a closeup of how well the “bling” matches the paper. They are called Tinsel Gems.
Diagonal Stack and Shuffle cards with Christmas paper
This technique is also fantastic for Christmas cards or just a thinking of you card. The sentiment on the one card comes from Nested Friends and the other is from Joy to You.
Video Tutorial
In this video I not only show you the diagonal stack and shuffle technique, I also explain a family favourite game. This dice game is great for all ages and has provided countless hours of joy for my parents. Gerard and I even played this game with Messenger video chat during COVID. Enjoy!!
Diagram for Measurements: Diagonal Stack and Shuffle Technique
Here is a diagram that I made to help you “see” it rather than just watch the video. I think it is a helpful tool.
Thanks!
Thanks for joining me today! I hope you were inspired and that you have fun with this technique. Below you will find a product list that is also a link to my Canadian online store. Have a super day. Hugs from Holland,
Hello stampers and happy Wednesday to you. Today I have a beautiful tinted embossing paste butterfly card for you. If you have been following me on my YouTube channel, then you might know that I have been a little obsessed with embossing paste. Once you open a jar, you just want to keep playing. Want to see what I made??
Beautiful tinted embossing paste butterfly
First off: a disclaimer. The Butterflies & Flowers layering decorative masks are no longer available. Every year Stampin’Up! “retires” some products and this is one such product. They have different masks available now but this was one I had on hand that would really show off the tinted embossing paste technique.
I first used a blending brush to make a solid butterfly image. Then I used the detailed image at the bottom to use with the embossing paste. Just two drops of pool party reinker were added to about a tablespoon of embossing paste. I put it in a little bowl and stirred it with the smallest palette knife. If you want to see the whole card being made, just watch the YouTube video tutorial at the end of this blog post.
Here you can see how nice the tinted embossing paste looks up close.
Video Tutorial
More Embossing Ideas
Did you know that I am a member of the International Create With Us tutorial bundle team? This month our tutorial bundle features embossing folders. You can get this fifteen card tutorial for free if you order online through me or you can purchase it in the tutorials section of my blog. Below is a sneak peek of our tutorial. PDF tutorials are a great way to jump start your creativity and to become a more talented stamper. Enjoy!!
Thanks for joining me today, I hope you have a super day!


![Paper Pumpkin Subscription [ 166815 ]](https://i0.wp.com/assets1.tamsnetwork.com/images/EC042017NF/166815s.jpg?w=140&ssl=1 "Paper Pumpkin Subscription [ 166815 ]")
![Paper Pumpkin 3 Month Subscription [ 166816 ]](https://i0.wp.com/assets1.tamsnetwork.com/images/EC042017NF/166816s.jpg?w=140&ssl=1 "Paper Pumpkin 3 Month Subscription [ 166816 ]")
![Pecan Pie Classic Stampin' Pad [ 161665 ]](https://i0.wp.com/assets1.tamsnetwork.com/images/EC042017NF/161665s.jpg?w=140&ssl=1 "Pecan Pie Classic Stampin' Pad [ 161665 ]")
![Garden Green Classic Stampin' Pad [ 147089 ]](https://i0.wp.com/assets1.tamsnetwork.com/images/EC042017NF/147089s.jpg?w=140&ssl=1 "Garden Green Classic Stampin' Pad [ 147089 ]")
![Small Blending Brushes [ 160518 ]](https://i0.wp.com/assets1.tamsnetwork.com/images/EC042017NF/160518s.jpg?w=140&ssl=1 "Small Blending Brushes [ 160518 ]")
![Water Painters [ 168253 ]](https://i0.wp.com/assets1.tamsnetwork.com/images/EC042017NF/168253s.jpg?w=140&ssl=1 "Water Painters [ 168253 ]")
![Early Espresso Classic Stampin' Pad [ 147114 ]](https://i0.wp.com/assets1.tamsnetwork.com/images/EC042017NF/147114s.jpg?w=140&ssl=1 "Early Espresso Classic Stampin' Pad [ 147114 ]")
![Balmy Blue Classic Stampin' Ink Refill [ 147168 ]](https://i0.wp.com/assets1.tamsnetwork.com/images/EC042017NF/147168s.jpg?w=140&ssl=1 "Balmy Blue Classic Stampin' Ink Refill [ 147168 ]")


")


 Polka Dot Trim")


")


 Designer Series Paper")
")


 Designer Series Paper")
")


 Foil Sheets")
 Designer Series Paper")
")

 Designer Series Paper")


 Bordered Ribbon")
 Grosgrain Ribbon")


