Hello stampers and happy Monday to you! I ran out of time on Friday so you never got to find out why I call myself the “pampered” stamper. Rumour has it that I like to be pampered and that is why. While that may be true from time to time, that is not the real reason I am The Pampered Stamper.
My First Love
My first love is making food. Yes I am that rare creature who likes to bake and cook. I read cookbooks for fun! Before I became a demonstrator I was a scrapbooker and my very favourite place to go was to someone’s home in Mississauga. Together with my sister-in-law Yvonne we would drive more than two hours one way down the 401 to go and scrapbook for a day. Crazy right? Do you know why we thought it worthwhile to drive that far for a day of scrapbooking? It was the food!!! This lady was my inspiration. I realized that paper crafting was much more fun if there was food involved. It really does change everything.
Pampered
Everyone loves to be pampered. It means those extra little things that make you feel special. That is what I like to do for my customers. Sharing my love of stamping AND sharing my love of food. It all starts with a great cup of coffee or tea. Being Dutch, there is no such thing as a “naked” cup of coffee. In the Netherlands when you order a cup of coffee anywhere you will always get a little something with it. So lovely. At The Pampered Stamper you will always get something with your coffee or tea too and usually it will be homemade.
Not only do you feel pampered when you get treats, there is also a different vibe when food is shared. Everyone slows down a little bit. People congregate. They talk more and get to know each other. In short, friendships and relationships are built around a simple cup of coffee.
Beyond Pampered
That is the name of my team! It was my team member Liz Fields who came up with this name and I am ever grateful. She declared that with all that I do for my team they are “beyond pampered”. A generous thought that I am not sure is true. As a leader I feel that I am never really doing enough for me team. I would love to have the time to do more. What I do do however is create an atmosphere of family, of community a “sisterhood of the traveling stamps”! Whenever there is a Stampin’Up! event I try to rent a cool Airbnb or HomeAway place so that we can have a very special time together.
We have monthly gatherings where we create, share and inspire around food. The result is a lot of fun with great memories and relationships being made. I try to do a Facebook live video for my long distance team members.
Loneliness
It is now common knowledge that loneliness is a huge problem for people in all age brackets. This may have to do with social media and our age of technology that hinders people from having real relationships. Let me tell you that joining a stamping group whether just for fun or for the business opportunity will definitely fix the problem of loneliness! The beauty of this stamping business is that it also lets you make a difference in people’s lives by sending cards to dispel the loneliness. I love being in the “happy” business! As you know, there is always room for you on my team or in my classes. Please reach out. You are loved!
A Card
We can’t have a blog post without a card, so I wanted to share this swap card with you that I received from Janice Thompson. She uses a very fun technique, stamping on embossing folders. If you have never done it, check out my blog post here. It make take more than one attempt before you are totally pleased, but stick with it and you will love the outcome!
Here is a closeup. Do you see the snowflake sequins from the Still Scenes Snow Globe suite?
Thanks
Thank you so much for stopping by, it truly warms my heart. We are all connected and together we make a difference in so many lives. I hope you have a wonderful day and please reach out if you have any questions or concerns.
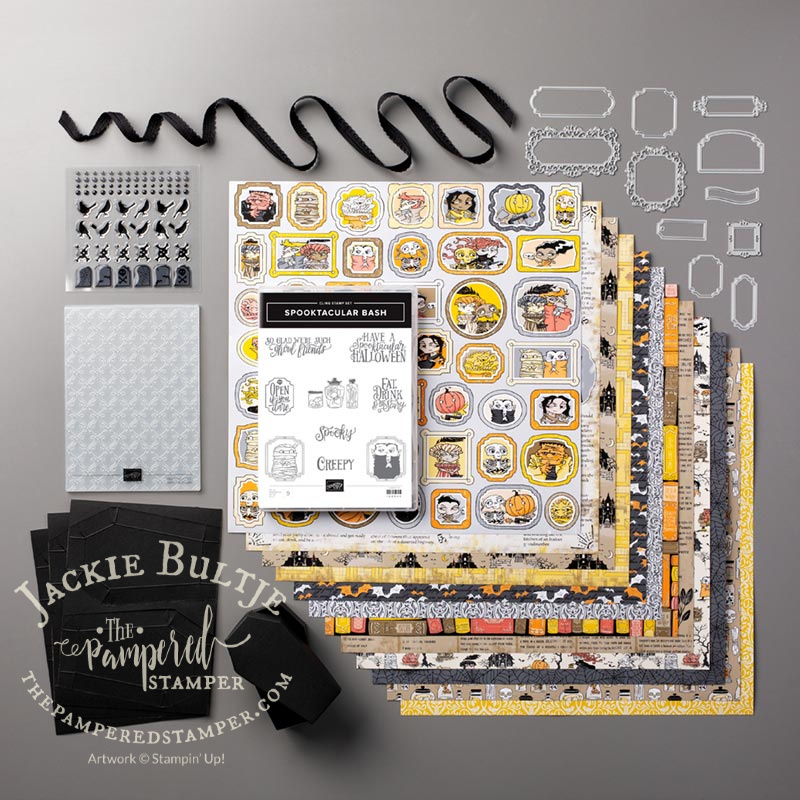
Hello stampers. I love words and I love puns so it is only natural that I love the saying “Ghoul Friends”. This saying is part of the stamp set Spooktacular Bash which is part of the Monster Bash suite. You can find it on page 54 of the holiday catalog.
The Card
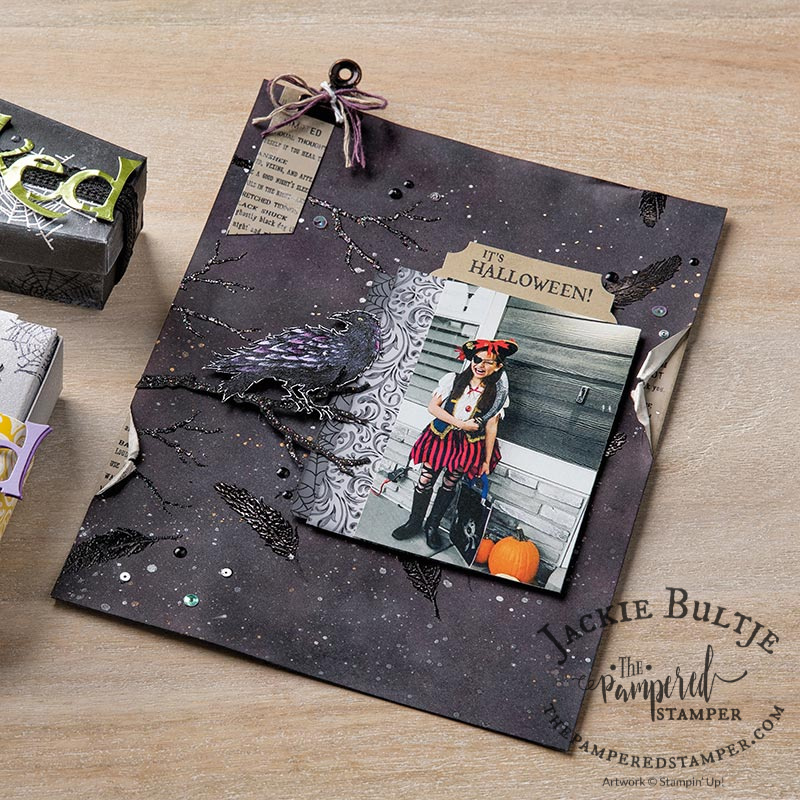
I don’t send out Halloween cards but I do love dressing up and handing out candy. Someday I hope to throw an epic Halloween party complete with fantastic ghoulish treats and fun costumes and of course scary games. This lovely card was a swap card that I received from Christina Walker.
Do you see all the lovely details on this card? The gorgeous ornate frames die and the Stylish Scroll embossing background? The glittered black organdy ribbon is the perfect finishing touch for this card. Here is a closeup picture so you can see it even better.
More Time
Do you ever wish that you had more time? I sure do!! Maybe it could also be a matter or prioritizing things. I know that I absolutely love Christmas so I often jump right into Christmas card making and I forget about fall cards or Halloween. If I would make a point of making all kinds of fun things for Halloween then perhaps I would host a big Halloween party and we could use all the fun stuff I had made. There’s always next year, but maybe I have inspired you to get creative for Halloween.
Share Your Story
If you have fun Halloween traditions, I would love to hear about them. Share your stories in the comments below and I will choose someone to get this fun card in the mail. Blogs are more fun when they are interactive don’t you think? If you do have a fun tradition, maybe you want to scrapbook it too. There was a fun sample in the holiday catalog and I’m going to share it here too.
Thanks!
I’m so glad you stopped by today. I hope you have fun decorating for Halloween, even if it is just a few pumpkins on the porch. Celebrating death is not my thing at all, but dressing up and sharing candy, well that is something quite different. Enjoy the little things and remember, #itsallaboutthetreats.
Hello stampers I am finally using voice dictation and it sure is a different way to write a blog post. I definitely have to get used to it; it’s hard to think what you want to write and I’m sure I have to go back and fix some mistakes. Hopefully this break will make my thumb feel better. It really is amazing what technology can do! Yesterday I made a card using some retired products and today I’m going to show you what I did with brand new holiday catalogue products: the Christmas Gleaming stamp set and some of the other products in the Brightly Gleaming Suite. I’m quite pleased with how it turned out.
Brightly Gleaming Suite
Before you design the card it’s a good idea to lay out all your supplies on the table. This gives you a great visual and helps to get your creative juices flowing and I also stamped a few of the ornaments in different colours and in different embossing combinations to see what might work best. I absolutely love the beautiful vibrant colours in this suite of products you can see copper, pretty peacock, night of navy and old olive. It was hard to cut into this beautiful paper but then I remembered the #loveitchopit philosophy. I cut strips of 4″ by 12″ and that was safe for transforming into any cards. Once you decide to cut into your pretty paper it really gets easy to design cards.
My Card
I used the same sketch from Freshly Made Sketches as I did yesterday. This is a totally different colour scheme with all blues and coppers rather than red and green. What do you think? Do you like this non-traditional look?
The Measurements
Card base: pretty peacock 8 1/2 by 5 1/2 scored at 4 1/4″
very vanilla – 4″ by 5 1/4″
copper: 7/8″ by 4″
Brightly Gleaming specialty paper: 3/4″ by 4″
Small square: pretty peacock 2 1/8″ by 2 1/8″, Brightly Gleaming patterned paper 2″ by 2″
Larger rectangle: pretty peacock 2 1/8″ by 3 1/8″, Brightly Gleaming patterned paper 2″ by 3″
I coloured three pearls with the pretty peacock dark Blends and embossed the two ornaments with copper embossing powder on very vanilla cardstock. I used a small piece of copper trim tied in a knot and frayed on each ornament, these are secured with a glue dot.
The Swaps
I always love a picture of the whole group of cards together; there’s something striking about the pile of swap cards laying there prettily. I hope I’m not breaking any rules by posting a picture of my swap card. I just sent them in the mail today and this is all I had for a blog post so I hope I’m forgiven and I haven’t ruined any surprises.
The Opportunity
If you live in Canada you can get these products now already if you choose to get the amazing deal on the starter kit. Yes, you can put items from the brand new Holiday catalog into your starter kit. In fact, you can put $205 worth of products in there and pay only $135. You will also get a $14 coupon code to use on your order in September. I hate to break it to you, but you will probably want more than just $205 worth!! Thankfully you have until the end of December to use your own discount without having to fulfill any minimum purchase requirements. Have I told you that I would love to have you on my team? That there is no pressure from me, only encouragement to help you meet YOUR goals. To get the starter kit, you can simply click here. Remember to click “no” when asked if you have a host code for the kit and then click “apply”.
Shopping Online
Have a super day and thanks for dropping by. If you do choose to order online, please help me out by also using the current host code: XBTQ47UR. Just click on the links below and that will take you straight to my online store. Online shopping is great if you live far away from me and are not regularly coming to classes. Even if you do live in town you may want to consider ordering online. If your order is close to $100 you are not paying any extra to order online and have it shipped straight to your door. How wonderful to get exactly what you want and not have to leave your house!!
Hello stampers! Did you know that this is the first time that Stampin’Up! has offered a coordinating combination of dies and embossing folders? Yes, this brand new product has dies that cut out an oval and a rectangular frame as well as embossing folders that transform these frames into works of art. I am even more excited to use the heirloom frames dies and 3D embossing folders now that my new 3D embossing plate came in. It is so easy to use with just the Big Shot base. At the end of this post I will share a video so that you can see it in action.
Why Get the new Embossing Plate?
When Stampin’Up! announced that they were no longer going to be selling the Big Shot I was rather alarmed. What were we going to do without a die cutting machine? It is true that they are working on a new machine but it will not be available for a while. I firmly believe that it will be a superlative product just like our Stamparatus is way better than any other product in its class. However, I am frugal and I didn’t really want to spend any more money making the Big Shot work for me. Our new 3D embossing folders are made to work in the new machine that is being developed and they will only work in the Big Shot with some tweaking. I used two pieces of thicker cardstock that come in our specialty designer series paper to create a shim. What a nuisance!! It was tricky to use and boy was it getting ugly. For $13 I have a beautiful 3D embossing plate which works like a dream. I can totally vouch for it as it will just make your life so much easier. No muss, no fuss. Yay!!
The Cards
What I like most about this card is the duplication of colour between the designer series paper and the stamped birds in the frame. It highlights one of the best features of Stampin’Up! products: colour coordination. You never have to guess. Your cards always look professional even if they are very simple. Colour coordination saves you time and simplifies the creative process.
Do you notice that this card is larger? That is because it is! It is a large Memories and More card measuring 6 1/4″ by 4 1/4″. I wanted a larger card to better showcase the pretty feather paper from the Bird Ballad suite. Otherwise the pretty grey heirloom frame would cover most of it up. the bird was fussy cut from the Bird Ballad paper as well.
The Opportunity
Did you know that the starter kit is also an option for someone who has no intention of becoming a demonstrator? Furthermore, did you know that you can put whatever you want into this kit? Yes! It is totally customizable to whatever you want and it costs only $135 in Canada with no shipping and tax. Normally you would get to choose $165 worth of products to put in your kit, but for the month of August you can choose $205 worth of product. There is an “Extra, Extra” promotion going on right now where you get an extra $40 worth of free product and then in September you get an extra $14 coupon code to use on your order.
You can get the kit just to get the great deal, but after that you will have until the end of December to use your own 20% discount. If you want to stay active as a demonstrator or keep getting your discount you need to spend or buy $400 each quarter. If you order the starter kit through me that automatically makes you a member of my Beyond Pampered Team. We have free monthly gatherings where we get together to stamp and enjoy treats. I also have a team training page that is free. My goal is to help you meet your goals and to live your dreams. Click here if you want to get started. You will be asked if you have a host code, click “no”, then click “apply”. The only time you have a host code is if you hosted a workshop and you wanted to use your host rewards towards the purchase of a starter kit.
The Video Must-See
Here is the video I made to show you a very important trick to using the Heirloom Frames Dies and 3D embossing folders without messing up. Without this trick it can be troublesome indeed, in fact, I wasn’t sure if I was going to promote this product until I discovered this trick. Happy stamping and thanks so much for stopping by.
Hello stampers. I have a very special interest in the Royal Peacock. Not only is it a gorgeous stamp set with a beautiful suite of products to support it, it is also a creature very dear to my grandson’s heart. Two weeks ago we went to the lovely local attraction called Clovermead. They raise bees, sell honey and have a petting zoo with lots of cute critters including a passel of goats, sheep, chickens, pigs, cows and, yes, peafowl. I say peafowl because there are peacocks and peahens and peachicks!! Little Leo doesn’t have too many words in his vocabulary yet, but one of the new ones is definitely peacock. He prays for the peacock every night before bed now. I think I need to send him a peacock card, what do you think?
I think that Stampin’Up! has really captured the beauty of the royal peacock in its stunning paper, foil sheets, rhinestones and reversible ribbon. When I was on the cruise I received this lovely card from my friend Kathy Morgan. I met Kathy years ago at a Leadership Convention in Houston, Texas. We were roommates at the Embassy Suites and we really bonded over happy hour! It was wonderful to spend a day with her and her husband BIll in Santorini. Thank you so much for gifting me this Royal Peacock card. I can’t wait to make it in a class. Here is Kathy’s blog if you want to check it out.
Royal Peacock is also a two step stamp set which allows for some amazing opportunities. The peacock was stamped in blueberry bushel and then a detail stamp was stamped over it in versamark and embossed in gold. Wow! The photo really can’t capture the beauty of this card. I took a close up so you can see it a little better.
In this closeup you can see the gold embossing that add a lot of richness to the feathers. You can also see the beautiful Noble Peacock specialty series paper in the background as well as the coordinating Beads & Baubles embossing folder. I have to say that this is one of my favourite suites in the annual catalog. The colours are just so rich and striking, just like the actual bird. I can see why Leo is enthralled. Click on the image below and you will see the contents of the entire Royal Peacock stamp set as well as the rest of the suite. It would be great to add to a starter kit or to order and get some bonus bucks. If you live in Canada and want to take advantage of the amazing deal on the starter kit, just click here.
Tomorrow’s post will feature me sharing some of the cards that my customers made at coffee and a card class this morning as well as one variation that I made myself. It was so neat to see how each person’s card turned out differently. One big lesson with pigment sprinkles: less is more!! If you are too generous with your sprinkling they you will actually ruin your card since the colours will be too saturated.
Thanks for stopping by today, I appreciate you!! Have a super day and be sure to spread some love by sending a card.
Hello stampers from a warm and sunny Chatham, Ontario!! Yes, the sun is shining and I’m so happy. Today I want to share with you the faux chalkboard technique, at least that is what I am calling it. This technique involves white craft ink and an aquapainter. I used Magnolia Lane stamp set, versamark, gold embossing powder and crumb cake cardstock. Thanks to Marion Greenlund who came to our twin team gathering yesterday and inspired me with her cards.
Here is another one of Marion’s cards.
After embossing the flowers in gold you daub craft white ink onto an acrylic block and then make a wash with your aqua painter and paint your flowers. When this has dried you go in with a sponge dauber and petal pink ink to colour the middle of the flowers. So simple and so pretty. I decided to step it up a notch and do some more layering for a very special lady.
I took the party to the inside with this card and embossed both the sentiment and the flower in gold on shimmery white cardstock. I really love how it turned out. Isn’t the ribbon so pretty? All part of the Magnolia Lane suite.
I love shimmery white cardstock for watercolouring. It holds up well to the water and the shimmer shines through. At over $1 a sheet I save this for special people!!
I had so much fun making this card. I love it when a technique is easy but impressive. It makes me feel so artistic!!! Can’t wait to do this in a class with my people. I did a live video on Facebook showing how to make this card, you can check it out here.
Thanks so much for stopping by. Remember there is a last minute sale on right now on selected retiring products from 10 to 30% off. Click here to see the deals. If you want to shop with me just click on the links below. The Good Morning Magnolia set will not be available until June 4 unless you put it in a starter kit. Have a super day!


 Glittered Organdy Ribbon")


")


 Organdy Striped Ribbon")
