by Jackie Bultje | Mar 25, 2020 | Paper Pumpkin, shimmery white cardstock, watercolouring |
Hello stampers and happy Wednesday to you. Do you love rain boots as much as I do? Colourful rain boots make me smile, and I finally got a pair of bright red Hunter boots three years ago. They were an unheard of, irresistible deal at The Bay for only $49.99. I wear them all year long and whenever I do, I get comments. People love them! That is why I was thrilled that the bonus set from Paper Pumpkin had rain boot outline stamps AND rainboot filler stamps with a cute floral pattern.
Singing in the Rain
We all need a little joy and whimsy these days with this low cloud of menace hanging over our heads. The unknown is scary and we are no longer sure of what the near future holds. Let’s have a little creative escape with these super cute rain boots. I started by stamping a sheet full of them in all different colours. Then I stamped a few more on shimmery white cardstock and watercoloured them with my aqua painter in a few more colours. Love!! Truthfully, these boots remind me of one of my favourite kids books that I used to read to my kids. It was called Big Sarah’s Little Boots.

Watercolouring Rain Boots
I was inspired by a fellow Canadian demonstrator, Laura Seki, who used boots and a saying. My saying comes from the saleabration stamp set Tags in Bloom. Here are Laura’s cards:

I wasn’t sure where her saying came from and I was too lazy to emboss so that is how I came up with my idea. Watercolouring with an aqua painter on shimmery white cardstock is fantastic. When you see the card in person you can really see how the shimmer comes through in the background and in the boots. If you cut your pieces 3 5/8″ by 4 7/8″ then you will get five pieces per sheet.

Which Boots are Your Favourite?
I also stamped a whack load of boots on a sheet of cardstock and stamped the patterns in different colours. Check it out! I even like the grey ones! Do you have fun rubber boots?

Trust me, it is so much fun to cut out these boots and decide which ones to put together on a card. Creativity is great for mental health, it takes your mind off the dark thoughts that can creep in during times like this. I challenge you to get out your stamping supplies and just play! If you want to get in on the Paper Pumpkin fun, here is the link to do that, your family will thank you.

Uplifting and Cheerful
I hope that this blog post made you smile today. In turn, you can bring a smile to my face and leave a comment. Tell me what you are doing to stay sane these days. What brings you the most joy? Yesterday I made apple pie and I have enough pie crust rolled out for two more pies and two dozen butter tarts. Tomorrow I will share my butter tart recipe. I think they are the best butter tarts in the world, but it is the pastry that takes them over the top in my estimation.
Paper Pumpkin and Videos
Please join me in my daily Facebook live videos. They are at 1pm every day except Tuesday it is at 9:30am in honour of my coffee and a card class and on Saturdays it is at 10am for the littles. This Saturday I will be featuring the Paper Pumpkin rain boots set. If you want more reasons why I am such a fan of Paper Pumpkin, check out this blog post. Have a super day and don’t forget to place your saleabration order before March 31! It’s also not too late to get the great deal on the starter kit, here is the link in case you have been procrastinating!
Product List
by Jackie Bultje | Oct 11, 2019 | Christmas, fancy fold, shimmery white cardstock, Toile Christmas |
Hello stampers! Today I want to share with you a Toile Christmas blue jay. There was a card I was planning to recreate that I had seen at our Twin Teams gathering made by the talented Marion Greenlund. When I was finally ready to make this card I realized I was missing some key components, the most crucial of which was the Peaceful Boughs Bundle. That is how the card for today has come to be!
Toile Christmas
Do you know the meaning of the word toile? It is actually a fabric and is derived from the French word meaning “linen cloth” or “canvas”, particularly cloth or canvas for painting on. In this case it refers to a type of repeated surface decoration traditionally printed on the same fabric. If you look at our Toile Tidings designer series paper you will see just that. Old Victorian wallpaper also looked just like that with a repeated picture or design.
The bird image in Toile Christmas is a cardinal which is a very popular bird in North America, but it can also be interpreted to be a blue jay. I don’t have any cherry cobbler or real red ink pads with me here in Holland, so I decided to make a blue jay. I combined it with the Feels Like Frost designer series paper for a look that I am really, really pleased with if I do say so myself.
The Card
Once again I really wanted to showcase the beauty of this paper without having to cut it down so I made a big 6 1/8″ square card. Of course that means that I will have to custom make an envelope to go with it but we have our envelope punch board to make that a relatively easy process.

Can you see why I am so happy with this card? The card itself is basic black and the panel on the right uses the full piece of 6″ by 6″ paper. I then cut a 2 3/8″ piece of the same paper (there are four sheets of each design in the pack) and I turned it upside down to get a bigger sky feeling. You can also see that it is a Z-fold card which allows the branches to overhang the one panel.

Here you can get a good look at the sentiment. This was also a stroke of genius inspired by necessity. I had no embossing powder so I used the Delicata copper ink pad and the stamparatus. That way I was able to ink up three times to get a nice bright image.

Two of the dies in Toile Christmas do not have coordinating stamps so I cut them out of shimmery white cardstock and coloured them with ink and an aqua painter. I added them to the stamped and coloured branch for some variety. After some close inspection I decided that something was missing. There was an extra branch laying on my stamp table just begging to be put to use, so I cut it up and added it in sprigs to the branches on the left. Do you like this version better as well?


I had more pictures of this version of the card but we had some major computer issues so these pictures are not currently available to me right now. It is imperative that I finish this blog post today so I don’t want to get bogged down into fixing computer issues, after all, here in Holland it is already late Friday afternoon.
To be totally honest, I am beyond thrilled with how this card turned out and I am also excited to share that I figured out how to paint a cardinal without using cherry cobbler or real red. He will be the feature of Monday’s blog post.
The Measurements
If you are like me, you find it most helpful to be given the dimensions so that you don’t have to guess and mess it up or waste paper, so here you go!
Card base: basic black 6 1/8″ by 11″ scored at 6 1/8″ and 8 5/8″
Feels Like Frost designer series paper: 6″ x 6″ and 2 3/8″ by 6″ (tow of these) one on the front of the card and one on the opposite side.
Thank You
Thanks again for stopping by to read my blog, I hope you were inspired by my creation for today. Stop by again on Monday to see how I made some beautiful cardinals. If you live in Canada and don’t already have a demonstrator, I would love for you to shop online with me or if you are local to Chatham, Ontario then come to a class some time. To stay connected you can subscribe to my newsletter, that is where I promote my classes as well as on my business Facebook page which you can find here.
Product List
by Jackie Bultje | Jun 24, 2019 | card kits, Looking Up Card Kit, masculine cards, shimmery white cardstock |
Hello stampers! Before I tell you about the double value on the Looking Up card kit I want to give you an update on my Pap. First of all, thank you so much for the outpouring of love and prayers for him. He was put on a very strong antibiotic for his pneumonia, and while there were some unpleasant side effects, it kicked in right away and he saw dramatic improvement. I am so thankful that I was able to drop everything and just go and be with them. My mom said that my very presence calmed them both and gave them optimism. My amazing daughter in law baked and cooked up a storm so they were blessed with a lot of food too. Thanks to the United Church ladies I had some rhubarb pies in the freezer that I baked up for them and even though they said they didn’t have great appetites, I knew that my roast beef and mashed potatoes would hit the spot with these old Dutchies. I wasn’t wrong! I felt like a mother bird watching her chicks eat. Good food and good sleep go a long way to helping with the healing process.

It really does help to have a tribe! That is what I call my stamping family. My team member Liz Fields took over for me and set up the booth at the Art at RM show which was part of Retrofest. It was such a good feeling knowing that this opportunity was not wasted and that it was in good hands. I came home with renewed vigor and inspiration. When time is of the essence then kits are our best friend. The kit I am using today was at the top of my list when I first saw the new catalog. It is a stunner! At first I was a little disappointed since I only had three kits and each kit had three of each card. That means only nine cards and one would be a sample. Doing more math, that meant I only had room for 8 people at coffee and a card class. What’s a girl to do? Take a look at the picture below, it has both the original cards from the kit as well as three cards that I designed myself.

Here is a close up of the alternatives. Do you know how I did it? The kit has additional pieces that you can pop up on the cards to make them look 3D. To tell the truth, I wasn’t happy with that look at all. I thought there was a much better use for those beautiful die cuts! Before I could use the die cuts I wanted to recreate the look of the clouds and watercolour wash in some of the kit cards. I just bought the rainbow builder dies that are on the clearance rack and the main reason I bought them is for the two long cloud shaped dies in there. Good news!! They are still available. Just click here and you are one step closer to owning them. On two of the cards I did a watercolour wash and on the hot air balloon card I made window sheet masks with the dies from the Rainbow Builder set and I sponged some gorgeous clouds using Bermuda Bay.

Tomorrow I will share closeups of the cards as well as some simple tips and tricks for getting your watercolour wash to look a little nicer. I will end this post with a quick video showing all the cards and a few tips and tricks that helped me get twice as much value from this kit. This kit comes with all the supplies to make 15 cards, a mini ink pad, a big clear acrylic block a stamp set and 15 gorgeous lined envelopes and two sheets of dimensionals to pop up the sentiments and the die cuts.
https://vimeo.com/344219141
Thanks so much for joining me today, I hope I inspired you with these fun and easy cards. Tomorrow I will do a video of the background techniques. I so appreciate everything you do. Each card or project that you pin helps me out and each comment encourages me. I love my stamping tribe! Have a super day.
**PS In case you are waiting for a PayPal button for paper and ribbon shares I cannot do that/ These items are not cash and carry items, you need to let me know that you want one and then I can send you an invoice. Paper shares are $66 for a 6×6 piece of each paper in the new catalog. Ribbon shares are $37.
Product List
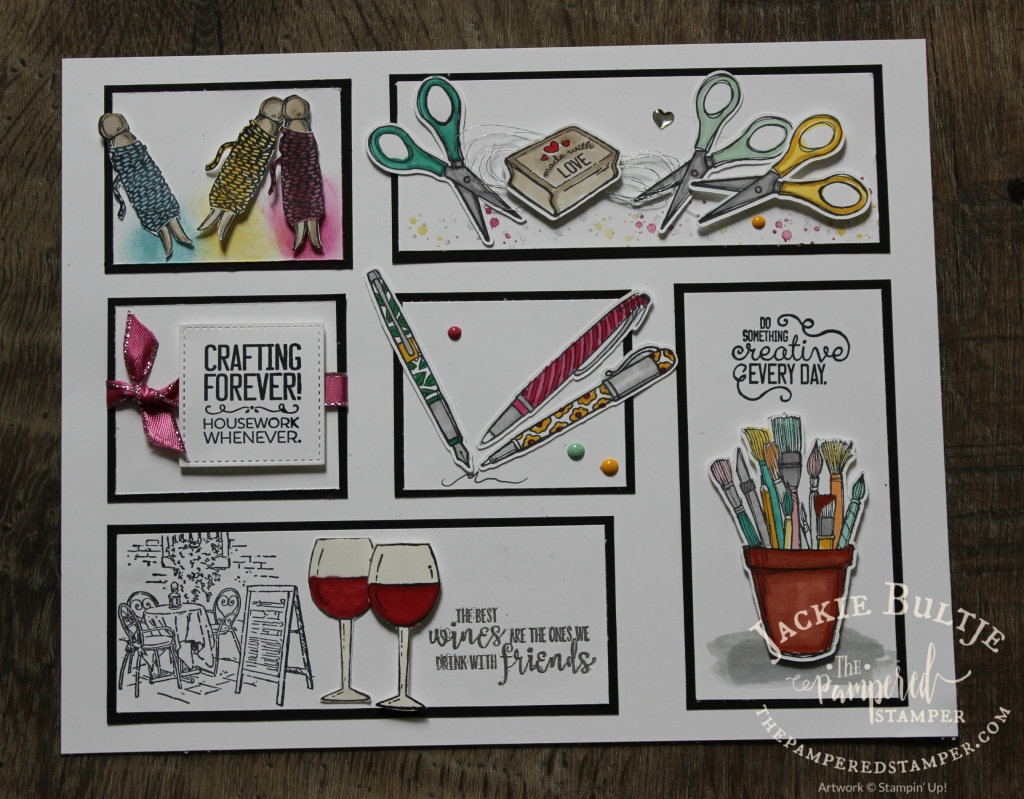
by Jackie Bultje | May 10, 2019 | art, Blends, crafting forever, framed art sampler, half full, shimmery white cardstock, wine |
Hello stampers! Framed samplers are so much fun to make and to display, but this Crafting Forever one is ideal for your craft room if you are lucky enough to have one. You could also make it as a gift for your favourite crafty person. I made it specifically as a thank you for all my club members. They make a commitment to meet five times a year to make cards with me and place orders and I think that deserves a reward. Lasting friendships are made through my clubs and that is the very best part for me too. I always tell “my people” that attending classes is the best thing that they can do for their hobby because it ensures that they use the things they buy. When you go to classes you are inspired to create. You learn new things and that motivates you to put your knowledge into practice and to share what you love with others. Homemade gifts never go out of style. Shall we take a look at this beauty?

This sampler measures 8″ by 10″. I might tweak it a little bit yet and I always encourage my class attendees to feel free to make it their own by adding or changing the embellishments or anything else they with to change. I think I will add a little bling to the top left square. You could also choose to colour in the cafe image on the bottom left rectangle. Everything was stamped on whisper white and matted with basic black. I used an assortment of Blends to colour my images. There is a LOT of fussy cutting. The only truly fussy one was the clay pot with the brushes. The wine glasses were stamped on shimmery white cardstock which makes them look more like glass. They are a different shade of white so they pop off the white background subtly. I bought the frame at Michael’s, it is part of their everyday value collection, so it was only $12 in Canada.

I thought I would show you what it looks like outside of the frame so that you can properly place your elements on the 8″ by 10″ white insert. Would you like some measurements?
wine and scissors rectangles: 5 1/2″ by 2″ (white) 5 3/4″ by 2 1/2″ (black) each
spools: 2 5/8″ by 2″ (white) 2 7/8″ by 2 1/4″ (black)
Crafting and pens: 2 1/2″ by 2 1/4″ (white) each, 2 3/4″ by 2 1/2″ (black) each
get creative- 2 1/4″ by 4 5/8″ (white) 2 1/2″ by 4 7/8″ (black)
You can adapt this to your favourite colour scheme. For a complete list of products that I used, just scroll down. I was inspired by Chris Galbraith, you can find her sampler here.
I used an aqua painter to make a swoosh of smoky slate under the clay pot of brushes. SInce I was using regular whisper white cardstock I had to just make a quick swoosh. You do not want to add a lot of water to this paper or it will disintegrate. It might have been a better choice to just stick with Blends. You can see from the picture that some of the elements are popped up to add visual interest. I used the little background dots from Timeless Textures to add some interest to the scissors rectangle. I first stamped them in smoky slate (second generation stamping which is the new way of saying “stamped off”) I also used second generation stamping in daffodil delight and berry burst. I wanted to add some berry burst to the stamped images to tie in the berry burst metallic edged ribbon. This gorgeous ribbon is retiring, so get it before it’s gone!
Thanks so much for stopping by today, I hope you enjoyed this post. Happy stamping!
Product List

Daffodil Delight Classic Stampin’ Pad
[126944]
$8.50


")
 Designer Series Paper")


 Metallic-Edge Ribbon")


