Hello stampers! What a fun Paper Pumpkin this is with the Bikes & Blooms theme. It’s really perfect for this dual demonstrator living in the Netherlands. I live in the middle of the greenhouse district, the heart of the flower industry and am even married to a flower grower. In case you didn’t know, Gerard grows amaryllis as a cut flower.
Whenever my Paper Pumpkin arrives, I first make the cards as shown and THEN I decide how I am going to play with the contents to create something unique for you. Here are the cards included in the kit, there are nine of them with cute envelopes too, which of course I was too excited to photograph!
Yes, we do drive our bikes with flowers in the basket, not just because it looks nice, but because it is practical too. In the Netherlands there are more kilometers of bike paths than there are roads!! Biking is often quicker than taking the car because of limited parking spaces and because road traffic can get really congested.
The stamps that come with this Bikes & Blooms kit have some lovely sayings in a very pretty font. There is a dual butterfly stamp as well as a single butterfly stamp, two sets of flowers and of course a big bicycle stamp.
The ink spot (that is Stampin’Up! talk for a mini ink pad) is Calypso Coral which is such a wonderful, summery colour. Now are you ready for my card??
Stylish Shapes dies were used to cut four squares which were then layered on to the Perennial Postage die cuts. Clockwise from top left, I used Barely Blush, Crisp Canteloupe, Pretty in Pink and Calypso Coral. Instead of using cardstock, I used Basic White cardstock and blending brushes to create my own. I love the softer look that occurs with this technique. Both floral stamps were put to use to do the collage stamping. Believe it or not, it is better if you first do your stamping, and then do your die cutting, otherwise it affects the colour on the edges of the diecut if you stamp afterwards. Another thing to note, the Barely Blush is such a light colour that it doesn’t do the “stamping off” or second generation stamping very well at all.
I stamped the bike in Hybrid Black and fussy cut it. “The sentiment “Have a lovely day” is also stamped in Hybrid Black. The four coloured squares are mounted on a piece of Basic White cardstock measuring 3″ or 7.6cm square. This is adhered to another Basic White layer 4″ x 5 1 /4″ or 10cm x 14.35cm.
If you look closely, you will see that the centres of the coloured squares are popped up with dimensionals. Adhere your Basic White layer to your Thick Basic White card which measures 5 1/2″ x 8 1/2″ scored at 4 1/4″ or 21cm x 14.85cm scored at 10.5cm.
Thanks so much for joining me to find out other ways to use your amazing June Paper Pumpkin, Bikes & Blooms. I love it and I am sure you will too. If you haven’t already subscribed, you can do so in the Netherlands here, or in Canada here. Be sure to hop along and see what all the other talented Dutch demonstrators have made with this fun June Paper Pumpkin.
Well hello and welcome to this fun Totally Techniques Blog hop. This month we are diving into Mirror Stamping. I immediately knew what I wanted to use, the bike stamp from the June Paper Pumpkin, Bikes & Blooms. Why not share my Dutch culture with you and create a scene with some trees, a canal and a bike? Seeing as this is a technique blog hop, I decided to throw in two more techniques for good measure. Any guesses what they might be after looking at my card below??
For my card front I used watercolour paper so that I could use a watercolour wash to make my canal, my grass, and the bike path. The canal was done using Balmy Blue with a slight accent of Azure Afternoon. My grass is Garden Green and the path is Crumb Cake. Next I made my sky using a blending brush, a few drops of glycerine mixed with a few drops of Balmy Blue reinker. This creates a velvety smooth finish! Lastly, I stamped the trees from the retired set Autumn Trees in Garden Green and Pecan Pie, spritzed with a little water. My bicycle was stamped in Early Espresso.
Now the big question is of course, how do you do the Mirror Stamping? It’s so stunningly simple, you might just chuckle. I merely stamped the bike in Early Espresso again on a piece of acetate that comes with our photopolymer stamp sets. After stamping, flip it over and rub onto your card front where you want it to be. I gave it a very light spritz of water after doing this to create a softer watercolour effect. The tree was even easier because it is symmetrical, so I just stamped it upside down under the first tree stamp. This time I gave it a spritz before stamping to give it a watery look.
I struggled a bit with where to place my sentiment before deciding to create a skinny banner to go on the back of the bike. What do you think?
Be sure to hop along and see what our other talented design team members came up with! Remember, we love to read your comments so that we don’t feel all alone in cyberspace. If you live in Canada, you can click on the icons below to shop with me. In the Netherlands, you can use this link. In the UK this link will be better for you. I appreciate you and will send you a free pdf tutorial bundle as a thank you.
Thanks so much for joining me today, I hope you were inspired to create your own card using the Mirror Stamping technique. Have a wonderful day! Stamping hugs, Jackie aka The Pampered Stamper
Welcome to the very first European Paper Pumpkin Blog Hop!! It is SO very exciting to finally be able to offer Paper Pumpkin subscriptions to my European friends. It also feels good to get back to regular blogging again.
What is Paper Pumpkin? It is a monthly card making kit that comes complete with a stamp set, a mini ink pad and all the materials needed to make 8 cards. Your first kit also includes an acrylic block. You can purchase a single kit, you can do a month to month subscription or you can purchase a 3, 6 or 12 month subscription. When you choose a 6 or 12 month prepaid subscription you do get a discount.
The best part is that you can skip a month if you want and you can also end your subscription whenever you want without penalty. Such freedom!!
Paper Pumpkin Blog Hop Participants
I hope that you get lots of inspiration when you hop along to all the other talented people who are sharing their alternative projects for the Lakeside Retreat kit.
The April kit is truly spectacular and it coordinates with the Lakeside Retreat suite in the Stampin’Up! catalog which makes it even more versatile. You can even get a special Paper Pumpkin add on kit which has some great dies that will coordinate with the next three Paper Pumpkin kits.
Let’s take a look and see what I did with my kit after making the cards just as described in the kit. For my first card I decided to pair it with one of our Product of the Month offerings, Notes of Spring.
My second card uses the envelope as my card front. I just loved the cloud pattern on the envelope and thought it would make the perfect backdrop for my Blessed Beginnings card.
The last card is one that I cased from Ingrid Heijnen. She presented the Waterside Retreat suite at OnStage in Cologne, and I absolutely loved this magnetic closure card. I will share my video tutorial for this card as well so you can see how easy it is to make.
What makes Paper Pumpkin so special?
When you subscribe to Paper Pumpkin, you are joining a worldwide community! Everyone gets this amazing kit around the same time and there is even a special Facebook group called the Paper Pumpkin Fan Club where people post alternatives that they have made using the kit.
I have been a Paper Pumpkin subscriber myself in Canada since it began and I would love to have you subscribe through me! Here is my link for my Canadian friends and here is the link for my European friends.
Thank you
Thanks so much for joining us today for our first ever Paper Pumpkin Blog Hop. I hope you got lots of inspiration and that you are excited to become a part of the Paper Pumpkin community. I have special gifts for you if you decide to subscribe through me as well. If you would like to subscribe to Paper Pumpkin in Europe, you can do so here. Live in Canada? Wonderful, you can subscribe with me here.
If you purchase a three month prepaid kit that will also qualify you for the Product of the Month. Right now there are three to choose from: Painted Illusions designer series paper, Notes of Spring stamp set and the Eyelet Blooms die. In Europe the product of the month is available for €6 with a €90 purchase and in Canada it is $5 with a $100 purchase. Limit of one per person and you must have an online account to get one. Your demonstrator cannot order this product for you.
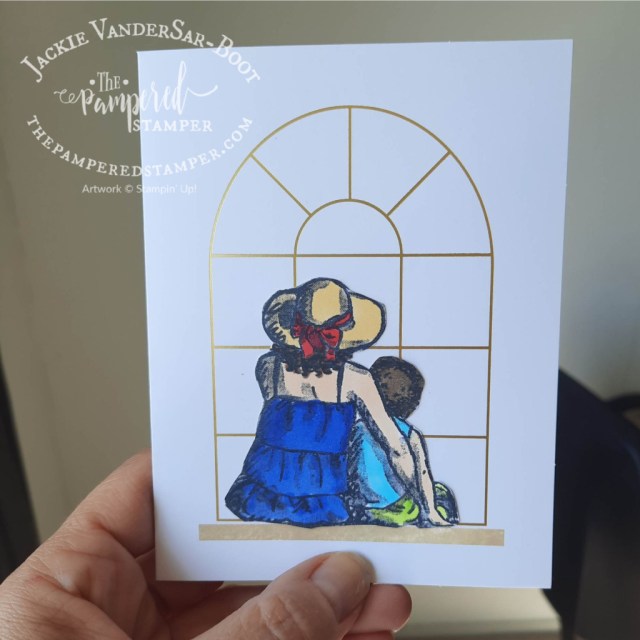
Hello stampers and happy Thursday, Gerard is at a dinner meeting from all the flower growers, so I am having a working supper complete with salad, a savoury pastry and yes, my second glass of wine. If there are spelling errors, you will know why! Today I am sharing with you some March 2023 Paper Pumpkin alternatives. Once again, I am using the lovely stamp set, Places in the Heart. Yes, oma is missing her grandchildren just a bit!!
Places in the Heart with the March 2023 Paper Pumpkin
One of the great benefits to Paper Pumpkin is that there is this great Paper Pumpkin community of stampers who share their Paper Pumpkin alternatives. This time I thought I would contribute to this treasure trove. I am totally in love with the Places in the Heart stamp set. Thankfully it is carrying over to the new annual catalog. Would you like to see my cards?
I may be a rare bird, but I really like simple cards without a sentiment on the front. You can write heartfelt words in the inside, don’t you agree?
Here is my second card with the very same layout. You simply stamp your image from Places in the Heart, colour it with your in color Blends and then “fussy” cut it. Fussy cutting simply means cutting with scissors as opposed to using dies and a die cutting machine or some sort of electronic cutting device such as the Scan’n’Cut.
Happy Vibes
I don’t know about you, but these cards just give me a warm and fuzzy feeling inside. Perhaps this will shock you, but I truly enjoyed being a mom to five amazing kids. Never was there a regret for having “that many” children. Now I get to enjoy “oma snuggles” and that is precious as well. Don’t get me wrong, but I enjoy snuggles of any kind. Hugs are wonderful!!
Changing the World One Card at a Time
This is my motto, and this is why I do what I do. I really believe that we can change the world one card at a time. Happy mail is powerful! My challenge to you is to send the cards that you are making. Don’t hoard them!
If you are intrigued by Paper Pumpkin, you can check it out with this link. Instant gratification is how I would describe it. You get a stamp set, an ink spot (mini ink pad) and all the materials to usually make nine cards. Perhaps you will do what I do. Make the first three cards as shown and then get creative with the leftover supplies!
Video Tutorial
Here is a video tutorial since seeing is believing! If you love my video be sure to give it a thumbs up and subscribe to my channel!
Thanks!
Thanks for joining me here today, it makes me happy to see the “silent footsteps” you leave behind. You see, I can see how many people have visited my blog, but unless you leave a comment for me, I cannot see that it was YOU! Have a super day and happy stamping. If you wish to purchase the supplies that I used, click here if you live in Europe, or simply click the links below if you are a Canadian. Thanks in advance!
Hello stampers and happy Wednesday to you. Today’s Happy Mail in Holland features Peaceful Christmas Wishes which was the Paper Pumpkin for October. Paper Pumpkin is a wonderful crafting kit subscription which will bring you instant gratification every month. Have you ever subscribed to Paper Pumpkin?
Paper Pumpkin Instant Gratification
Paper Pumpkin really is about instant gratification! This crafting box comes every month and all you have to do is unwrap your gift, find the instruction sheet and start stamping! I usually make only one of each of the projects in the box and then I go to the Paper Pumpkin Fan Club page on Facebook to see what everyone else has done with it. You can also simply Google it. For example for this kit you would Google “Paper Pumpkin Peaceful Christmas” and then all the projects will pop up; just click on “images”. Here is a link to see what happens when you do that.
If you would like to give yourself a belated Christmas present, just click here. If you really want to spoil yourself, then get a twelve month prepaid subscription after January 4 and before February 28 and then you will get five free saleabration items and about $40 worth of host products as well. How much fun would that be?
Paper Pumpkin Happy Mail
Today I received this beautiful card from Ingrid Vos, from Hamilton, Ontario. Ingrid is a fellow SU demonstrator and we have met at SU events and she has also participated in some of my online classes. I appreciate you Ingrid and thanks for the happy mail AND the gorgeous handmade ornament from your niece.
Do you see what a difference the beautiful red linen twine bow makes? A full spool of it was included in the October Paper Pumpkin. I love all the extras that you get in your Paper Pumpkin kits.
Supporting Local Business
I love when I hear a story about a woman starting her own business so that she can stay home with her young children. Ingrid included a beautifully detailed wooden ornament with my card that her niece made. She started a business called Fox and Leaf Co. so she could work from home and raise their three little ones.
Looking for a Great Deal?
If you are an avid stamper and collector, you might already have this set. If not, it is a steal of a deal right now for only $38 instead of $95. The second best part is that I already have a great tutorial written for it as well, so you don’t even have to come up with your own ideas!! Check it out here.
If you want to see a great card that I blogged about two years ago, you can check it out here.
Stamping Through My Stash
Every Wednesday I do a live video where I “stamp through my stash”. I pick a stamp set from my stash that has not yet seen ink and I made something fun with it. Join me on my adventure every Wednesday at 10am EST (Detroit or New York time zone if that makes it easier) You can check out this video playlist on YouTube here.
Did you know that if you subscribe to my channel, comment on your favourite video and share it to Facebook that you could win the Poinsettia Petals bundle? There will be a draw as soon as I get to 4100 subscribers.
Thanks!
Thanks for joining me today, it always feels good to connect with you and to share what is happening in my stamping world. The rain is falling here, the skies are grey, but my heart is happy because I am with the one I love. Hugs from Holland!! Have a super day.
Hello stampers and happy Wednesday to you. Today my post is about the Peaceful Christmas Paper Pumpkin. Like the name suggests it coordinates with our Peaceful Cabin suite in the holiday catalog. I am going to show you a way to get a LOT more bang for your buck with this kit and also why Paper Pumpkin is such a wonderful product to have on hand. Let me tell you a story.
Overheated Paper Pumpkin
I just spent a few days at my parents place and I am so very blessed to still have them with me and in their own home. However….staying with them requires that I have a summer wardrobe available ALL the time. They live in their kitchen and as they are elderly, they like the temperature to be very warm. Even in a lightweight summer dress with bare legs the sweat trickles down my neck. Menopause is not an easy taskmaster. Even my Paper Pumpkin was breaking out in a sweat!!
Seriously though, when I go visit my parents and I know that it will be more than 24 hours, I take a Paper Pumpkin with me. At the very least it gives me a creative escape to help take my focus away from the hot kitchen. At the best, I get creative time with my mom. This visit Pap was very sick and in a lot of pain and we spent a lot of time helping him. When this happens we play a lot of dice games that mom is super familiar with so that we can chat and catch up at the same time. I did bring out the Paper Pumpkin but she just watched me make the two sample cards and she asked some questions about what I would stamp in the inside. It was still a nice diversion for her and took her mind off the serious state of her husband’s health.
The Best Way
The best way to get your Paper Pumpkin is to start your subscription, unless you have a bunch of friends that also want to try it. If that is the case and you can get 7 coworkers or friends together THEN you should each get a one month subscription and some adhesive then you will also get some host benefits so you can get a free stamp set. Alternatively with only 3 people getting a 3 month pre-paid subscription you will also get host benefits. Check out your options here. I always get extra kits which you can purchase from me if you are local, but when you subscribe yourself you get a free clear block in your first kit and that is quite wonderful.
Paper Pumpkin is portable so you can take it with you whenever you know you are either going to have a long wait OR you can have some “me” time anywhere you go. It’s also a great way to share your hobby with your friends. So often I hear people moaning about wanting to lose weight and I am sometimes one of them. My theory? Keep your hands busy and your mind occupied and you will eat less!! Paper Pumpkin can be a dietary aid, who would have thought?
Lots of Inspiration!
Another great thing about Paper Pumpkin is that there is a huge group of people who share their ideas on Facebook in a group called Paper Pumpkin Fan Club. Here are a few ideas that I found there to help me have more fun with my kit. Sometimes I contribute my ideas there too, but this has been a month where I take rather than give creatively and that is ok.
I love these alternatives and you can read all about them here.
Here is a wonderful tag kit and holder.
Cindy made a beautiful little holder to go with it and you can read all about it here and watch her video so you can make your own.
Finally here is a great card that is made using the gorgeous envelopes in this Paper Pumpkin kit. You can find Sharon on Instagram here.
The Actual Cards in the Kit
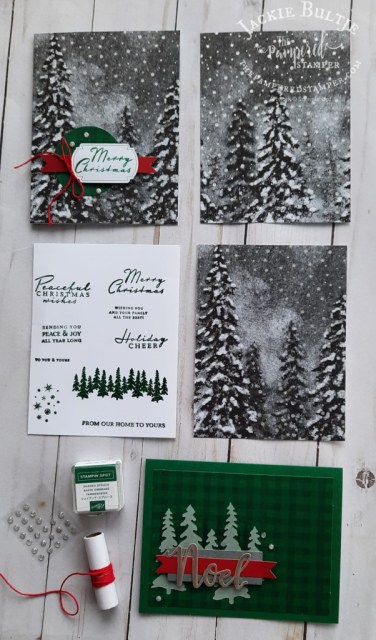
Finally here are the cards in the kit that I made in my mother’s hot kitchen. Want to double your beautiful cards? Simply cut the cards in half, they have those gorgeous trees printed on both sides! Then you can simply mount them on a thick basic white card base.
As always, the cards are even nicer in person. On the green card you can’t even see that the trees are stamped behind the vellum trees for a lovely landscape effect. It’s also hard to see that the circle behind the tag is also a gorgeous plaid. Seeing is believing!
Another great benefit of Paper Pumpkin is that after you have completed your kit you still have the amazing stamp set, ink spot and extra accessories. You can start your subscription today by clicking here and remember, you can skip a month at any time with no penalty OR you can increase the number of kits that you get each month in case you need some for gifts or for an event such as a kids birthday party. What a great craft and activity idea!
Thanks for joining me today! Happy stamping and have a super day.


![Paper Pumpkin Subscription [ 166815 ]](https://i0.wp.com/assets1.tamsnetwork.com/images/EC042017NF/166815s.jpg?w=140&ssl=1 "Paper Pumpkin Subscription [ 166815 ]")
![Paper Pumpkin 3 Month Subscription [ 166816 ]](https://i0.wp.com/assets1.tamsnetwork.com/images/EC042017NF/166816s.jpg?w=140&ssl=1 "Paper Pumpkin 3 Month Subscription [ 166816 ]")
![Small Blending Brushes [ 160518 ]](https://i0.wp.com/assets1.tamsnetwork.com/images/EC042017NF/160518s.jpg?w=140&ssl=1 "Small Blending Brushes [ 160518 ]")
![Barely Blush Classic Stampin Pad [ 167678 ]](https://i0.wp.com/assets1.tamsnetwork.com/images/EC042017NF/167678s.jpg?w=140&ssl=1 "Barely Blush Classic Stampin Pad [ 167678 ]")
![Pretty In Pink Classic Stampin Pad [ 163807 ]](https://i0.wp.com/assets1.tamsnetwork.com/images/EC042017NF/163807s.jpg?w=140&ssl=1 "Pretty In Pink Classic Stampin Pad [ 163807 ]")
![Calypso Coral Classic Stampin' Pad [ 147101 ]](https://i0.wp.com/assets1.tamsnetwork.com/images/EC042017NF/147101s.jpg?w=140&ssl=1 "Calypso Coral Classic Stampin' Pad [ 147101 ]")
![Stylish Shapes Dies [ 159183 ]](https://i0.wp.com/assets1.tamsnetwork.com/images/EC042017NF/159183s.jpg?w=140&ssl=1 "Stylish Shapes Dies [ 159183 ]")
![Perennial Postage Dies [ 162607 ]](https://i0.wp.com/assets1.tamsnetwork.com/images/EC042017NF/162607s.jpg?w=140&ssl=1 "Perennial Postage Dies [ 162607 ]")
![Basic Black Hybrid Stampin' Pad [ 166648 ]](https://i0.wp.com/assets1.tamsnetwork.com/images/EC042017NF/166648s.jpg?w=140&ssl=1 "Basic Black Hybrid Stampin' Pad [ 166648 ]")
![Basic White 8 1/2" X 11" Cardstock [ 159276 ]](https://i0.wp.com/assets1.tamsnetwork.com/images/EC042017NF/159276s.jpg?w=140&ssl=1 "Basic White 8 1/2\" X 11\" Cardstock [ 159276 ]")
![Basic White Medium Envelopes [ 159236 ]](https://i0.wp.com/assets1.tamsnetwork.com/images/EC042017NF/159236s.jpg?w=140&ssl=1 "Basic White Medium Envelopes [ 159236 ]")
![Crisp Cantaloupe Classic Stampin Pad [ 167680 ]](https://i0.wp.com/assets1.tamsnetwork.com/images/EC042017NF/167680s.jpg?w=140&ssl=1 "Crisp Cantaloupe Classic Stampin Pad [ 167680 ]")
![Basic White 8 1/2" X 11" Thick Cardstock [ 159229 ]](https://i0.wp.com/assets1.tamsnetwork.com/images/EC042017NF/159229s.jpg?w=140&ssl=1 "Basic White 8 1/2\" X 11\" Thick Cardstock [ 159229 ]")


![Early Espresso Classic Stampin' Pad [ 147114 ]](https://i0.wp.com/assets1.tamsnetwork.com/images/EC042017NF/147114s.jpg?w=140&ssl=1 "Early Espresso Classic Stampin' Pad [ 147114 ]")
![Pecan Pie Classic Stampin' Pad [ 161665 ]](https://i0.wp.com/assets1.tamsnetwork.com/images/EC042017NF/161665s.jpg?w=140&ssl=1 "Pecan Pie Classic Stampin' Pad [ 161665 ]")
![Garden Green Classic Stampin' Pad [ 147089 ]](https://i0.wp.com/assets1.tamsnetwork.com/images/EC042017NF/147089s.jpg?w=140&ssl=1 "Garden Green Classic Stampin' Pad [ 147089 ]")
![Balmy Blue Classic Stampin' Ink Refill [ 147168 ]](https://i0.wp.com/assets1.tamsnetwork.com/images/EC042017NF/147168s.jpg?w=140&ssl=1 "Balmy Blue Classic Stampin' Ink Refill [ 147168 ]")
![Water Painters [ 168253 ]](https://i0.wp.com/assets1.tamsnetwork.com/images/EC042017NF/168253s.jpg?w=140&ssl=1 "Water Painters [ 168253 ]")