by Jackie Bultje | Apr 18, 2019 | Beach Happy, Emboss Resist technique |
Hello stampers. It’s that time of year again when we announce the retiring list. We all sigh over our favourites that are leaving but the truth is we would have an enormous catalog if nothing ever retired. The old makes room for the new. Beach Happy is one fantastic set that you might want to get before it is gone. I loved playing with it. With the stamparatus it is so easy to make the beach chair and umbrella. I tried it with a regular acrylic block and I struggled. With the stamparatus it was perfect the first time and every time. How I love that tool!! I made one card for my Blends Club and one where I wanted to play with embossing and watercolouring. Let’s take a look.

I used Blends on the umbrella, the sand and the hat. I fussy cut the hat and the beach bag. This is a super simple and very fast card to make but yet it packs a big visual punch. I have to say Beach Happy is a fantastic set for both masculine and feminine cards.

I haven’t used my In-Colour Emboss Powder enough this year and a little goes a long way so I think I could really go crazy and do beach scenes in lots of colour combinations and not run out. I love how you can do an emboss resist technique. What does this mean? I stamped and embossed my images on shimmer white cardstock. I was then able to do a colour wash right over top of the images and the colour doesn’t stick to the embossed images, just to the paper around it. Fast, easy and fabulous!! The chair is embossed in black and lovely lipstick and the umbrella is in black and pineapple punch. The colour wash was done in coastal cabana, crumb cake and soft suede. I am feeling very artistic and that is saying a lot!! If I can do it, you most certainly can as well.

I had a lot of fun making these cards, stamping is indeed therapy. One of the first techniques I ever learned when I started stamping was embossing. It still gives me great pleasure to see dry powder transform into a glossy surface. If you have never tried it before you most definitely should. If you would like to book a class with me I would be happy to teach you this fun technique. Remember, this is the girl who never felt artistic and avoided any art classes in high school like the plague. I am slowly starting to change my self image when it comes to art and creativity. Discover how easy it is to become artistic with stamps, ink and paper.
I hope you all have a super day and I thank you for stopping by today. If you would like to purchase any of the items needed to make these cards, just click on the images below. You do need to live in Canada in order to shop from me. Sad but true. Same thing for joining my team. I live in Ontario, but my team is from many different provinces and that makes me ever so happy. Would you like to join too? Just message me, of click here to get started on that amazing journey.
Product List

Black Stampin’ Emboss Powder
[109133]
$6.25
by Jackie Bultje | Apr 16, 2019 | Blends, Wonderful Moments |
Wonderful Moments is a great stamp set that has six lovely images, 12 different sayings and a few design elements. It can be used all alone without any embellishment or colouring or you can colour the images with Blends, an aqua painter and ink, watercolour pencils or with a blender pen and ink. Not sure where to start? “Case” the catalogue. That simply means to use the samples in the catalogue and copy them. That is what my team member Carolyn Hanson-Henderson did with this card. A few months ago we did a card swap with our team and that was the theme: “case the catalog”. C.A.S.E. means copy and share everything. Here is Carolyn’s gorgeous card.

Carolyn used blackberry bliss as the card base which she embossed with the Ruffled embossing folder, fresh fig ribbon and regals collection designer series paper. I liked this card so much that I decided to case it in night of navy for my Blends Club on Thursday since night of navy is one of the colours that all the club members are getting.

I love the combination of night of navy and granny apple green so I immediately thought of our Tropical Chic designer series paper. I also love gingham, so this ribbon was just perfect. Since the pattern in the paper is also small it is possible to mix a few patterns together for great effect. The little strip of green patterned paper is 3/4″ by 5 1/2″, perfect if you #loveitchopit to use up all your scrap. If you cut a card front layer out of 6″ x 6″ paper then you will have a strip left over that will be enough to cut two strips for two of these cards! Don’t hoard your paper, love it, chop it and use it.
Blends are perfect for colouring this lovely lady. I used the Bronze Blend to colour her hair and Ivory on her legs and hands. Night of Navy is used on her dress, shoes, balloons and gift bag. Do you notice the shadow around her? I created that using Light Pool Party which I lightened some more using the Colour Lifter. Here is a closeup.

I realize that with the pop of granny apple green it really isn’t a monochromatic card anymore!! I still love it and there are blue dots in the paper…. I have to say I am super pleased with how the Blends show up in this photograph. Everyone in the Blends Club (this is now the second one I am offering) is super happy with how they colour. I hope to offer a third summer session if there is enough interest. I am also thinking it is high time for me to offer online classes! I keep procrastinating. I would love to hear from you if you are interested in online classes. Maybe that will give me the push that I need to get started. I also think that the ruffled embossing shows up really well. This folder is so beautiful, it truly creates a 3D effect that makes you want to touch the paper and hold it at different angles to see if it has been coloured like that!
Thanks for stopping by today. If you need anything or wish to recreate this card, just click on the images below and you will go straight to my online store. If you could also use the host code when you shop online that would be fantastic. The code is always found on the sidebar of my blog.
Product List
by Jackie Bultje | Apr 11, 2019 | watercolouring, Waterfront |
Hello stampers. Not all stamps are created equally. Some stamp sets are just super versatile and can be used in many more unexpected ways than they were originally intended for. Thankfully there is the internet that harnesses the creativity of so many people and makes it easy to get your own creative juices flowing. Waterfront is one such stamp set. I fell in love with it because it works so well with watercolouring and with creating a scene. It is amazing how easily you can change the mood of your scene by switching up your colour palette. I had a lot of fun playing around with it this afternoon. It’s too bad that I had so many other things that I needed to do as well or I could have spent a lot more time with it. Let’s take a look at what I did.

This was my first attempt at watercolouring with Waterfront on watercolour paper. Mistake number one: stamping the sentiment with Memento black. It isn’t waterproof. I should have used Stayzon. Mistake number two: I should have lightly spritzed the watercolour paper before stamping. After stamping you can spread the colour around with an aqua painter to soften the look. I do really like the colours I chose though: bermuda bay, pool party, pear pizzazz, lucky limeade, soft suede and flirty flamingo. The saying I used on this is from the February Paper Pumpkin. I think it deserves to be framed. If you want to get more of these exclusive stamps, you might want to consider treating yourself to a Paper Pumpkin subscription. Just click on the red box at the bottom of this post!
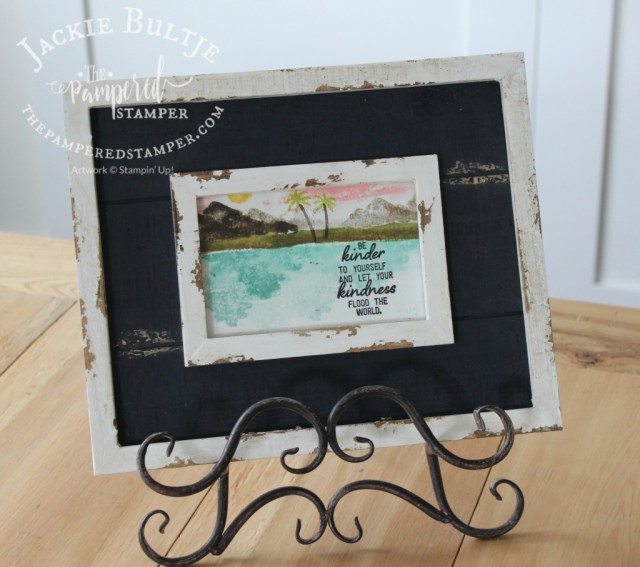
This art piece also has a story to tell. I didn’t mess up on the words this time. I chose to stamp in versamark and emboss with black emboss powder. Then you can colour wash right over top and it looks great. But I accidentally stamped my shore line in soft suede instead of pear pizzazz. I didn’t want to waste my watercolour paper so I stamped over top of it with pear pizzazz. It doesn’t look too bad. My mountains are a little darker than they should be. When I was trying to create a shadow by stamping with gray granite off set over the soft suede, I accidentally inked up in early espresso. Do you think maybe I was rushing a little? No worries, it is interesting to see how the different colours look together.

This card and the following two were all inspired by an Artisan Blog Hop from a little while ago. I love this saying and it is so very true.

This card shows how you can use Waterfront in a totally different way. The polka dots were made using the “sun” image. I love this playful card.

Isn’t amazing what you can do with ink and a sponge? Love the tropical colours of this card. The front of the card is only 2 1/2″ high, I cut the rest off so that the scene will “pop” when you open the card. I love the inspiration that we get from our Artisan Team.
We will be making these projects at a class next Wednesday April 17 at 1pm and 7pm. Class is $30 including the stamp set for three cards and a frameable art piece, or $20 if you already have the set. Be sure to check out my Facebook live video as I talk about these cards.
Product List
by Jackie Bultje | Apr 10, 2019 | Kindness & Compassion, sympathy |
Hello stampers. One of the sad realities in life is that we are often in need of sympathy cards. On the bright side, it is often therapeutic to take the time to make a beautiful card to show you care. We often feel helpless in the face of someone else’s grief, but a handmade card in the mail will help the bereaved person feel less alone. It is actually a good idea to send your card a few weeks after the funeral when the person may need to be reminded that they are not forgotten. We have a beautiful stamp set in the annual catalog called Kindness Compassion. Not only is it great for making sympathy cards, it also perfect for sending thank you cards for those who were helpful to you during the time of your bereavement. Giving the bereaved person a set of thank you cards that they can use can be very timely and thoughtful. Take a look at the set.

I chose to make my swap cards for Quebec City local OnStage using this set. I combined it with the Delicate Lace Edgelets and the Subtle embossing folder for a simple but striking card.

I always like the look of a group of swap cards together. They also always take much longer to do than I anticipate. I am very happy with how they turned out. The Delicate Lace Edgelits are stunning on this card.

If you use the Precision Plate with your Big Shot when cutting out the delicate lace edgelits there is very little poking that you have to do. I used my clever ribbon trick to make this bow. I will share a video I made quite a while ago in case you haven’t seen it yet.
http://https://www.youtube.com/watch?v=WOwUeuKeymI
I still had Dandelion Wishes laying on my stamp room table from Coffee and a Card class, so I thought the dandelion image would look good on the inside of this card. What do you think?

On April 15 the retirement list will be posted. If you want to beat the rush, be sure to order your ink refills and card stock for the retiring colours: tranquil tide, berry burst, lemon lime twist, fresh fig and powder pink. You may have heard that the Big Shot is retiring as well as the paper trimmer. With both of these products Stampin’Up! is being innovative and is working on coming up with an even better product. My advice is to get what you need NOW for both of these products: extra blades, cutting plates, precision plate, magnetic platform, anything that was on your list. I am super excited to see what they have in store for us. As always, thanks for stopping by. I try to make it easy for you to shop with me if you live in Canada, just click on any of the images below and you will be taken straight to my online store. If your wish list is long do consider the great deal on the starter kit. If you have any questions, just send me a message or comment on this post. I would love to connect with you.
Product List
by Jackie Bultje | Apr 8, 2019 | Dandelion Wishes |
Hello stampers. I fell off the bandwagon of posting regularly because something far more important was happening. I was able to introduce my family and friends to a very important man in my life who crossed the ocean to come and see me. We had a whirlwind ten days together and I had no time or desire to do much work while he was here. You need to make priorities in life and now that he is gone again I will go to work with gusto. I had these beautiful cards made with Dandelion Wishes ready for posting and sharing last week already and thought I would do just one blog post while Gerard was here, but that didn’t happen. I cased these cards from Megumi Holland (I thought her last name was quite fitting at this time!) Here is her blog so you can check it out.
The trick to these cards is striking and simple. You simply emboss the dandelions using versamark and white embossing powder. Set with the heat gun making sure you don’t wave it around like you are drying your hair. Hold it in one spot, at an angle so you can see what you are doing, about one inch away from the cardstock. When you see the embossing powder start to “melt” and get shiny, then move to the next section. After embossing you colour over the raised image with your Blends.

I used the Subtles embossing folder for the background panel to add some more depth and texture to these elegant cards. The polka dot tulle ribbon is also a great look and feel for this card imitating the airy feel of the dandelion fluff. I used the Stitched Shape framelits and the layering ovals and circles framelits for the sentiments.

You can tell I was in a bit of a hurry for both the embossing and the photography. It is not the sharpest picture I have ever taken!! Notice the placement of my watermark? It is supposed to distract you from the blurry photo. A type of digital embellishment opportunity.

I love how my idea turned out. My thought was that this sentiment needed to be paired with blowing dandelion fluff. I used to love doing this as a child. There is something magical about dandelion fluff blowing in the wind on a soft summer day. I first embossed the sentiment in white and then I stamped the dandelion image over top in versamark with no embossing for a subtle tone on tone effect. This card is also super appropriate after the ten days I have just had!! My heart is happy.

This picture was taken on Friday afternoon at The Prince of Wales Hotel in Niagara-on-the-Lake. It was a cool and rainy day and this was the perfect location for a long and leisurely lunch. We finished our lunch by having dessert coffees by the fire in the library. I made a video of this iconic place so you could enjoy it too! Here it is:
http://https://www.youtube.com/watch?v=9KKWy56BB3s
Thanks for joining me and I hope you have a super day. Don’t forget that Stampin’Up! has come out with some fabulous storage solutions for our Blends, ink pads, markers and reinkers.

Be sure to check the images below that will link you straight to my store. I so appreciate each and every one of you. Thanks for shopping with me either online or in person.
Product List


 Designer Series Paper")
 Designer Series Paper")

 Mini Ruffled Ribbon")


