Hello stampers and happy Wednesday to you. Today I have a Sketched butterflies card for you using an emboss resist technique. One of the main reasons that I fell in love with Stampin’Up! is that their products made me feel artistic. I don’t draw well, but the stamp designers sure do, so I can use their stamps to make things of beauty. These sketched butterflies are truly beautiful.
Emboss Resist Video Tutorial
Rather than describing how you utilize this emboss resist technique, hop on over to YouTube to watch this video, it is so much fun to see this technique in action! Please let me know if you end up trying it yourself. I will also be demonstrating this technique at my St Jacobs Fall Retreat. You have until August 25th to sign up for a wonderful time. Come with a group of your friends and you will be making lasting memories and perhaps starting a new tradition!!
Thanks!!
Thanks for joining me today on my blog. If you live in Canada, you can click on the images below and you will be in my online store. Remember, our patterned paper is on sale for the month of August, 15% off!
If you placed an order in July, then you will have received an email with coupon codes for “bonus bucks”. Each coupon code is worth $6, so be sure to redeem them with an August order. I hope that you have enjoyed this emboss resist technique, have a super day!!
Let’s wander. Doesn’t that sound just wonderful?! How often do we take the time to wander?? That is one of the reasons that this stamp set appealed to me so much. Let’s wander where the wifi is weak is one of the sayings. Where the wifi is weak is usually also where it is beautiful and peaceful!! Would you like to see the card that I made with this set?
My Let’s Wander Card
To make this card, I used a fun technique called emboss resist. What that entails is first embossing your image and then adding colour either with blending brushes, daubers or sponges. In this case I used a water painter and diluted ink refills. My colours of choice were Crumb Cake, Lost Lagoon and Pretty Peacock. The die for the sentiment is from Stylish Shapes dies. I spattered a little crumb cake ink with my water painter and the lost lagoon ink that is on there was there from the creative process!!
Video Tutorial for Let’s Wander
Check it out!
If you want to see the stamp set in closer detail, just click on the image in the product list. This list is SO helpful, not just for shopping. The links WILL take you to my Canadian online webshop, but you can also use it as a tool to get more information about the product. Thanks so much for joining me today here on my blog. If you like what you see, please pin my cards so that more people can find out about me. I appreciate you and hope that you have a super day.
Hello stampers and happy Monday to you. Today I have a Simple Emboss Resist card for you using the Circle Sayings stamp set. Find out how easy this technique is when you watch my YouTube video tutorial. The paper that I used for this card is an “online exclusive” called Simply Irresistibles. All the links for the products that I have used are found at the bottom of this blog post.
YouTube Video Tutorial for Simple Emboss Resist Card
Watch this video to see how this card was made. Emboss-resist is such a fun technique! If you haven’t already done so, please subscribe to my YouTube channel.
Free PDF Tutorial Bundle
If you spend $35 with me online or if you purchase the Circle Sayings stamp set, you will get a tutorial bundle featuring many cards using this stamp set. What a great way to get the most use out of your purchase!! If you want to see more emboss resist cards, click on this link. Happy stamping, and thanks so much for joining me today.
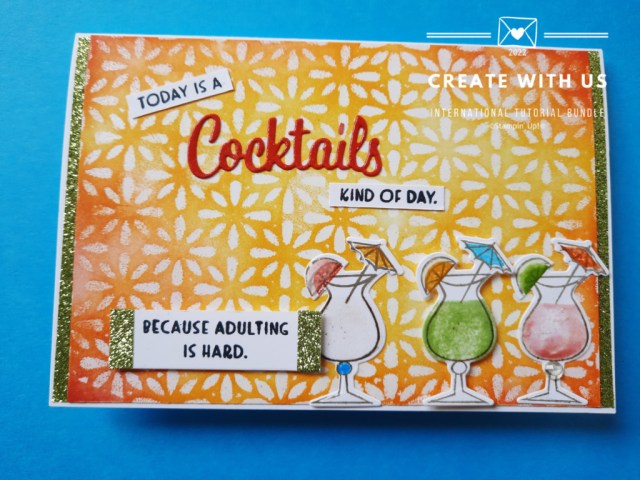
Well, isn’t that a bit of a tease? Nothing’s Better Than is actually the name of a pretty fun stamp set. I would say that nothing is better than being loved and loving that person back and both of you feeling like you’re the lucky one! Today I am sharing a card that I made using Nothing’s Better Than for the first time. This card was made for next month’s Create With Us International tutorial bundle which has the theme of Heat Embossing.
Nothing’s Better Than Cocktails
Cocktails are a lot of fun, but they are so expensive!! I made this card not just because I really do love a good cocktail, but I also love the cheerful colours that we want to hold on to while summer is becoming a distant memory. First I’ll show you the card and then I will tell you about the different ways that I have used heat embossing to make it.
Here is a closer view of the card.
Heat Embossing Three Different Ways
First I used heat embossing to create an emboss resist technique with a stencil or decorative mask. Place the mask over your cardstock and press all over with versamark. Heat emboss with clear embossing powder and then sponge on your ink for a beautifully patterned background.
Second I used versamark and clear embossing powder directly on the die cut to make the cardstock glossy and almost three dimensional.
Lastly I used masking paper and clear embossing to create some texture for the liquid in the cocktail glasses. Embossing doesn’t always have to be in metallics or colours. Clear embossing is super versatile and can be used quickly over top of any stamped image to make it look like it has been embossed in colour.
Get Your Own Discount
Did you know that you can get your very own discount on Stampin’Up! products by getting the starter kit? The starter kit is always a great deal but this month it is even better. Rather than me writing a big long story about it, grab a cup of coffee or tea and watch my short YouTube video. I wish someone had shared this with me earlier!
Belgium and Ireland
Did you know that Stampin’Up! has now expanded into Belgium and Ireland? I can now recruit people from these countries too because I have a European team through my Dutch demonstratorship. Please reach out to me if you are interested or you can simply sign up here incognito if that is more your jam.
Nothing’s Better Than….
With a title like that I just had to share a picture of Gerard and me. We had such a wonderful, romantic evening last Saturday and my cousin took this photo of us. I had to share both photos because the first one highlights the dramatic entrance with the red carpet. It really makes you feel like a movie star. I was happy that I chose to wear my little black dress!
You can’t tell in the photo, but my lovely scarf actually has a squirrel on it. Next time I will share a photo of it. My friend Tracy had this exact same scarf and I complimented her on it so many times that she gave me one for my birthday. It is still one of my favourite scarves! Do you have a favourite gift that you still treasure?
Happy stamping and thanks for joining me today! Oops, almost forgot, the Create With Us International tutorial group has a new Fancy Folds tutorial just out. It’s amazing!! You can get it for free with a $60 purchase or you can buy it here on my blog.
Hello stampers and happy Friday to you. I love you to the moon and back! Have you ever said that? If so, this card might really resonate with you. I just love the big moon in this stamp set, or is it the earth? Doesn’t matter, it is open to creative interpretation! Either way this is a fantastic card and I am so glad that I came across it online. Thanks so much to Julie Petrie for the fabulous inspiration! I made some minor adjustments but the idea certainly wasn’t mine. Does it remind you of E.T. Comes Home?
A Funny Story
If you look carefully you might notice that my bear looks a little different than the bear in the stamp set. Do you know why? I cut off his back leg!! For the life of me I couldn’t figure out what this was until I did a video showing this stamp set and asked people to help me out. I thought it was something in his pocket, or a big seat, I had no idea! Now of course it looks obvious! Here is the original card and link to Julie’s blog.
A Few Instructions
I first stamped the dots from Time of Giving (I forgot to add that one to the supply list at the end of the blog post!) The dots were stamped in versamark and clear-embossed. After that I sponged on Misty Moonlight with blending brushes over the entire white panel which measures 4 1/8″ by 5 3/8″. The trees are from Mountain Air and I used the Stamparatus to stamp them in Memento black to make sure they were nice and dark.
The moon was stamped in Smoky Slate and cut using the layering circles dies.
The bear was stamped on shimmery white cardstock and coloured with a waterpainter. See the colours in the supply list below. Don’t forget to cut off his leg!!
The sentiment was die cut using a die from the Seasonal Labels dies in the holiday catalog. Remember, if you want to purchase any of these things, just click on the images in my supply list! I’ve made it so easy for you.
Love You To The Moon
This is not the only wonderful saying in this set. I also love “Always reach for the stars” and “more thanks than stars in the sky”. There is a row of images of the moon in its different phases with the saying underneath “enjoy this new phase of life”. Lastly there is a beautiful “congraulations” in a gorgeous handwritten font.
I absolutely love books and have been addicted to reading ever since I could put two letters together. When I see this stamp set I am reminded of these two classic children’s books. Do you love to read?
Time to Evaluate
Be sure to have a good look through the holiday catalog. Many sets, accessories and paper are retiring. It’s so much easier to order them before they disappear rather than search for them on Facebook sites later. With a $60 purchase you will also get a free pdf tutorial from me. If you have a preference as to whether it be a Demo Design Dream Team tutorial or an International Create With Us tutorial, just let me know!
I hope that you have a super day and a good weekend. Christmas is almost here! It looks like it will be a subdued celebration again this year with COVID numbers and the variant alive and well and governments raising the alarm bells. I know that I am thankful for this hobby, this business and all of YOU!!
Hello stampers and happy Wednesday. Oh the magic of embossing! While this was one of the first techniques I learned, even before the die cutting machine, emboss resist takes it to a new level. Today I am going to show you two emboss resist cards that are very simple to do and very different in their finished look.
Emboss Resist
When you do an emboss resist card you start by embossing your image, usually in white but other colours work as well. Depending on which cardstock you used, you can either sponge ink over top of your embossed image or you can do a colour wash with an aqua painter over your image. With today’s cards I used a sponge and ink. If you watch my daily Facebook live videos at 3pm then you have seen me make this first sunflower card.
Echoing the Colours of Yesterday
I loved the colour combination so much from yesterday’s Bargello technique cards that I decided to replicate it on this card. Why not make the sunflowers funky rather than realistic? It is amazing how the card looks completely different just by switching up the colours and changing the shape of the sentiment. What I really like about both of these cards is the addition of a spattering of water droplets. You could use a toothbrush to do this but I had a flat brush that I use for brushing away excess embossing powder. Just wet the brush and then give it a sharp flick so that you get a few water droplets falling on your card. They leave a great watermark which you can then accentuate with frosted or clear epoxy droplets.
The Video
If you would rather see the technique rather than reading about it, check out this video. I am really enjoying hearing where everyone is from and watching the community grow. It would be great to hear from YOU. What do you like about the videos or my blog? The more interaction there is between me and my readers and viewers the more likely you will see and read what you want to. A great example of that was yesterday’s video. Someone had requested sympathy cards, so that is what I made.
A Fantastic Opportunity
Do you love stamping? Do you have a hard time narrowing down your wish list? Maybe it’s time to make a wise decision and get the starter kit. It could be that you just want your own discount and that is totally ok. In fact if you love to make cards or scrapbook, why are you not getting a continual discount on your products? If you live in Canada you can get the amazing deal on the starter kit through me. Just click here and you can pick out $165 worth of products PLUS a FREE bundle. If for example you chose the Prized Peony Bundle you would get a bonus of $78.25 which would cost you $96.25 as a customer. You also get a free Paper Pumpkin in your kit which is worth $35.
Do What You Love and Get Paid!
If you are truly passionate about making cards and also get great satisfaction from sharing what you love and what you know, then there is an amazing opportunity here for you. I cannot tell you enough how tremendously satisfying it is to own your own business, to develop it as you want and to be able to call your hobby your job! The best thing for you, not to brag, is to have ME as your upline because you get to benefit from everything that I have learned over the last fourteen years. I love to share with my team what made me get to the pinnacle of the stamping world in Canada and the world. Last year I was number four in Canada and number forty nine in the world out of more than fifty thousand demonstrators!
Thanks!
As always, thanks for popping over to read my blog. I truly appreciate you and I hope that you have a wonderful day. Take joy in the little things, find a way to brighten someone else’s day and get creative. See you at 3pm for my live video, I think I will be unveiling the Prized Peony bundle.


")
")


")


 Polka Dot Trim")


")


")


 Designer Series Paper")


")


 Circle Punch")


")


")
")


