Hello stampers and happy Monday to you. Today I have some fabulous Garden Birdhouse cards with Blends. Blends always make me happy because they just colour beautifully. Trust me, even people who dislike colouring fall in love with our Blends. The colour just goes on so smoothly with such rich depths and they really do blend so beautifully. I’ve combined the Garden Birdhouses stamp with the free saleabration set Beautifully Happy. Someone in the stamping world combined those two stamps and I was very impressed with the result.
A Little Tip for the Crumb Cake Garden Birdhouses Cards
If you look carefully at the Crumb Cake cards, you will see some white on the garden birdhouses. I used our Chalk Marker on them and afterwards I was super disappointed to find that they are no longer in our offering. Thankfully you can get this look another way. Simply use your Blender Pen with some white craft ink. I keep one Blender Pen just for use with white craft ink. The white on Crumb Cake is such a soft look for a gender neutral baby card.
Hello stampers and happy Saturday to you. Today I am going to be telling you about my Save Your Sanity Stamp Camp. Now you might be wondering, and rightfully so, how did I come up with that name? Well, we all know how busy December can get. Busy, busy, busy. Often busy with doing things for other people. I thought it might be a very good idea to carve out some time to simply have some fun with friends. A creative oasis to save your sanity! Together with four demonstrators on my team I am offering you just that!
Save Your Sanity Stamp Camp
Meet the four other demonstrators who are teaching at this Save Your Sanity Stamp Camp. The first instructor is my most “senior” team member in terms of having been on my team for the longest time. Yvonne Macfadyen is just lovely and you are going to enjoy hearing her English accent as she instructs you. Yvonne has very capably taken over my weekly Coffee and a Card class together with friend and team member Liz Fields. Here is her card:
The next instructor I would like you to meet is Alison Reid. Alison is my second most senior team member and she is full of great ideas! When she retires from her full time job she is going to be one heck of a demonstrator! Can’t wait to go on incentive trips with her!! Here is Alison’s card.
The next instructor is one of my newest team members and I am absolutely thrilled that she has agreed to teach! Meet Claudette Meriano. I am blown away by her work time and time again. She is super creative and often thinks out of the box. Here is Claudette’s card.
The fourth instructor is technically not on my team, but she is what we call an “orphan” demonstrator. The person that she signed up under is no longer a demonstrator, so she has been welcomed to be a part of our team. Meet Holly Snow. She is just so down to earth and approachable! You will feel totally at home at her stamping station. Holly will be sure to go that extra mile to make sure that you are happy with your card! Here is her cheerful card!
My Stack and Shuffle Card
I thought it would be fun to use the Stack and Shuffle technique to make some simple but beautiful Christmas Cards. My card uses the brand new Fabulous Florets Collection. It isn’t technically available until November 1 but you can put it in your starter kit now!
Kits by Mail or Attend in Person!
You have two options: a kit by mail or come in person either from 1-4pm or 6-9pm. I am so super proud that I am getting more organized. Here is the Google Form that you can fill out so that I know your preferences. Payment can be done with etransfer to jackiebultje@gmail.com. I know that I have to change my email address but that is also such a hassle! There is a new email now which is thepamperedstamper1@gmail.com but I still have to link it with my bank account and then I need to change it on all my platforms. No worries, it will happen!!
My hope is that you will attend this fun class and have a break from the Christmas busyness. Thanks for joining me. If you want any of the supplies that have been used for these cards, then just click on the links below. Have a super day!
Hello stampers and happy Wednesday to you. Today I have a two minute paper miracle for you. If you have been following me for a while you may already know that my favourite things are ones that combine beauty, ease and speed. When those three things come together it make me a very happy squirrel. Paper crafting can be intricate and detailed sometimes, and beautiful things will happen but most people are short on time and patience so two minute paper miracles are wonderful! Let’s take a look at what I am talking about.
Two Minute Paper Miracle
This two minute paper miracle is brought to you with the cracker & treat box dies. I love Christmas crackers but I have never made them and seldom have I bought them. Usually they are overpriced and are filled with junk. When I saw this one in the new annual Stampin’Up! catalog I thought, here’s my chance! It is even easier to use than I had anticipated. Trust me, I am not exaggerating when I say that you can do it in two minutes. I will share both a photo with you as well as a video tutorial.
Why So Thrilled?
Why am I so thrilled with these cracker & treat box dies? Not only are they super cute and fast to make, they also work very well with our patterned paper. The dies do not cause the paper to tear, they give just the right score lines. You can also close them by simply pulling the twine tightly around them. No fussy folding required. It really is a miracle!! I can see that with something this simple, ordinary days are going to be turned into extraordinary ones. This project will also help you with your burgeoning amount of patterned paper, so you can #loveitchopit.
Video Tutorial
Here is the video tutorial so you can see how I made these cracker & treat boxes with the Rings of Love patterned paper. This paper will be free with a $60 purchase when saleabration starts on July 1. Summer saleabration is in effect from July 1 until August 31.
Thanks!
Thanks for joining me today. If you want to help grow this stamping community you can pin my projects to Pinterest or share them with your friends on Facebook. I would love if you would subscribe to my YouTube channel. It’s a great way to stay up to date on my videos and also an easy way to find old ones. If you ever need help finding something, please reach out. As always the links to shop with me are at the end of my blog. Have a super day!!
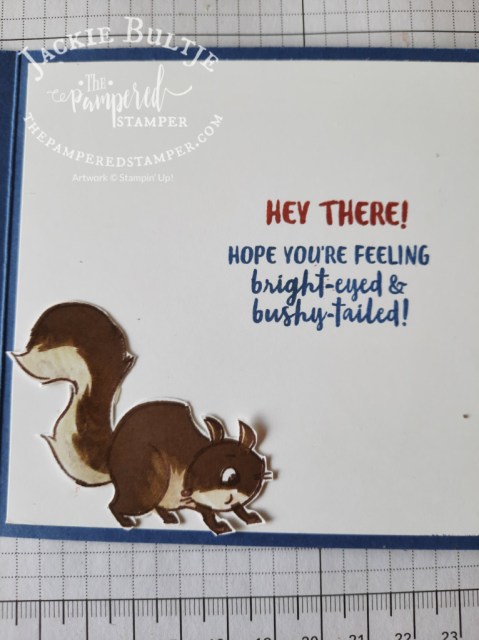
Hello stampers and happy Wednesday to you. Today I am sharing a fun card using Nuts About Squirrels. Can you believe that today was the first time that I inked it up? It is a perfect match for the retiring Beauty of the Earth paper. Let’s take a look.
Nuts About Squirrels Paper Strips Card
This card is a great template for any card that you want to make with the goal of showcasing your pretty patterned paper. Simply cut seven strips that are 3/4″ wide by 3 1/4″ tall. Adhere them on a basic white piece that is 3 3/4″ by 5″. My card base is Misty Moonlight which is also retiring April 30, 2022. You could choose any colour that is found in your patterned paper. This is just another way to #loveitchopit.
I featured this card in my Stamping Through My Stash video today, and when I do that I always stamp all the images from the stamp set. You can see that “swatch” here. It’s a great idea to stamp all the images from your stamp set when your order arrives as well as try out all the dies. Stampin’Up! has a three month guarantee on their products (three years on the Stampin’ Cut & Emboss Machine) If there is a problem, you want to know about it right away so you can get your defective products replaced. This is a rare occurrence, but one to be on the lookout for.
Inside the Nuts About Squirrels Card
For the inside of my card I used my second “fussy cut” squirrel and the stamparatus to stamp two different sentiments in two different colours, misty moonlight and cajun craze.
I used a blender pen to get rid of the stark contrast of my stamped squirrels. This one definitely looks like he is up to no good!!
Video Tutorial
Here is my video from YouTube. Click on the bottom left corner to watch on YouTube. If you haven’t already done so, be sure to subscribe to my channel so that you don’t miss out on the fun!!
Free Shipping Tomorrow!
Just a heads up that there is free shipping tomorrow on orders of $100 or more. This is an offer straight from Stampin’Up! I am also giving away two pdf tutorials with a $100 purchase and normally it is$120 to get two. One from the Demo Design Dream Team and one from the Create With Us International Team. Thanks for joining me today. Hugs from Holland!!
Hello stampers and happy Wednesday to you. On Monday I was able to ink up this gorgeous set for the first time. I just happened to have a customer drop by and she had not yet seen this stamp set. When she saw me stamp it, her jaw dropped and she said “WOW”! The wildlife stamps just jump off the page because they are very realistic looking due to the distINKtive technology of the stamps.
Wildlife Wonder: Some “Beary” Good Tricks
When I get a new stamp I ink up all the stamps in a few different colours and strengths. This gives me a good idea as to the versatility of the stamps. I also wanted to try stamping directly on the New Horizons paper. At first this seemed like a bad idea. You could see the patterned paper right through the bear. Then the magic happened. I grabbed a blender pen and went all over the bear image with it. Worked like a charm!
The other great trick with the bear is to fussy cut him close to the stamped image. When you do this he or she blends in better with the scene on the paper.
Clever trick number three is to be sure to “ground” the bear. There is a long skinny stamp that looks a bit like a cirrus cloud; use that to make a base for your bear like I did in the first card.
Clever trick number four has nothing to do with the bear. This time the wolf is the star of the show. I used a scrap of leftover patterned paper and fussy cut the grass to make a bit of a hiding spot for our resident wolf. Don’t you think it worked well?
Clever trick number five. If you watch my video you will see that the owl used to have a prominent place on the wolf card. Trouble is, it was a bit TOO prominent. The owl was simply too large. Instead I made a focal point for the sentiment which I punched out with a 2″ circle punch. The owl was stamped off in Crumb Cake to the left of the sentiment. Very effective, I think! These cards were made “on the fly”. If I would do the wolf one again, I would not use a scrap, but I would make an entire border across the front to camouflage the wolf a bit.
Video Tutorial
When you watch this video, please click on the brown box that says “watch on YouTube”. That way you can give me a thumbs up, subscribe or perhaps even leave a comment. Trust me when I tell you that it really makes a difference in my day when I see you do any of these things. There is also a “share” button under the video and then you can choose whether to share to Pinterest or to Facebook. Yay!!!!
Thanks for joining me today. If you want to purchase any of the products I used for these Wildlife Wonder cards, the links are below in the Product List. Have a super day!
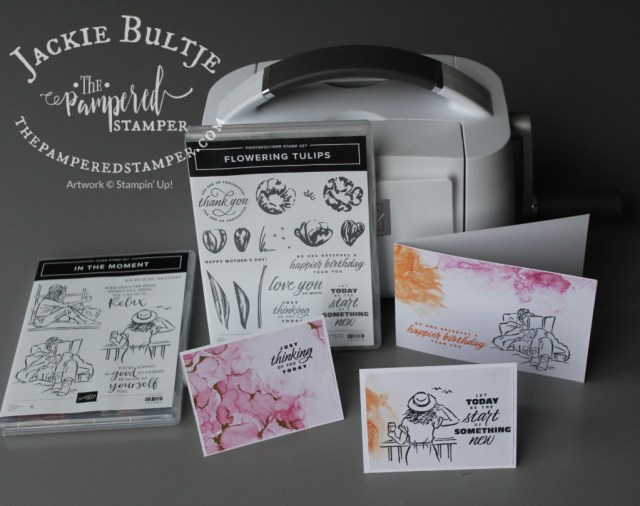
Hello stampers and happy Friday…actually, almost Happy New Year!! Today I want to show you a way to save your sanity. We can put so much pressure on ourselves to create beautifully stunning and intricate cards. While that can be a fun challenge and very rewarding, this is a gentle reminder to also enjoy easy simplicity once in a while. Yesterday I was feeling overwhelmed and a bit stressed and these simple cards brought me joy and peace.
Save Your Sanity with Some Simple Cards
I have always loved words. Words are very important and convey so much meaning and feeling, so choosing the right ones for your card is a big deal. Especially when the card is simple and the focus is mainly on the words and on the paper you want to make sure that your words are the right font, the right size and the. right thoughts! My cards use In The Moment for the images and Flowering Tulips for the words. The gorgeous paper is Expressions in Ink.
Here is a little video telling you the story of how these cards came about.
My last card is not shown in this picture because I make it at the end of the video. Curious? Be sure to watch AND subscribe. I am aiming for 4100 subscribers and to help make that happen I am doing a draw for the Poinsettia Petals bundle. All you need to do to enter is to subscribe to my channel, comment on your favourite video and share one to social media such as Facebook.
Simple Cards Bring Joy
These cards brought me joy yesterday and today as I see them laying on my desk they are bringing me more joy. I am going to offer a class where we can make these cards. People can choose their own colour scheme and stamps. It will be so much fun to see what they come up with!
Here is a closeup of one of the cards so you can see just how gorgeous this paper is and how well it combines with these stamp sets, In the Moment and Flowering Tulips.
Sometimes cards look a little different seen from another angle, so here they are against the backdrop of our fabulous Stampin’ Cut & Emboss Machine. If you don’t have this beauty yet, January is your month! You can put it in a starter kit and pay no tax or shipping AND get to pick two bonus stamp sets to put into your kit. Perhaps you could choose the two I have used today!! How much fun is that??
Prime Time Group
Did you know that I have a private Facebook group called Prime Time With The Pampered Stamper? Each Wednesday I post the supply list and measurements and on Thursday I do an exclusive video. Once a month there is a prize drawing and each month there is a free 15 project pdf tutorial for this group. It costs only $10 a month to join. If you are interested, just click here.
This is the card we made yesterday, another exercise is simplicity and beauty. Next week will do something a lot more challenging.
More Happy Mail Next Week
Next week I will share some more happy mail in Holland cards including a gorgeous hand painted one from my cousin. I hope that you have a fun celebration today and a very happy and blessed New Year. Thanks for joining me on my stamping journey. I’m so glad you’re here.


")


")
")
")


")
 Designer Series Paper")


")


")


")
 Designer Series Paper")


")
")
")
 Designer Series Paper")


 Specialty Designer Series Paper")
")


