Hello stampers and happy Wednesday to you. Today my post is about the Peaceful Christmas Paper Pumpkin. Like the name suggests it coordinates with our Peaceful Cabin suite in the holiday catalog. I am going to show you a way to get a LOT more bang for your buck with this kit and also why Paper Pumpkin is such a wonderful product to have on hand. Let me tell you a story.
Overheated Paper Pumpkin
I just spent a few days at my parents place and I am so very blessed to still have them with me and in their own home. However….staying with them requires that I have a summer wardrobe available ALL the time. They live in their kitchen and as they are elderly, they like the temperature to be very warm. Even in a lightweight summer dress with bare legs the sweat trickles down my neck. Menopause is not an easy taskmaster. Even my Paper Pumpkin was breaking out in a sweat!!
Seriously though, when I go visit my parents and I know that it will be more than 24 hours, I take a Paper Pumpkin with me. At the very least it gives me a creative escape to help take my focus away from the hot kitchen. At the best, I get creative time with my mom. This visit Pap was very sick and in a lot of pain and we spent a lot of time helping him. When this happens we play a lot of dice games that mom is super familiar with so that we can chat and catch up at the same time. I did bring out the Paper Pumpkin but she just watched me make the two sample cards and she asked some questions about what I would stamp in the inside. It was still a nice diversion for her and took her mind off the serious state of her husband’s health.
The Best Way
The best way to get your Paper Pumpkin is to start your subscription, unless you have a bunch of friends that also want to try it. If that is the case and you can get 7 coworkers or friends together THEN you should each get a one month subscription and some adhesive then you will also get some host benefits so you can get a free stamp set. Alternatively with only 3 people getting a 3 month pre-paid subscription you will also get host benefits. Check out your options here. I always get extra kits which you can purchase from me if you are local, but when you subscribe yourself you get a free clear block in your first kit and that is quite wonderful.
Paper Pumpkin is portable so you can take it with you whenever you know you are either going to have a long wait OR you can have some “me” time anywhere you go. It’s also a great way to share your hobby with your friends. So often I hear people moaning about wanting to lose weight and I am sometimes one of them. My theory? Keep your hands busy and your mind occupied and you will eat less!! Paper Pumpkin can be a dietary aid, who would have thought?
Lots of Inspiration!
Another great thing about Paper Pumpkin is that there is a huge group of people who share their ideas on Facebook in a group called Paper Pumpkin Fan Club. Here are a few ideas that I found there to help me have more fun with my kit. Sometimes I contribute my ideas there too, but this has been a month where I take rather than give creatively and that is ok.
I love these alternatives and you can read all about them here.
Here is a wonderful tag kit and holder.
Cindy made a beautiful little holder to go with it and you can read all about it here and watch her video so you can make your own.
Finally here is a great card that is made using the gorgeous envelopes in this Paper Pumpkin kit. You can find Sharon on Instagram here.
The Actual Cards in the Kit
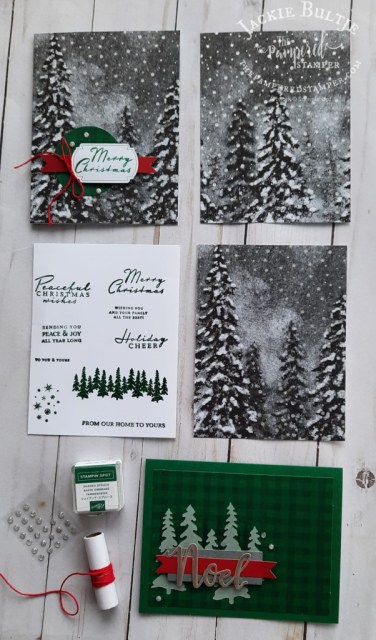
Finally here are the cards in the kit that I made in my mother’s hot kitchen. Want to double your beautiful cards? Simply cut the cards in half, they have those gorgeous trees printed on both sides! Then you can simply mount them on a thick basic white card base.
As always, the cards are even nicer in person. On the green card you can’t even see that the trees are stamped behind the vellum trees for a lovely landscape effect. It’s also hard to see that the circle behind the tag is also a gorgeous plaid. Seeing is believing!
Another great benefit of Paper Pumpkin is that after you have completed your kit you still have the amazing stamp set, ink spot and extra accessories. You can start your subscription today by clicking here and remember, you can skip a month at any time with no penalty OR you can increase the number of kits that you get each month in case you need some for gifts or for an event such as a kids birthday party. What a great craft and activity idea!
Thanks for joining me today! Happy stamping and have a super day.
Hello stampers and happy Wednesday to you. Transforming your paper with Blends is a very rewarding experience. Many of us love to colour and when you take your monochromatic paper and chop it up to a manageable size you are ready to transform it. That is what I did with my card for my private Prime Time group. I used the Peaceful Place paper to make this card.
Transforming Your Paper With Blends
At the heart of this technique is another practice called #loveitchopit. Truth be told, we often hoard our pretty paper. Experience has taught me that when I chop my paper I am much more likely to use it. The best measurements for chopping are 4″ x 12″ strips and then you can cut them into 4″ by 5 1/4″ for card fronts. This will leave some smaller strips that you can use in the inside of your cards.
The Paper as the Focal Point
I decided to turn this gorgeous paper into the focal point of this easel fold card. It looks great combined with Early Espresso and Old Olive cardstock. Transforming your paper is easy with Blends don’t you think?
The Finishing Touch
I added a few metallic dots and some linen thread for the sentiment. It was so much fun making this card and I am looking forward to doing a video tutorial with it for my Prime Time group on Thursday.
Follow Me on YouTube
Did you know that I do a weekly virtual coffee and a card class on YouTube? You can follow along even if you don’t order the kits to do it yourself with me. Each Tuesday morning at 10am EST I do the video. This past week I actually showed this colouring technique at the end. I’ll share the video here. Keep an eye out for the little red rectangle in the corner of my video. If you click on that you can subscribe to my channel and then you will be notified every time I post.
Busy Squirrel
Sometimes life gets a little hectic and then I drop a few things that I was super enthusiastic about. One of those things was my Parcels in the Post program. I hope to revive that very soon!! Another is stamp clubs. I miss my stamp clubs and am hoping to start them up again but on a virtual platform. Many people are not big fans of more technology so they stay away from Zoom. Did you know that you can also use Facebook rooms to get together. Maybe we will have a little play session to see how it works. Who is interested?
Thanks so much for joining me today. Happy stamping and have a super day!
Hello stampers and happy Monday to you. Last week I forgot to share my brilliant idea with you! It’s the product playground or “stempel speeltuin”. You might be thinking, what the heck are you talking about? Let me tell you.
Thinking in Two Languages
Now that I have been dating Gerard for three years and spending significant chunks of time in the Netherlands, I am now reading novels in Dutch! I sometimes wake up realizing that I just dreamed in Dutch. No surprise then that I first came up with a Dutch name for my idea and then an English one. This idea came to me after my first coffee and a card class here in Holland.
Product Playground or Stempel Speeltuin
Whenever I have taught my coffee and a card classes I have tried to strike a balance between hands on stamping, embossing and die-cutting and a relaxing morning. That means that the card bases and the layers are all pre-cut and sometimes some of the die-cutting is also done. The benefit of this is that there are no long lines at the Stampin’ Cut & Emboss machine or with the heat tool. There is also a drawback. When you don’t use the tools yourself you don’t realize how awesome they are.
My solution is that starting in the Netherlands I am going to add a component to my class. We always start with coffee or tea and something I have baked. Then we make one card. Yes, one. I used to make three cards with my Canadian girls but it sometimes started feeling like a marathon unless I had done a lot of the die cutting ahead of time. It is nicer to take the time to make one card together and enjoy the process with no pressure to hurry up.
The State of Affairs
Even with making only one card, you should have seen the state of affairs with my table! Such a lovely, creative mess. The reason for that is that I decided to let them play with an extra piece of cardstock that I had shown them how to emboss with a new embossing folder. Hence the idea of a product playground. You see, people want to play. Once they start creating, they develop a taste for it. Shyness and fear is overcome. I want to facilitate that.
Each week I like to focus on a certain stamp set, bundle or suite. The product playground or stempel speeltuin will be on a separate table. On this table there will be coordinating designer series paper, cardstock, ink ribbon and bits and bobs that I have made with that suite. Customers can create their own card or box using the supplies on the table. I will be close by to answer questions, but basically this is a place where they can do their own thing. I’m really excited about it!
Technical Issues
If you have been following my journey in the Netherlands you will know that I have battled many technical issues. I have learned some serious gratitude from this experience. You see, in Canada we think we have it pretty bad when it comes to internet and cell phone technology. It is expensive and sometime spotty. Well….
In the Netherlands, at least if you live outside the city, it can also be a challenge. On Saturday it took a serious turn for the worse. The cables were cut by a work crew next door. Internet providers were contacted but they claimed to be super busy and would not come until Monday. On Monday they sent someone to the house to confirm that we had no internet. We already knew that. No fix. No “monteur” as they call them here. We now have to wait till Wednesday!
I am writing this blog post because Gerard got me a Dutch phone and data plan so I am using the hot spot on my phone. He is wonderful for thinking of creative solutions.
Weekly YouTube Video
GIven the internet situation I will be prerecording my weekly virtual coffee and a card class. The nice thing is that I can release it as a “premiere” which means I can watch it live with you and chat as we watch. Will you join us? Here is the link to my YouTube channel. If you subscribe you will be notified when I post a video and it would also make me super happy!
Tomorrow we will be making a beautiful Christmas card using the Peaceful Cabin suite. This is also the card that we will be making for coffee and a card class on Friday in the Netherlands at Bloemenlaan 6. If you want to come, please let me know!
In Person Christmas Class
The in person class on Saturday October 30 is almost full. If you are local you can still order your supplies. I will be doing a smaller version of this class in the Netherlands as well on Friday October 15 at 9:30am. Take a look here to see all the beautiful cards!
If you just want the pdf to make the projects, you can get it here.
Thanks!
I’m so glad you joined me today. Please share your stories with me, I love them so much. Have a super day and happy stamping. If you want any of the products that I used to make this card then please click the links below. Have a super day!
Hello stampers and happy Wednesday to you. My Peaceful Cabin Virtual Coffee and a Card class is all ready to go! I love this stamp set so very much! The cabin stamp is simply stunning and the dies to go with it are fantastic. I must say, you do need the bundle in order to be able to make these cards. Even though I used a lot of designer series paper and die cuts, the cabin stamp is quite essential.
Peaceful Cabin Cards
Here is the selection of cards that I am offering for my virtual coffee and a card class in October. If you order the bundle from me you can get the card kit for only $10. Already have the bundle? Then the card kit is $25 including postage. You can join me every Tuesday at 10am EST on YouTube and I will also post to Facebook.
Some Simple Tips
I made this graphic to share some simple tips for using this bundle more effectively. Perhaps you will find it helpful!
A Personal Note
Today is just a short blog post. I had a wonderful morning and part of the afternoon with my cousin Machteld. What a blessing to connect with family in such a deep and meaningful way. I just love the fact that her mother was so close to mine. Sadly her mom died from cancer at 42. My mom is so touched that her daughter and her niece have such a close connection.
A Difficult Transition
Truthfully I still struggle a bit with letting my business go. It seems that without in person classes people do not buy in the same way. While I love teaching, at heart I am a salesperson. I am hoping that through consistent videos and blog posts my followers will shop with me online. If you have any doubt about whether your business would mean anything to me, doubt no more!
Tonight I am off to IKEA with Gerard to buy a sit/stand desk that should be a big help to my back. Stay tuned as the makeover of my stamp room starts.
Thanks so much for joining me! Happy stamping and happy shopping. Remember, saleabration ends in just 8 days.
On a side note, Peaceful Cabin bundle is one of the free bonus bundles that you can get if you buy the starter kit. You can do so here.


")


 Specialty Designer Series Paper")


 Designer Series Paper")
 Gingham Ribbon")


 Paper Pack")


