by Jackie Bultje | Oct 16, 2019 | Christmas, Snowman Season, Vintage |
Hello stampers! This crazy squirrel has landed back in Canada and I am happy to share with you a vintage snowman card. The card that I am going to share with you is a swap card that I received from the talented Jackie Topa. I have admired Jackie for a long time. She first caught my eye with her fantastic punch art.
The Card
Jackie’s vintage snowman card is real red and crumb cake. She used the snowflake stamp in Snowman Season to repeated stamp and make a wreath using mossy meadow. A hole punch was used to punch holes throughout the wreath so that the real red would show through and look like holly berries. So clever! A little slit was cut in the wreath so that the snowman could be tucked inside.

If you look closely you can see that the Merry Christmas was embossed with our new shimmer black embossing powder. Jackie also brushed Wink of Stella on the wreath to add some subtle sparkle.

The inside is also finished up nicely using real red and pool party.

The Joy of Swaps
It was so nice to come home to a pile of happy mail. There were actually more handmade cards in my stack of mail than bills! The reason for that is because I was involved with two swaps. One of the swaps was a Canadian Business Leaders swap and the other one was a Pampered Stamper Training Group swap. I am so thankful for this vintage snowman card by Jackie Topa. It really is wonderful to have the support and involvement of the broader Stampin’Up! community of demonstrators.
I had a lot to do today so it was a Godsend to have this beautiful vintage snowman card to feature in my blog post. This morning I played pickleball and I made 6 cards for my Feels Like Frost class on Thursday night. I also have to make some beautiful things with brand new product that Stampin’Up! sent me from their head office for my presentation at OnStage in Toronto. Enough to make your head spin, but thankfully I got a great night’s sleep last night. I was in bed at 8:30pm and slept till 7:15am! Tonight I will probably go to bed early again and after that jet lag should be behind me.
A Funny Story
My daughter Katrina picked me up at the airport yesterday, but she is dog sitting for a friend in Oakville, so we first headed back there and then I drove home alone. It was lovely to drive through our beautiful province with the sun shining on all the beautifully coloured trees. Using the great bluetooth technology I was able to call some of my family on my drive, but that ended up biting me in the butt!
I was just entering Chatham-Kent when Rachel called me. She reminded me to slow down since Chatham-Kent is notorious for its police presence on the 401, so keep that nugget of information in mind. After that we were in such deep discussion that I was not paying attention to my surroundings. In my defense, there was also construction going on BUT I ended up missing BOTH of the Chatham exits so I had to drive all the way to Tilbury before I could get off and drive back to Chatham. You would think that 285 km was a long enough trip not to want to add another 25 kilometers to my journey.
Thanks
Thanks again for joining this crazy squirrel! I appreciate each and every one of you. It is so nice when you take the time to comment, when you pin my creations to Pinterest and when you share on Facebook. All those things make such an impact on my business, but they also provide crucial emotional support. Owning your own business is not for the faint of heart! I was just talking with Katrina about that yesterday. Sometimes it can be daunting but I am happy to be able to do what I love and to share it with you.
If you live in Canada and want to shop with me, just click on the images below and you will be in my store! If you use the host code then nothing will go to waste. If you order $200, then you will get 10% in host benefits and can also get exclusive host sets. Do NOT use the host code if you are ordering that much. Of course, you also know that if you are placing an order for more than $110, then your best deal is really the starter kit. Let me know if you have any questions! Have a super day.
Product List
by Jackie Bultje | Jul 20, 2019 | paper, Pressed Petals, Vintage, washi tape |
Hello stampers and welcome to a rare Saturday blog post. Since I had an “oma” day yesterday, I thought I would do a blog post today. I am featuring Pressed Petals specialty designer series paper for my Tuesday coffee and a card class so this post will showcase those cards. My main point is that when you have beautiful paper like this, it needs to be the star of the show. You start with the beautiful paper, then you choose a coordinating cardstock, which is very easy to do just by looking at the description of the paper in the catalog. Right there it will tell you which colours are in the paper and that makes it simple to choose which colour you want to accentuate in the paper. Add a little texture with ribbon or embellishments, choose how you want to frame your sentiment and you are all set!

While these three cards all look very different, they all use the same collection of Pressed Petals specialty designer series paper. Each card just focuses on a different colour found in the paper. Which one is your favourite? I don’t have the Path of Petals stamp set yet that goes with this suite because the coordinating framelits were backordered. I also wasn’t sure if I needed another stamp set with flowers. After a second look at this set, I realize that I really do love the sayings in it, so it will be on my next order! I chose to use the Woven Heirlooms stamp set instead which I think is a very good fit too. Here are some close-ups of the cards.

It is a bit difficult to see in the picture that I used the Scripty embossing folder in the background on the Blueberry Bushel cardstock. It mimics the script of the sentiment from Woven Heirlooms. It may be a bit bright for a sympathy card but I feel that it is entirely appropriate if it is indeed a “celebration of life” event for someone who has lived a good, long life. Sympathy cards don’t always have to be dull and gloomy.

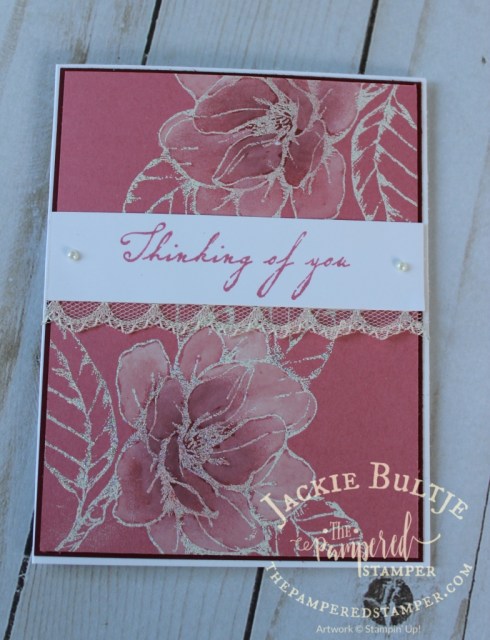
For this card I pulled the burlap theme from the background of the Pressed Petals patterned paper. I also distressed the background on the sentiment panel by stamping off with Rococo Rose and Woven Heirlooms. The sentiment was stamped in Merry Merlot. Both of these colours can be found in the Pressed Petals patterned paper. Layering the lace over the burlap ribbon evokes a lovely vintage feeling. You could also add some pearls if you wanted to.

This last card uses my favourite washi tape ever! It is called Pressed Petals specialty washi tape because one of the rolls actually uses individual flower petals that you can easily combine into different flowers. How awesome is that? The card also uses two of the coordinating sheets of the Pressed Petals designer series paper. I once again used the Scripty embossing folder for the background of this very vanilla card.
I am very excited to announce that I am going to start doing regularly scheduled weekly live Facebook sessions every Tuesday evening at 7pm called Coffee and a Card Revisited. It will feature the cards we made that morning at coffee and a card as well as any special insights that may have arisen during the class or cards evolved from it. Of course, given my squirrely nature, there also be random Facebook lives and other videos posted both on YouTube and on my Pampered Stamper Facebook page.
If you are a demonstrator needing or desiring more training and inside tips on how I work my business, you may want to join the Pampered Stamper Training Group. It is only $5 month just to slightly compensate me for my time. I am very excited to see how my trainees achieve greater success through their participation in this group.
Today is July 20, so there are only 11 days left for Bonus Days. If you spend $60 in July, you will get a $6 bonus coupon to spend in August. I thought I would end this post with a photo of yours truly on one of the formal nights of the cruise. I am on our own private balcony on the ship. Stampin’Up! spoils us with the best rooms. I had some truly relaxing moments on this balcony with a very full heart of gratitude.

After a hot week in Rome it was so nice to enjoy the cool breezes off the sea. Thanks so much for stopping by today, I hope you enjoy the rest of your weekend.
Product List
by Jackie Bultje | Jun 29, 2019 | Pressed Petals, technique cards, Vintage, washi tape |
Hello stampers. It is a Friday afternoon here in southern Ontario and it is officially summer and it feels like it too! Can’t complain about the heat after such a long wet and cold spring! (I didn’t get the post finished, so it is now almost noon on Saturday!!) I have just discovered the Pressed Petals paper and the coordinating washi tape. Both are just so lovely!! I did a quick Facebook Live video on my page, I am hoping that you can access it here. Pressed Petals has a very vintage feel to it and the washi flowers look so real you want to touch them! I am very, very impressed. I think you will have a LOT of fun with this product. As adults we definitely need to play as well and I think that is something that is seriously lacking in most people’s lives. When is the last time that you played?

The best part of this card is the amazing washi tape flower! It looks like a roll of washi tape but it is actually individual petals with which to make very realistic flowers. They are beautiful to look at and touch and the delightful surprise is that they are so very easy to make.

The best tool for making these pressed petals washi tape flowers is the silicone mat. After you have made your flower, use the embossing buddy and tap the back of the flower to take the stickiness away. That way your flower will sit naturally on the card and not get stuck to it and lose the dimension.

Here is the paper in this beautiful suite of products.


Let’s take a look at the inside of the card. I used the other spool of washi tape which is absolutely beautiful and also has a great vintage feel to it. I used Woven Heirlooms for the sentiment.

Here is a closeup of the pretty flower! The Perennial Essence floral centres are perfect for the Pressed Petals washi tape flowers.

Thanks so much for joining me today, I hope you like the card. As always, if you want to order anything, and you live in Canada, just click on the images below and you will go straight to my online store. If you live in the USA, click on the shop with Julie link and she will help you out! Have a super day.
Product List
by Jackie Bultje | Jun 18, 2019 | faux chalkboard, Magnolia Lane, Rococo Rose, technique cards, Vintage |
Hello stampers. Have you ever noticed when you go shopping that you see Stampin’Up! colours? That is no happy accident. Stampin’Up! prides itself on being on trend, especially with the “in colours”. I am going to take some time during the next week to introduce you to the new incolours. Today we will be taking a peek at Rococo Rose. My team is doing an event next week Friday featuring the new incolours and this card is my contribution. I also incorporated our new shimmer white embossing powder which it totally amazing! I love how heavy the powder is but still with a fine consistency. It embosses beautifully and is a great mix between white and shimmer. The shimmer part actually looks like silver.
I combined Merry Merlot with Rococo Rose as the sponging in the middle of the flowers turned out such a lovely deep shade. I used the faux chalkboard technique and then sponged rococo rose in the centres of the flowers. Here is a closeup look.

I absolutely love the vintage feel of this card. I plan to offer a tutorial on this card in the very near future. Exciting things are happening on this blog! Thanks so much for joining me. I always appreciate your comments. I still need an address from Kathy Ireland who won the last blog candy which is a mini version of the Hugs from Shelli stamp set. Tomorrow I will choose another winner from the comments. Not sure what the prize will be yet, but I know it will make you happy.
If you wish to purchase any of the items used today, just click on the images below and you will be taken to my online store. I always appreciate it if you use the host code, this helps me to consolidate orders and save money by not losing out on host rewards which I use to keep my class costs down. The current host code is always shown on the sidebar of this blog. Have a super day!!
Product List
by Jackie Bultje | May 28, 2019 | Hugs from Shelli, Paper Pumpkin, Vintage |
Hello stampers. Oh the thrill of finding a pretty vintage nest with eggs in the lower branches of a tree! This Hugs from Shelli Paper Pumpkin kit fills me with joy. I especially love the card with the vintage nest of eggs on it and the matching envelopes with the pretty little nest of eggs. I have been on a Paper Pumpkin bandwagon for the month of May because I really believe in this product and I want you to lock in the savings before the price goes up in June! So many people ask me for a kit after I get them but often the good ones are sold out. Lately there have been a lot of stellar kits and I proved to my Blends class just a while ago that you can turn what you think is a “bad” Paper Pumpkin into some very pretty cards. Let’s take a look at what I made using the leftovers of the kit.

For the card on the left I used the bird from Best Birds and coloured her with Blends. The only other thing I added was polkadot tulle ribbon. I added a mat of Balmy Blue cardstock and put it on a Very Vanilla card. For the card on the right, I ran a piece of Pool Party cardstock through the Pinewood Planks embossing folder. I cut out the label with the vintage nest from the matching envelope and tied some twine around it. So simple, so pretty.

Here you can see the detail of this pretty card. The pinewood planks embossing folder is the perfect fit with this vintage nest. I tied the twine from the kit around the pool party mat before adhering it to the card base. I adore this card because not only is it beautiful it is stunningly simple!! The best combination ever.

Do you think this card would look better if I coloured the eggs in the vintage nest and the leaves on the branches? Let me know and I will try out your ideas! Thanks so much for stopping by, and if you want to subscribe to Paper Pumpkin, here is the link. I hope you have a super day. Make someone happy and send a card today.
PS. My new catalogs are here! Let me know if you want one. I will mail anywhere in Canada. Postage is around $5 but I trust that if you want me to mail you a catalog that you will also order from me and then the catalog is my gift to you. If you want it only for inspiration, then I would appreciate payment to cover the shipping.
Product List
by Jackie Bultje | May 17, 2019 | anniversary, Hugs from Shelli, Paper Pumpkin, Vintage, wedding |
Hello stampers. Hugs From Shelli arrived yesterday and today I got to play with it. What are Hugs From Shelli? It is the name of the latest Paper Pumpkin that Shelli designed and it is a stunner. Shelli loves all things vintage and this kit reflects that. Sumptuous velvet ribbon, pretty bronze metal birds, vellum feathers and the most gorgeous cards in four different patterns. This kit has twelve cards in it!! I am on a Paper Pumpkin kick and I am really, really promoting it right now because you can still save significant money if you get a twelve month prepaid subscription before June. Why? Because in June the price is going up $3 a month. The twelve month pre-paid is always the best deal because you not only save $1 per month, you also get a month for free AND you get host benefits of $27.50. It is a win-win. Do you want to see what the cards in the kit look like?

One thing to be careful of when making these beautiful cards is that there are three different sized labels to put on the front of the cards. I made a mistake on the “Hello Friend” card. I used the wrong size!! I didn’t feel like taking it apart but it does look better on a smaller label.

The embellishments and elements from the kit looked so pretty laying on my table that I just had to take a picture to show you. Even the envelopes are special. I decided to use my kits to make anniversary and wedding cards for my regular Coffee and a card class on Tuesday morning. I am so happy with how they turned out. If you look closely at the anniversary card you will see that our nested label framelits coordinate perfectly.

I want to show you closeups of all the cards that I made.

I made a little mistake on this next card. I used the wrong sized label. The picture also does not capture the pretty detail in the metal bird embellishment.

I just love the vellum feathers in this set. The pretty peacock velvet ribbon is so beautiful in real life, this picture does not do it justice.

This next card I had already made a month ago at OnStage in Quebec City when we were given a sneak peek at the amazing Paper Pumpkin designed by Shelli Gardner, cofounder of Stampin’Up!. I was stamping in a room full of ladies and I didn’t do it perfectly, but it is what it is, and it is still perfectly lovely.

Here are the closeups of my alternatives.

This wedding card made me think of something borrowed, something blue, so I added a blue feather and some speckling in the background. Both of those images are in the Hugs from Shelli stamp set.

Now this is the right size label for this card but I turned it into an anniversary card and layered it with a blushing bride nested label framelit. I tied a bow using the twine provided but adding some old olive linen thread as well. My reasoning here was the quote from the Bible ” a three-fold cord is not easily broken”.

This last card is a vintage for the bride card. I added some pearls and the polka dot tulle ribbon. The sentiment is from Special Celebrations. You could step it up a notch by adding another layer of cardstock behind the sentiment. I actually just got up to look at the card, but in real life it doesn’t look as stark or need that extra layer. I had so much fun playing with this set and am excited to share it at coffee and a card class on Tuesday. I know everyone is just going to love adding their own touch to the cards. Some people might not need wedding or anniversary cards. If not, they can make the originals or change them to suit their needs. Here is a picture of the stamp set. Even the tissue paper in this kit was different, a lovely vintage pink!

Thanks so much for stopping by. If you live in Canada and decide that you want to get Paper Pumpkin, then you do that by clicking here. Have a super day and a great long weekend if you are in Canada. Long live the queen!
Product List

")


 Crinkled Seam Binding Ribbon")
 Burlap Ribbon")
 Scalloped Lace Trim")


 Polka Dot Tulle Ribbon")


