Well, isn’t that a bit of a tease? Nothing’s Better Than is actually the name of a pretty fun stamp set. I would say that nothing is better than being loved and loving that person back and both of you feeling like you’re the lucky one! Today I am sharing a card that I made using Nothing’s Better Than for the first time. This card was made for next month’s Create With Us International tutorial bundle which has the theme of Heat Embossing.
Nothing’s Better Than Cocktails
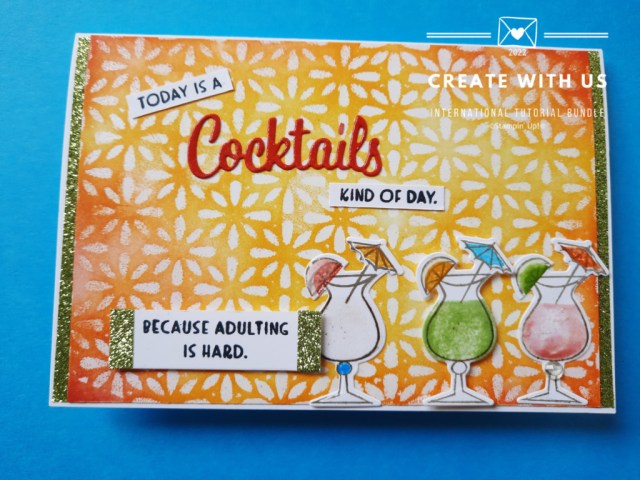
Cocktails are a lot of fun, but they are so expensive!! I made this card not just because I really do love a good cocktail, but I also love the cheerful colours that we want to hold on to while summer is becoming a distant memory. First I’ll show you the card and then I will tell you about the different ways that I have used heat embossing to make it.
Here is a closer view of the card.
Heat Embossing Three Different Ways
First I used heat embossing to create an emboss resist technique with a stencil or decorative mask. Place the mask over your cardstock and press all over with versamark. Heat emboss with clear embossing powder and then sponge on your ink for a beautifully patterned background.
Second I used versamark and clear embossing powder directly on the die cut to make the cardstock glossy and almost three dimensional.
Lastly I used masking paper and clear embossing to create some texture for the liquid in the cocktail glasses. Embossing doesn’t always have to be in metallics or colours. Clear embossing is super versatile and can be used quickly over top of any stamped image to make it look like it has been embossed in colour.
Get Your Own Discount
Did you know that you can get your very own discount on Stampin’Up! products by getting the starter kit? The starter kit is always a great deal but this month it is even better. Rather than me writing a big long story about it, grab a cup of coffee or tea and watch my short YouTube video. I wish someone had shared this with me earlier!
Belgium and Ireland
Did you know that Stampin’Up! has now expanded into Belgium and Ireland? I can now recruit people from these countries too because I have a European team through my Dutch demonstratorship. Please reach out to me if you are interested or you can simply sign up here incognito if that is more your jam.
Nothing’s Better Than….
With a title like that I just had to share a picture of Gerard and me. We had such a wonderful, romantic evening last Saturday and my cousin took this photo of us. I had to share both photos because the first one highlights the dramatic entrance with the red carpet. It really makes you feel like a movie star. I was happy that I chose to wear my little black dress!
You can’t tell in the photo, but my lovely scarf actually has a squirrel on it. Next time I will share a photo of it. My friend Tracy had this exact same scarf and I complimented her on it so many times that she gave me one for my birthday. It is still one of my favourite scarves! Do you have a favourite gift that you still treasure?
Happy stamping and thanks for joining me today! Oops, almost forgot, the Create With Us International tutorial group has a new Fancy Folds tutorial just out. It’s amazing!! You can get it for free with a $60 purchase or you can buy it here on my blog.
Hello stampers and happy Wednesday to you. Today I want to show you how you can make magic with the Labels Aglow dies. These are not your typical dies and it might be a little overwhelming at first to figure out the best way to really make these dies shine (pardon the pun!). I have made 8 different cards with these dies and with the Lights Aglow paper. The most unusual one was the one that I cased straight out of the mini catalog on page 33. I will share that one first.
Slimline Card with Labels Aglow Dies
This slimline card uses one of the biggest circular dies from the Labels Aglow Dies. It also incorporates the beautiful specialty glimmer paper in Evening Evergreen and Gold. Photos honestly cannot do justice to the shimmer of this card. I also love that it is a Happy New Year’s card. Those are great if you have forgotten anyone on your Christmas list or if you are a little behind schedule. Here it is!
Video Showing 9 Cards Made With Labels Aglow
Card Closeups
Here are some of the cards that I have made over the past two days. Most of them are truly a clean and simple cards making them easy to recreate. This is a fun way to make lots of Christmas cards without them all being exactly the same. Remember that if you are embossing your sentiments in gold, be sure to use your embossing buddy first for much better results! Trust me, I got lazy and tried doing it without that extra step and I regretted it.
One More Idea for Labels Aglow Dies
As I was making these cards another idea came to me but I didn’t have time to put it into action yet. I think these dies would be perfect for making a tea light holder or lumière. Perhaps in the next few days I will have to time to make some to show you. If you beat me to it, be sure to send me a photo of your creation!
A Long Wish List?
If you have a long wish list of stamping supplies, you may wish to consider the amazing deal on the starter kit right now. You can put $206 worth of supplies in it and pay only $135. Sounds too good to be true, but it really isn’t! If you have questions, please ask me. Here is the link to get that deal. Thanks for joining me today and happy stamping! New customers and new team members are always welcomed and they all get free pdf tutorials. You will never have a creative block again!
Hello stampers and happy Friday to you. Happy Canadian Thanksgiving to you too! I was hoping to host a Canadian Thanksgiving dinner here for my Dutch friends a week later but when I went to order a turkey I had a little sticker shock. A 12 pound turkey was going to cost me 120 euros. That’s about $160. I couldn’t do it. Instead I will share a few of my creations from the last month that have a nice fall vibe.
Apples Make Me Happy
Thanksgiving needs to have pie and one of those pies should be an apple pie. The other two should be pumpkin and pecan because we all know that you need at least three pies to choose from! I made this fun apple card a couple of weeks ago and I just love how the apples turned out.
When the kids were little we used to go apple picking at the local orchard and then we would go home and make a ton of applesauce together. Of course there would also be a few delicious apple pies made. Great memories and great scrapbook pages!
It’s hard to believe but these cards are almost exactly the same size. One is American sized and the other European A4 size, so a little longer and narrower. Which one do you like better? You can see the video tutorial here.
Matchbook Treat Holders
Looking for a super simple treat holder? This matchbook treat holder is so easy but so very cute. I used the Hello Harvest bundle to make them and the Rustic Harvest paper.
This is what it looks like in the inside:
Distressed Gold Season Of Chic Card
My last fall creation has more subdued and antique looking colours. I am curious to hear what you think about this one.
If you purchase the Season Of Chic bundle then you are in for a treat! I am going to give you a 13 project tutorial bundle and each of the cards features this Season of Chic stamp set. How awesome is that?? You can see the video for this card here. I hope that you discover my YouTube channel and subscribe. It is one of the main ways that I now teach my people the art of card making!
Thanks!
Thanks so much for joining me today, I am thankful for YOU. I hope that you choose me as your demonstrator and if that is not possible, please support me by purchasing my awesome tutorials. You can find them on my blog as well, or just click here for some instant gratification. I hope you have a fantastic weekend. The links to my online store can be found below.
Hello stampers and happy Tuesday to you. With company over from Canada it is still difficult getting into a normal routine. Here is a short blog post featuring a very fun Triple Pocket Fun-Fold Card. Here are some photos as well as a video showing you how to put it all together.
Triple Pocket Fun-Fold Card
Triple Pocket Fun-Fold Video Tutorial
Seeing is believing and it is really nice to see how to make this easy fun fold. Do it a few times in a row to make sure it sticks in your brain.
A Great Day to Stock Up!
Today is a great day to stock up on your stamping supplies or to spoil yourself with a few new items. Do you know why? It’s free shipping today, for one day only on orders of $100 or more. Want to save even more? The best way to do that is to get the starter kit which is a super fantastic deal for the entire month of October. Get $206 worth of products for only $135. You can join my team here.
Thanks!!
Thanks for joining me today, happy stamping and happy shopping too. Have a super day!
Hello stampers and happy Tuesday to you all. It has been SO long since I have written a blog post so today I thought I would introduce myself as the new Mrs. van der Sar-Boot. I accidentally changed my name on Facebook using the Canadian way of spelling Dutch names. Some of you were asking about that! In Canada we capitalize the “V” but in the Netherlands they do not. So many people have a “van” which means “from” in front of their names that it doesn’t count. If you go to V in the phonebook you will not find any names there that start with “Van”. Funny, right? I also added the “Boot” because that is my maiden name and that is also often done here. Now I have to wait 60 days before I can change my name on Facebook again, those are the rules.
Mrs. van der Sar-Boot
That sure is a mouthful isn’t it? I will also have to change the watermark on my cards to take the “Bultje” off but I think I am just going to do van der Sar on there or it will take up too much room. Perhaps I will just ask Nicole who designed my watermark to show me both options. I am so glad that I have branded myself “The Pampered Stamper” as that will not change.
I thought it might be fun to share a few photos from our big day. It was such a fantastic day for us. Despite all the sorrow surrounding our wedding day with so many deaths including my Pap, Gerard’s dad, my best friend Karen’s dad on our wedding day and then my ex-mother-in-law the week after, our day was amazing. The weather was perfect, the food was great, the flowers incredible, the littles were all terrific and everyone had a great time. Our photographer captured it all in the most delightful way, what more could we ask? The best part? We are happy beyond our wildest imaginations!
What About My Business??
I thought this would also be a good time to reassure you that I am definitely keeping my business going while living in the Netherlands for the next four years. I have now been a Stampin’Up! demonstrator for seventeen years and have built a great business with a fantastic team and I want to keep that going for sure. The plan is to return to Chatham every three months or so and when I do I will do a team event and a customer event. Naturally I am hoping to grow my YouTube channel and to have you order from me online.
Right now I am doing videos at 10am EST with the following schedule:
Monday: Cheer Corner
Tuesday: Stories and Stamps
Wednesday: Stamping Through My Stash
Thursday: private Prime Time Video (free for my team but open to everyone to subscribe to here
Friday: private Training Group Video (free for my team but open to ALL demonstrators for a yearly fee here
Here is my YouTube channel so that you can subscribe and stay up to date with what I am creating.
Live in Belgium or Ireland?
Stampin’Up! is beginning in these two countries on October 4. How exciting is that? If you live there or anywhere in our European market you would be most welcome to either shop with me or join my team. You can check out the options here on my European website.
Historical Party
We had a Dutch wedding reception as well and it was held in a little café on the edge of the Staalduinse Bos. My mom used to walk and bike there with her friends and this charming café was already in existence when she was a little girl. The picture below is of us with her family. Not everyone could make it of course but it was wonderful to have so many friends and relatives come to celebrate with us.
Do you remember my friend Karen? It was so very sad that her dad died on the morning of our wedding. Of course she was unable to attend the wedding, but her and Paul were able to come to the Netherlands to celebrate with us here. What a treat.
Regular Routine
I am looking forward to getting back to blogging more regularly, I have definitely missed it. Thank you for joining me today! Have a super day.


")


")


 Specialty Designer Series Paper")
")
 Specialty Paper")
 Specialty Paper")
")


 Satin Edged Ribbon")


 Satin Shimmer Ribbon")


")
")
")


