Hello stampers and happy Tuesday to you. I know, I know. Blog posts are never on Tuesdays. This one is. Today I am sharing with you some simple cards with Fancy Frames dies. I hope you love them as much as I do!!
Fancy Frames Dies
What makes these dies so special is that they make it so very easy for you to make a stunning card with very little effort. No one will know how easy it was for you to create your masterpiece! No fussy die cutting, no cranking of lots of dies, just some pretty paper, coordinating cardstock and a few pretty gems. Sound unbelievable? Take a look!
Card Samples
Here are a few cards that I have made this week using these lovely Fancy Frames Dies. I also made a video tutorial that I will include at the end of this post.
Here is a closeup of the Abigail Rose card. I love how this card came together with all those subtle tones! The roses on the front were fussy cut from the patterned paper. “You’re always so good to others…” comes from In The Moment stamp set. The brushed metallic dots are the perfect finishing touch.
Using Leftovers
Do you see the cards above? I found some leftover Hues of Happiness paper and played with them to make these cards. The polka dot paper is one of the free saleabration items which I coloured with blending brushes and Balmy Blue ink. I love the crane turned into a stork for the baby card!
Video Tutorial
Here is a video showing you how I made some of these cards. Enjoy!! If you haven’t already, please subscribe to my channel. It’s a wonderful to stay in touch with what I am sharing. Lately it seems that Facebook is making it more difficult to find older posts and videos, so YouTube is a great alternative!!
Don’t Forget About Saleabration!
Summer saleabration is in full swing! You can order your Christmas stamps (or anything else!) and get free items as a bonus with each $60 purchase. You can see all the offerings here.
The current host code is 3S2AFM37.
Thanks so much for joining me today! I appreciate that you are a part of my stamping community, have a super day!
Hello stampers and happy Monday to you. Today I am featuring a Torn Paper Strip peekaboo card. Sadly the patterned paper that I used for these cards is no longer available. I would say that the lesson in this is to get what you really want when you see it. That is not always economically feasible but do let me know as I will always try to help you out as much as I can!
Torn Paper Strip Peekaboo Card
The premise behind this card style is to do a controlled tear in the panel on the front of your card to expose some pretty patterned paper tucked in behind. If you don’t have this pretty paper you could also create a stamped scene. I have made a video tutorial so you can see exactly how it is done. The only drawback with this card is that it is not really easy to mail. This one should be given in person!!
Do you see the difference in the two cards? The main difference is that I sponged the edges of the torn strip on the card on the left with soft suede ink. There is also a larger margin showing on this card (1/4″ instead of 1/8″) The card on the right has some ink spatters from the Deep shade of Blends.
Take the Party Inside
I finished off the inside of the card using the Grassy Grove bundle. Sponge daubers were used to add some garden green ink to the image that was stamped in soft suede. I’m really happy with how that turned out. If you want to see more cards made using this Grassy Grove bundle, check out my older blog post here.
Video Tutorial
If you are like me, it is so nice to actually see a technique in action. Here you go!! I hope you enjoy it and that you also subscribe to my channel on YouTube. Don’t forget the thumbs up!! Thanks so much. I hope that you know how much of a difference you can make to my business, even if you can’t purchase Stampin’Up! supplies from me. Simply by sharing my work you help me reach a broader audience.
Thanks!
Thanks so much for joining me today. I hope that you have a super day and that you were inspired to do some stamping of your own.
Hello stampers and happy Wednesday to you. Today I have a two minute paper miracle for you. If you have been following me for a while you may already know that my favourite things are ones that combine beauty, ease and speed. When those three things come together it make me a very happy squirrel. Paper crafting can be intricate and detailed sometimes, and beautiful things will happen but most people are short on time and patience so two minute paper miracles are wonderful! Let’s take a look at what I am talking about.
Two Minute Paper Miracle
This two minute paper miracle is brought to you with the cracker & treat box dies. I love Christmas crackers but I have never made them and seldom have I bought them. Usually they are overpriced and are filled with junk. When I saw this one in the new annual Stampin’Up! catalog I thought, here’s my chance! It is even easier to use than I had anticipated. Trust me, I am not exaggerating when I say that you can do it in two minutes. I will share both a photo with you as well as a video tutorial.
Why So Thrilled?
Why am I so thrilled with these cracker & treat box dies? Not only are they super cute and fast to make, they also work very well with our patterned paper. The dies do not cause the paper to tear, they give just the right score lines. You can also close them by simply pulling the twine tightly around them. No fussy folding required. It really is a miracle!! I can see that with something this simple, ordinary days are going to be turned into extraordinary ones. This project will also help you with your burgeoning amount of patterned paper, so you can #loveitchopit.
Video Tutorial
Here is the video tutorial so you can see how I made these cracker & treat boxes with the Rings of Love patterned paper. This paper will be free with a $60 purchase when saleabration starts on July 1. Summer saleabration is in effect from July 1 until August 31.
Thanks!
Thanks for joining me today. If you want to help grow this stamping community you can pin my projects to Pinterest or share them with your friends on Facebook. I would love if you would subscribe to my YouTube channel. It’s a great way to stay up to date on my videos and also an easy way to find old ones. If you ever need help finding something, please reach out. As always the links to shop with me are at the end of my blog. Have a super day!!
Hello stampers and happy Monday to you. There are always hidden gems in the catalog. Things that we don’t see as we are flipping through the pages. It’s not until you have them in your hands that you realize exactly how big the dies are, how sparkly the embellishments or how pretty the font of a sentiment. I did a video on YouTube showing my latest finds and I hope you like them too. I mistakenly thought some of them were from the new mini, but many are from the annual catalog. Take a look!!
Hidden Gems Video
Perfect Timing
I am pretty sure that after watching this video there might be a few things on your wish list. No problem!! Tomorrow is FREE SHIPPING but only for one day and only for orders of $100 or more. Need some more feel goods? Your order with me will help me get to my goal of taking Gerard on the next incentive trip. Selfish I know, but it would be so nice for him to meet my Stampin’Up! friends and get the royal treatment. He has been such an encouragement to me and I would love to spoil him. COVID has stopped this from happening the last three years!
If you use the current host code 9SXXT3QW you will get a free Demo Design Dream Team tutorial as well as an International Create With Us tutorial bundle. I truly appreciate your business!! To see some more sneak peek items, check out this blog post.
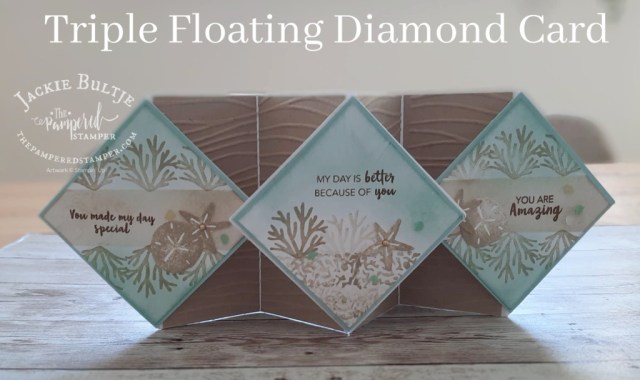
Hello stampers and happy Friday to you. Today I am going to share the Triple Floating Diamond card that my team member Barb Gourlay taught at my team retreat a couple of weeks ago. It’s a stunning card and with some clear instruction it is not that difficult to make. This blog post will include Barb’s written instructions as well as my video. I hope it inspires you to make your own card, and if you do, please share it with me, I would LOVE to see your work. Let’s take a look.
Triple Floating Diamond Card
Here is the photo of my triple floating diamond card. This style of card was designed by Scrimpingmommy from the UK. I have been unable to find her video or blog post on this card, but that is what Barb used as her inspiration. She changed up the measurements so that the card would fit in a regular North American envelope that Stampin’Up! sells.
Edited: one of my followers found the link to the original video, so if you want to make this card in metric you will find it most helpful. Just click here.
Barb’s Instructions
Here is a copy of Barb’s instructions, I hope you find them helpful!
Triple Floating Diamond Card Video Tutorial
Here is the video tutorial. The nice thing is that you can pause it whenever you need to or you can go back and watch a part again if you didn’t understand it clearly. I hope you also subscribe to my channel so you don’t miss any of my videos! There is a red subscribe button on the bottom corner of the video. It also helps if you click “watch on YouTube” when you click on the video in my blog post. Hope that makes sense!
A Little Smile Kit on Sale!
Good news! The kit that I used to make this card, A Little Smile, is on sale! All kits in the Stampin’Up! kits collection is buy one get one half price until the end of June. If you want to check out the selection, just click here. Remember, there are two different categories of kits so be sure to check them both out. When you put in your order be sure to make the second kit the more expensive one since it will be the one that gets reduced by 50%.
Thanks!
Thanks so much for joining me today, I hope you enjoyed this card. Happy stamping and have a super day!