Hello stampers and happy Saturday. When I saw the Merriest Moments hybrid embossing folder, I thought what the heck is that? The price tag was also a little hefty, so it was not among my first purchases. When I understood the concept of how these two products worked together to create a beautifully detailed and intricate frame I was sold!
Hybrid Embossing Folder
What exactly is a hybrid embossing folder? It is one that is designed to work in tandem with dies. The hybrid embossing folder gives specific, intricate detail to the dies that coordinate with it, allowing you to layer them and to mix and match features. Take a look at what I did with them. Keep in mind that I haven’t even used any of the dies that are included to cut out the various leaves, greenery and poinsettias. There is a ton of possibilities in this bundle!
My Cards
In this card I have combined Soft Succulent and Basic White cardstock with the pretty Tidings of Christmas paper from the annual catalog. I love the classic, subtle patterns in this paper pack. I made another version of this card with a bow. Which one do you like better?
For this card I used an Assorted Memories & More card as the base and a layer of designer series paper that measures 4″ by 6″. I decided to cut it in half lengthwise so that you would see more of it behind the focal point. The mini ruffled ribbon was used to “bridge the gap”.
This trick also helps you save on ribbon and that also means you save more money that you can put towards more stamps! Don’t you just love how my brain works?
Monochromatic Card with a Pop of Red
I love the elegance of a white Christmas card but the pop of red is like a cardinal in the snow. Beautiful! This is a Z-fold card. I used For Unto Us stamp set for the sentiment on the front of the card. This is the same stamp set I am using for my Gingerbread & Peppermint class which you can read all about here.
Another Tidings of Christmas Hybrid Card
This next card also uses the Tidings of Christmas paper from the annual catalog, you can find it on page 133.
Hybrid Embossing Folder and Chalk
I finally got a chance to play with my new chalk. You can find it in the annual catalog. I took a paring knife and scrape off a little of the two green chalks in the collection. I inked up the embossed and cut frame with Versamark and then I used Q-tips (cotton swabs) to apply the chalk to the frame. You could do it without the Versamark but then your colours would be more muted. For some of the greenery I mixed the two colours together for a third green.
Now is the Best Time!!
Now is the very best time to stock up on your stamping supplies and to indulge in a few new Christmas sets. Until September 30 you can get free products with each $60 purchase. It’s our first ever summer saleabration sale and it is almost over!! Have you taken advantage of it yet? Did you know that you also get a free pdf tutorial from me as a gift with a $60 purchase? Life is good!!
Want it All?
Is your wish list long? Then do yourself a huge favour and get the starter kit. It is meant for and mainly used by those who simply want their own discount. After you get the starter kit you are entitled to your very own 20% discount. There are no rules for how long or how much you order. If after 6 months you don’t meet the quarterly requirements of $400 you will simply drop as a “demonstrator”. No biggie at all.
Until September 30 you also get a free bonus bundle of your choice. You can check out the impressive list here. If you are excited about this awesome opportunity, trust me, it only gets better from here. Do you know why? It’s because you also get to be a part of an awesome, dynamic and supportive team of fun and creative people across Canada. Whooohoooo! Here is the link to join.
See it in Action
Yesterday I did a video showing the benefits of the new Stampin’ Cut & Emboss machine. Not only is it beautiful, it is also designed to be super comfortable to use and easy to understand. There is no need to remember which plates to use for which function. I also use the Hybrid Embossing Folder to demonstrate this machine, so it is worth taking a look at.
Thanks so Much!!
Do you have any idea how much you mean to me? I am ever so grateful for your interaction with me on all of my social media platforms. It thrills me beyond belief every time you comment or share my posts, when you purchase my tutorials, place an online order or join Prime Time or my Training Group. I notice each action that you take and I try to follow up with you so that you know beyond a doubt that you are NOT taken for granted.
I hope you have a super day and know that you are loved. You matter!!
Hello stampers and happy Wednesday to you. Today I have a pretty host gift box to share with you. If you have been following me for a while, you will know that boxes are not my forté. Thankfully I have a Dutch upline who is amazing with boxes, so with her help I am getting outside of my comfort zone and realizing that boxes aren’t so scary after all. This pretty gift box is made using our amazing paper that is only available as a host gift. Have you seen this paper yet??
Pretty Host Paper
Perhaps it is because of COVID, but workshops and classes seem to be something from a long time ago! Did you know that you can host an online workshop? I would LOVE to do a Facebook party with you so that you can get free stamping supplies while introducing your friends to the joys of stamping all at the same time. You can also get this paper by placing a $200 order yourself. Placing an order of this magnitude would also score you three free saleabration items!! Hmmmm….did I get you thinking?
Images of our patterned paper never really do the paper justice. I used the delicate black pattern in the middle of the bottom row to make my pretty box.
Pretty Host Gift Box
Black and white paper pairs well with a host of colours, but I am drawn to Bermuda Bay. At first I was looking to pair it with a white ribbon, but the wide smoky slate ribbon is absolutely perfect. What an elegant box to house this delicious box of chocolates. I am deeply grateful to Caroline van der Straaten for our High Tea(m) day where we made these boxes. Her box is part of the last International Create With Us tutorial bundle so you can get the step by step instructions if you want. This tutorial is FREE with a $60 purchase or you can also buy it in my online store here.
I really like that the box combines cardstock with patterned paper for a unique look. The die from the Colour & Contour bundle is perfect for threading through the ribbon. The stamp set that I used as the focal point is called Biggest Wish. Truthfully I had overlooked this stamp, but now it is on my wish list. I love the bold fonts and also the way the words can be combined. You can find this set on page 63 of the annual catalog or just click on the image in the supply list below if you want to add it to your purchase today. Now is a great time to add to your stash. There are two weeks left of saleabration where you can get free products with a $60 purchase and two options free with a $120 purchase.
Inside the Box
Here is a peek inside the box. It holds a lovely box of Lindt chocolates which just about anyone would be happy to get. I used to think it was a waste of time making pretty boxes, but now I see that there is a lot of value in giving a beautiful handmade gift. The recipient really feels the love that you made something special just for them. It turns the ordinary into something extraordinary and we need more of those surprise and delight moments in life.
Prime Time
I will be making a different version of this box tomorrow in my private Prime Time group. If you find that you are stamping less and missing classes, this might be just the place for you. It is only $10 a month and you get a regularly scheduled weekly video class on Thursdays. Every Wednesday I post the supply list and measurements so you can play along with me on Thursdays. You also get a FREE pdf tutorial each month which is valued at $15 to $25. This perk alone makes this group a fantastic investment. If you want to join, just click here.
Stay Tuned!!
I am really excited about hosting a Facebook party that will give us a chance to have fun together. Let me figure out all the details and then I will get back to you. In the meantime, I have homework for you! Grab a piece of paper and write down some names of people who could use some fun in their lives. Tell them about this idea and then choose whether you want to get together to stamp using one kit to share or whether people want to order their own kits. We have lots of great kits to choose from so we don’t all have to use the same one. I already know which kit I want to use. It’s the new one from the holiday catalog which is now available: Christmas Whimsy.
Thanks so much for joining me today. I hope you were inspired and that you are also excited to share the joy of stamping with your friends. Let them decide if they want to try something new, don’t decide for them!
Hello stampers and happy Monday to you. Did you know that you can get the gorgeous Peaceful Prints Paper for free? This paper is part of the summer saleabration campaign. Perhaps you have been so busy recovering from COVID stress and concerned about a possible fourth wave that stamping has taken a backseat in your life.No worries! There is so much exciting stuff waiting for you and it is not too late to take advantage of saleabration. It goes until September 30. Here is the link to all the saleabration offerings.
Peaceful Prints Paper
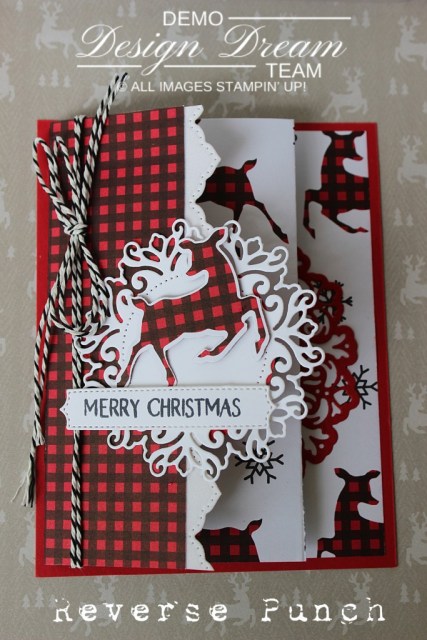
This beautiful paper is free with a $60 purchase and with that purchase you are also entitled to the huge tutorial bundle that this card is a part of. What I especially love about this paper is that it coordinated with our Peaceful Deer Bundle on page 26 of the holiday catalog. The Peaceful Prints paper has Garden Green, Real Red, Cherry Cobbler, Sahara Sand and Basic Black in its designs. You can punch the buffalo plaid deer out with the punch and in my YouTube video I show you how you can punch them out in BOTH directions which is a super cool trick. Check it out below.
Peaceful Prints Fancy Fold Card
I’m so happy that I decided to go back and check on my previous blog posts because I thought I had already blogged about this card. I love it so much!! This paper is stunning and I don’t want you to miss out on it. I am not going to share how I made the card because that information is all in the tutorial that you can get for free with a $60 purchase. You can also purchase it for $20 US if that suits you better. This particular tutorial focuses on the saleabration and holiday catalog so there is lots of variety for you and of course tons of talent!
A Hidden Gem
Do you see that gorgeous focal point? That buffalo plaid deer really stands out on that lacy white circle doesn’t it? Do you know where it comes from? Let me tell you! Check out page 70 and page 159 in the annual catalog. Encircled in Beauty is the name of the dies and the bundle is called Encircled in Friendship. Wait. It gets better! There is another stamp set in the holiday catalog that also coordinates with these dies making it an even better investment. That stamp set is called Encircled in Warmth. All the links to these products will be at the bottom of my blog post, you can simply click on them and then shop in my online store. How excited are you??
One More Photo
Have you noticed when you look at a pretty card that someone has either given you or is sharing with you so that you can be inspired that you look at it closely? I know that I like to check it out from different angles so that I can see all the details. A blog post can be that way too and I like to share a card from different angles and perspectives. Sometimes due to time constraints this is not possible, but when it is, it does make me happy to do so.
Don’t you love how the black and white twine from the Playful Pets Combo trim pack looks with this paper? It made me super happy too. I hope you enjoyed my card today and that you feel inspired to make one of your own. It’s always nice to have a few fancy Christmas cards made ahead of time for the special people in your life. Who are you going to send yours to?
Sharing the Joy
I have decided to start beginner card classes in the Netherlands. It’s time to share my joy of stamping with new stampers and I intend to share that journey with you as well in the hopes that you too with share your hobby with new people. Often I remind my team to consider how happy they are when they are stamping. More people could use that type of joy in their lives. I know that before I started stamping I had no idea that papercrafting would be something that I would enjoy and excel at. You just never know how something simple like stamps, ink and paper can change a life.
Thanks for joining me today! I hope you jump on the saleabration bandwagon before it is too late. Happy stamping and happy shopping. If you need inspiration, check out my tutorials here and indulge. You deserve it.
Hello stampers!! It’s so good to be back to share my love of stamping with you. Today I will be blogging about the Christmas Whimsy card kit. You may have noticed the cute whimsical images at the beginning of the holiday catalog and wondered where to find this kit. It is now available! Let’s take a look.
Christmas Whimsy Card Kit
The Christmas Whimsy card kit is part of our online kit collection. Kits are no longer available in the catalog and I will tell you why. In the past our kits were a bit confusing. Some included the stamp set and ink spot, and some didn’t. Some had instructions for the cards and some didn’t. There were different price points and sometimes our kits sold out. Now the kits are all the same price and they all include the same basics: an ink spot, a stamp set, a clear block as well as all the consumable products needed to make your cards. All available kits will be seen online. When they sell out, they will be gone and this will eliminate the frustration of trying to order something that is either back-ordered or sold out.
I don’t know about you, but these whimsical Christmas cards remind me of Nordic Christmas folk tales. They bring me back to my childhood, although I realize that probably has more to do with nostalgia than reality!
The Whimsical Christmas kit also comes with a versatile stamp set so you can finish your cards beautifully and then use this stamp set for other cards too. Take a look!
Why Get This Kit?
I am on a mission to get my stampers to share their hobby with others! The past two years have taught me that this amazing hobby has more meaning and purpose than ever. Let’s try and give the gift of stamping and creativity to more people. I think we can all agree that we need more joy in life. More moments to treasure, to slow down, to enjoy the little things and each other. Less screen time. Less loneliness.
If you are a seasoned stamper, I would encourage you to get this kit or a different one if you prefer. Invite a few friends over if you feel comfortable having people in your home (I know at first it can feel a little weird after all this time of isolation!) Take a photo of your group enjoying the kit and I will send you a surprise in the mail!! Click here to order your kit in you live in Canada.
A Personal Note
I thought you might want to get up to speed what is happening in my life. Gerard was finally able to visit me from August 28 to September 7. Yesterday we were able to fly back to Holland together, which was so very lovely!! Our first time flying together and not having to say goodbye at an airport. When the KLM crew heard about this and the rest of our story they surprised us with a tray of champagne in real crystal stemware, chocolates and nuts as well as a handwritten postcard. Quite unforgettable really!
We had a whirlwind tour including a wonderful two day visit with my parents, my cousins on my mom’s side and then a visit to Ottawa and Montreal. Having five kids has never felt so busy as now!!
Thankfully my back is doing much better. I was concerned about the plane ride, but I managed just fine. It helped that we had an extra empty seat beside us and I could lay down for a while with my head on Gerard’s lap! His lap was much cosier than the seat armrest!
Sharing What I Love
I hope that you will join me on Tuesdays for the weekly virtual coffee and a card classes. At 10am EST I will be live on YouTube and on Facebook I hope! I am going to do a trial run and see how the internet is doing here at Gerard’s house. He has made some changes and has done his very best to make this possible. If the speed is not sufficient then I will prerecord these classes for the highest possible quality.
Blogging should be back up to speed again as well. I do love connecting with your this way and it keeps me creating. This time I brought a LOT more supplies with me so that my creativity isn’t stifled. I am also trying to set work hours. In the past when I was in Holland I often slept in thinking that all my people in Canada were still sleeping too. This became a bit of a problem because I was often on my computer in the evenings and then it seems like I am working all the time and that is not healthy for a relationship! We’ll see how it goes. Let me tell you, 7:30 came way too fast this morning but I did it!
Thanks for joining me and I hope you have a super day. Looking forward to sharing what I love in Holland too.
Hello stampers and happy Wednesday to you. I am thrilled to present to you an online and in person class called À la Carte Christmas Class. This class will take place online on Thursday October 28 at 7pm EST and in person on Saturday October 30 at 10am. You will make ten gorgeous cards regardless of which option you choose. You will receive a class kit that will include more items than you will need to complete your cards so that will be a LOT of fun. Let me explain how it works.
À la Carte Christmas Options
I called this class À la Carte Christmas Class because you have three options to choose from as to which format you choose and then at the class you can also choose which cards you want to make with your kit. Lots of options for you to personalize your experience. You can even choose to join in on the online event on Thursday and then come in person on Saturday as well.
All options include ten cards, a kraft gift box and a package of Gingerbread & Peppermint acrylic shapes. The base price for this is $35 plus $5 shipping anywhere in Canada.
The regular class also includes a stamp set of your choice. You can choose between For Unto Us OR Holly Jolly Wishes. For this option you will also receive 6 iridescent snowflakes. The price for the regular option is $55 plus $5 shipping if you need it shipped.
Lastly there is the deluxe option at $120. You get all the things that are offered in option one and two PLUS the Frosted Peppermint bundle as well as a 6″ by 12″ piece of white velvet and red velvet paper.
Video Tour of this Class
There are so many cute details on these cards and they are finished beautifully on the inside and even on the back!! You can check it out in this video tour as well. Seeing is believing!!
Here is a closeup of one of the cards so you can see just how lovely they are up close.
Here is another look at all the cards. Remember, you will be making ten cards in any combination that you like. Included in your class is a half a package of the Gingerbread & Peppermint Memories & More collection which means ten large cards and envelopes, two sticker sheets, three “baking racks”, 18 3″ by 4″ cards and 9 4″ by 6″ cards.
Ready to Join This Fun Class?
I have tried to make it really easy for you to join this À la Carte Christmas Class. You can just click on the button below and choose your option. I am looking forward to crafting with you either in person or online!


")
")
")


 Glittered Organdy Ribbon")
 Mini Ruffled Ribbon")


 Host Designer Series Paper")

 Smoky Slate Textured Ribbon")
")

")


")
")


 Specialty Designer Series Paper")


