Hello stampers and happy Monday to you. I finally got to using the Forever Forest bundle. It was a little comical watching me make this card because at first it didn’t look like it was going to amount to much! Check out the video later on in this post to see for yourself. Take hope! Blunders can be fixed or minimized.
Video Tutorial
More Inspiration
Do you know how I check to see if I ‘need” a new stamp set? I put the name of the stamp set and then “Stampin’Up” behind it in the Google search. Then click on images. Grab a coffee or tea and scroll. If you are suitably inspired, then you click on order now! Here are a few other cards that I found that I loved, using this bundle.
You can check out Cheri’s blog post here to read more about this stunning birthday card.
Check out Catherine Proctor’s blog here to read all about this great card.
Thanks!
Thanks for joining me today on my blog. I hope you were inspired, not only by me, but also by my fellow Stampin’Up! demonstrators. Together we CAN change the world one card at a time.
Hello stampers and happy Saturday to you. Yes, I am catching up on my blog posts or these Christmas projects will no longer be relevant!! Today I used the Stars at Night Hybrid embossing folder and the deckled circle dies to make a beautiful Christmas ornament.
Video Tutorial
The Catalog as Inspiration for my Stars at Night Ornament
I used the catalog for my inspiration for this ornament. The Stampin’Up! designers used a gold metal circle purchased from Amazon, but I didn’t have these, so I improvised. If you sandwich two deckled circles together with the cording in between you get a lovely and relatively sturdy ornament. Also much cheaper!!
I hope that I have inspired you to use your paper for things other than cards. If you want more inspiration AND you want to pay it forward, then join me for my Christmas Magic party on Wednesday December 13 at 10am EST or 4pm in the Netherlands. You can join for free with a $60 order OR you pay $20 which will go to kits for the Women’s Shelter and Mental Health support groups. Here is the registration form.
I hope you join me for some paper crafting fun! We will make tags, bags and ornaments and perhaps even a box!! Together we really CAN make a difference. Please share this post if you care.
Happy Friday stampers! Can you believe that I made these cards in September and am finally posting them now?? Deckled Circle dies are really a fantastic addition to your stack. Do you know why? There are 14 of them and the largest one makes for a very lovely and large card, just shy of six inches!!
Read on to find out how I got these layers, it’s much easier than it looks.
Lots of Layers with Deckled Circle Dies
Stamp your image on a six inch square piece of very vanilla cardstock. Cut out by layering on three circle dies (second largest, fourth largest and sixth largest) Fold a piece of Early Espresso cardstock in half. Place the largest circle die so that the top of it is beyond the fold line. You will see open space. Then run it through your die cutting machine. You will have a circular card base. Using the third and fifth largest dies, cut out Shaded Spruce circles.
Adhere your largest stamped circle on the Early Espresso card base, then the Shaded Spruce layer, then the next stamped circle….repeat. Embellish with some die cuts from Joy of Noel. I used some retired red glimmer paper for the holly berries.
For the inside of the card I just stamped part of the Graceful Deer image in Pecan Pie along the right edge. Making spirits bright was stamped in Real Red.
Video Tutorial
Watching the video is much easier that figuring out the written instructions. I had forgotten that I had a video for this otherwise I wouldn’t have written out the instructions. Is that lazy or is that smart? Which way of learning do you prefer?
How is your December going?
I try not to get into the Christmas countdown as it does stress me out a bit and for what reason?? It’s just silly. One day at a time and enjoy each one. I should make some lists so that I have things planned out, that really does make a difference. Are you organized like that? Any tips for me?
If you are looking to spoil yourself, check out the deals online as well as the beautiful items that are retiring. Get them before they’re gone and ensure that you have just what you want under the tree!
Cozy Cabin Winter Retreat
This might be the nicest gift to give yourself. A few days away with fellow stampers getting spoiled with great food, fun stamping and some great business tips if you are a demonstrator. You can read all about it here.
If you can’t make it for the full retreat, you can also join in for a full day of training and treats. Get two stamp sets as well as sample class ideas. More details here.
I hope that you have a super day, thanks for joining me today.
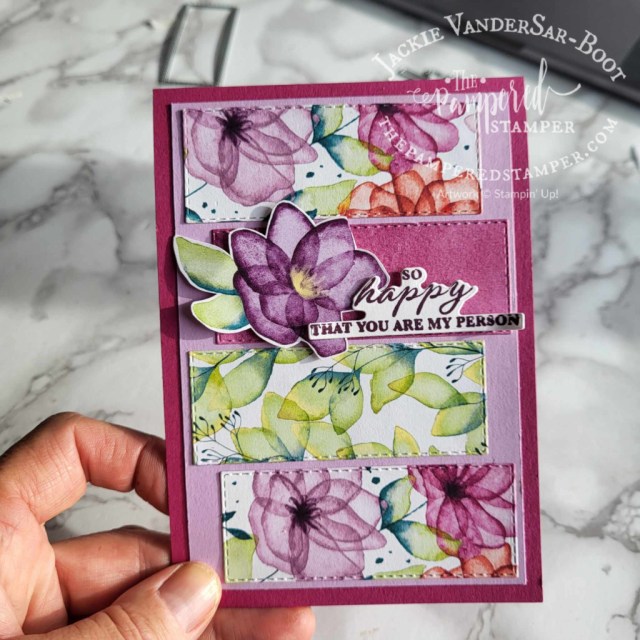
Hello stampers and happy Wednesday. Today I have some gorgeous Delightful Floral cards for you. This paper is simply stunning and can be found in the Online Exclusives section on the Stampin’Up! website.
For this first card I cut out some of this lovely Delightful Floral paper with the rectangle stitched dies. The flower was also fussy cut from the paper. The sentiment is from Wonderful Thoughts stamp set and dies.
For this card below I used two different pages from the Delightful Floral paper pack and embossed right on the patterned paper. These sentiments are from Sentimental Park.
This cute card uses the small Assorted Memories & More card as well as a label die cut from Sentimental Park and the Delightful Floral paper. One side of this paper is a stunning watercolour wash that is fantastic for stamping on.
Below you can see the trio of cards that I made using Sentimental park stamp set and dies as well as the Delightful Floral paper. It was quite addictive once I got started!! Remember, a set of matching cards can make a very thoughtful gift to a non-stamping friend!
I forgot to include in the product list that the dies and the sentiments for these last three cards are from Sentimental Park.
Video Tutorial
I always try to include a video tutorial in my blog posts because I am a visual learner. Do you learn that way too?
Thanks!
Thanks for stopping by my blog today. I hope you were inspired and that it was also refreshing to see some cards that are not Christmas cards. Of course I am also in full swing for making Christmas cards but I still had some blog posts in the wings waiting for me to complete them and post them. Want to create these cards at home and live in Canada? You will make my day if you click the links below to shop with me. Hopefully I will then make your day by sending you a free pdf tutorial bundle!
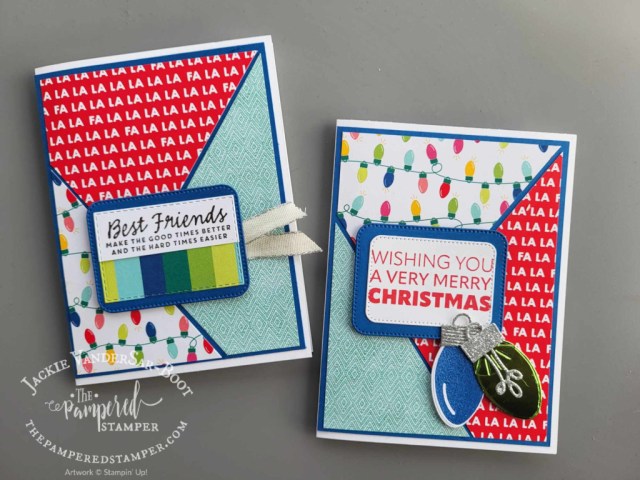
Hello stampers and happy Monday to you. Today I have a very fun technique to share with you. I call it the Diagonal Stack and Shuffle technique. It was my squirrel friend and fellow Canadian demonstrator Tamara Bertram who first showed me this style of card. What fun!! Just like her. To make it even easier for you I have also made a diagram to show you how and where to cut your patterned paper to make it work. Further on in this blog post you can also watch the YouTube tutorial that I made to make three lovely cards using Winter Meadow designer series paper. Not only is this paper gorgeous for Christmas cards, it is also great for sympathy and get well cards. Shall we take a look??
Here you can see a closeup of how well the “bling” matches the paper. They are called Tinsel Gems.
Diagonal Stack and Shuffle cards with Christmas paper
This technique is also fantastic for Christmas cards or just a thinking of you card. The sentiment on the one card comes from Nested Friends and the other is from Joy to You.
Video Tutorial
In this video I not only show you the diagonal stack and shuffle technique, I also explain a family favourite game. This dice game is great for all ages and has provided countless hours of joy for my parents. Gerard and I even played this game with Messenger video chat during COVID. Enjoy!!
Diagram for Measurements: Diagonal Stack and Shuffle Technique
Here is a diagram that I made to help you “see” it rather than just watch the video. I think it is a helpful tool.
Thanks!
Thanks for joining me today! I hope you were inspired and that you have fun with this technique. Below you will find a product list that is also a link to my Canadian online store. Have a super day. Hugs from Holland,


 Designer Series Paper")


")


")


 Specialty Designer Series Paper")


")
 Specialty Paper")


 Designer Series Paper")


")


 Designer Series Paper")
")


 Foil Sheets")
 Designer Series Paper")
")

 Designer Series Paper")


