Be still my heart!!! The Bee Mine suite is SO stinkin’ adorable. I am all pumped for my Fourteen Days of Love. Join me as I made an adorable project every day from February 1 to 14. If you want to create along with me you will need to purchase the following supplies:
Bee Mine Suite
Black gingham ribbon
Real Red, Daffodil Delight, Granny Apple Green and memento black ink pads.
Deckle Circles dies
Basic Black, Real Red, Basic White cardstock.
More Than Just Cards
Here is a cute little home decor piece that I made with the Bee Mine Suite. I used a frame that I already had on hand. The opening for this frame is 4″ square, but what you see is only 3 1/2″ square. What an adorable way to show your people that you love them?
Fourteen Days of Love
I got the idea for Fourteen Days of Love from fellow demonstrator Darla Watson. These Bee Mine projects below were all inspired by her tutorial. I changed things around a bit but her tutorial was super helpful. Stay tuned as I plan to make my own tutorial as well!!
Hello stampers and happy Thursday to you. Today I am sharing a gorgeously vibrant Tropical Leaf card. There are so many great watercolour tips to be gleaned from my video tutorial. Many thanks to Tami Hewlett for sharing her gorgeous card that inspired me! I hope that I inspire YOU to try this fun card!!
Tropical Leaf Bundle Card
If you want to enjoy a blast from the past, consider checking out this blog post from 2020 where I watercolour adorable rainboots.
Five Watercolour Tips and Tricks
Use either Fluid 100 watercolour paper from Stampin’Up! OR the retired Shimmery White cardstock for your background and your leaves.
Ink your leaves with three shades of green starting with the lightest shade. Spritz lightly with water and tilt your stamp so the colours run together a bit.
For the background ink up your E. block in Azure Afternoon and Tahitian Tide. Spritz lightly with water, let the colours run together a bit and press into your background layer.
If you have excess ink, absorb it with a piece of paper towel or toilet paper! It’s amazing how well this works!
When your background is dry, tap a water painter so that a few drops fall down. This gives a great effect.
Video Tutorial
For these types of watercolour tips, watching a video is always pure gold!! I hope you enjoy watching this amateur get some pretty awesome results. Trust me, I was very nervous to share this with you not knowing how it would turn out.
Inspiring Each Other
I am humbled and grateful at the inspiration that I gain from my fellow demonstrators. Without Tami Hewlett’s inspiration, I would never have made this card. I didn’t watch her video or even read her blog post, I just saw her card and started playing. Now I see that I used different ink colours than she did and the results are still fantastic. Where to you seek your inspiration?
My hope that when you see me trying new things, you will also feel empowered to do it as well. Creativity is so thrilling!! Have a super day, and please shop with me if you live in Canada or in Europe, your business keeps me going!!
Hello stampers and happy Saturday to you. I know! A blog post on Saturday? This free split sponging technique Zoom class is so exciting to me that I just couldn’t wait to share it with you. While you are reading this blog, I am sharing this card with the 25 Dutch demonstrators that came to my High Tea and Paper Pumpkin event. When demos get together we usually like to swap. That means that I will be sharing my swap cards with you in the next little while.
Free Zoom Class with the Split Sponging Technique
Why do a free Zoom class? I’ll be totally honest. The truth is that running my business online can get a bit lonely. With the fact of living in two countries and traveling a lot back and forth, it is difficult to hold consistent in person classes. While I love creating video tutorials, I thought it would be a nice change to be able to see you as well. Creating a lively stamping community is dear to my heart. Here is the link to the event where you can also get the Zoom link to join in on this free class which will be on Tuesday May 9 at 4pm CET which is 10am EST. You can google what time that is in your time zone.
Split Sponging Technique Cards
Here you can see what we are going to be creating. It’s really so simple, yet so striking. Huge thanks to Jay Soriano for sharing this technique and layout. If you want to see more cards made with Artistically Inked, check out this blog post.
Of course I couldn’t leave the inside of the card blank, so I stamped the small flower from Artistically Inked in the inside using Melon Mambo and Parakeet Party for the leaves. You can really see the distINKtive design of this stamp. Basically this means that you get a variegated colour with just one simple stamp. I love how artistic this makes me look and feel!
What to do before the free Zoom class
First of all you are going to want to put the date and time into your calendar on your phone so that you get a reminder. Then click “going” on my event page so that I know I won’t be stamping alone. Be sure to check out the supply list below to make sure you have what you need to play along. Questions? Message me; I love to help.
Zoom Recording
Did you miss the free Zoom class? Here is the recording for you. Enjoy!!
More Resources
If you already have the Artistically Inked stamp set you might want to get this pdf tutorial bundle which is now half price!
Thanks for joining me today. If you like what you see, please share either on Facebook or Pinterest. Comments are always appreciated too! Have a super day.
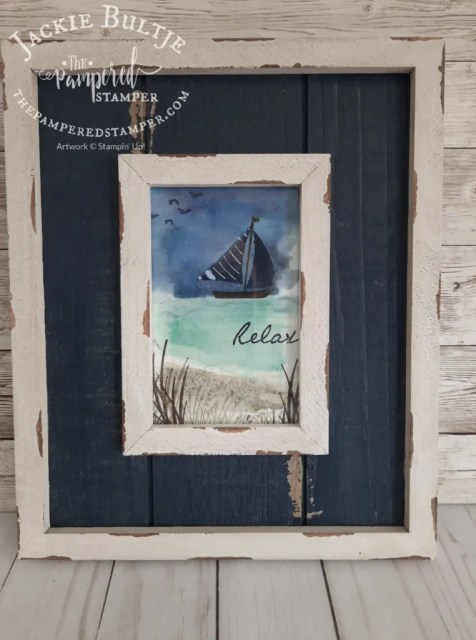
Hello stampers and happy Wednesday to you. This is the first Wednesday of the month and that means it is the Monthly Global video hop. The theme is Anything but a Card. I chose to do a home decor piece. Aren’t you supposed to do something everyday that scares you? I chose to make a watercolour painting with stamps. Let’s take a look.
Anything but a card
Did you know that Stampin’Up! carries watercolour paper? It comes in 5″ by 7″ pieces but I had to cut it down to 4″ by 6″ to fit the opening in my frame. Don’t throw those extra strips away! They are perfect for practicing different techniques and for trying different amounts of water saturation.
Here you can see it unframed.
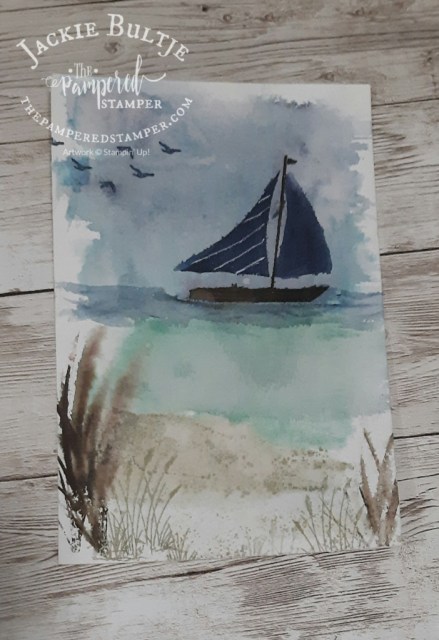
My First Attempt
This was the first watercolour I did and then I forgot to take a picture of it in natural light. These photos were taken at night so they’re not the best, but they will have to do. I like this version too. You will notice that I had a little too much water on my reeds.
I’m Curious!
Which watercolour do you prefer? The one with or without words? When you tackle a project like this each one of your attempts will be different. It is so much fun and your pack of watercolour paper comes with ten sheets! What are you waiting for?
Video Tutorial
Here is my video showing you how I did it.
Hugs from Holland
By the time you are reading this I am spending my fourth day in Holland already! I am so excited to share pictures of Holland in the spring. This is the first time that I am in Holland for early April. It is also my shortest stay in quite a while, just a month this time. Thanks for joining me today and happy stamping!
Hello stampers. Did you know that I am now doing a regular Facebook live every Tuesday at 7pm EST? I am calling it Coffee and a Card revisited since I make all three cards from Coffee and a Card class that morning. I’ve done it twice now and I am really loving it. Last night the third card I made used Pigment Sprinkles. After I showed how I made my original card there was a lot of interaction and suggestions and the result was some different cards which I will share with you today. Facebook live is the next best thing to actually coming to a class. It’s even better when it turns into a play session! Thanks to everyone who joined me last night. If you missed it, you can still catch it here.
First I will show you the card with the three little silhouette children. We decided in class that it was better without the squirrel. He simply didn’t fit the theme or the look. What do you think? The so saffron layer is 3 3/4″ by 5″. You add the tree branch after you put the saffron layer on the blueberry bushel card. Trim off the excess tree by turning the card over first.
The next card uses only the gorgeous grape pigment sprinkles. When I did this one of my viewers immediately spotted the face of a bear. She is so right!!
The next card used two colours of pigment sprinkles, mango melody and granny apple green.
We noticed last night during the Facebook live that the colour of the pigment sprinkles doesn’t first match the colour on the lid. But when you add water the magic happens! I embossed the sentiment in shimmer black embossing powder as well. I wasn’t sure if it work well for words, but it does indeed.
I had made this card at coffee and a card class. Remember that with pigment sprinkles, less is definitely more. For this one I used gorgeous grape, melon mambo and bermuda bay. I love the white space on this card. The sentiment is from the July Paper Pumpkin On My Mind. I matted this one on gorgeous grape for a totally different look.
This last card I have dubbed “engagement” card since it was the result of a suggestion from one of my Facebook live viewers Dianne Bazelmans. She suggested that after sprinkling on the pigment sprinkles and spritzing with water that I drag the block across the paper. I like how it turned out. You do notice that the colours tend to blend together as you go across the page. This girl is swinging before an evening storm. I totally forgot to add the branches but I like it like this as well. I will add a branch later, right now I need to head off to pickleball. I will post it on my Instagram and Facebook for you to check out there.
Thanks ever so much for joining me today. Remember it is the last day for Bonus Bucks today. Spend $60 and get a $6 coupon code to use in August. It’s not huge bucks, but it is a lot better than nothing and it all adds up. Have a super day. (don’t forget to help me out by pinning some of my cards or even sharing this post on social media)
Hello stampers! Framed samplers are so much fun to make and to display, but this Crafting Forever one is ideal for your craft room if you are lucky enough to have one. You could also make it as a gift for your favourite crafty person. I made it specifically as a thank you for all my club members. They make a commitment to meet five times a year to make cards with me and place orders and I think that deserves a reward. Lasting friendships are made through my clubs and that is the very best part for me too. I always tell “my people” that attending classes is the best thing that they can do for their hobby because it ensures that they use the things they buy. When you go to classes you are inspired to create. You learn new things and that motivates you to put your knowledge into practice and to share what you love with others. Homemade gifts never go out of style. Shall we take a look at this beauty?
This sampler measures 8″ by 10″. I might tweak it a little bit yet and I always encourage my class attendees to feel free to make it their own by adding or changing the embellishments or anything else they with to change. I think I will add a little bling to the top left square. You could also choose to colour in the cafe image on the bottom left rectangle. Everything was stamped on whisper white and matted with basic black. I used an assortment of Blends to colour my images. There is a LOT of fussy cutting. The only truly fussy one was the clay pot with the brushes. The wine glasses were stamped on shimmery white cardstock which makes them look more like glass. They are a different shade of white so they pop off the white background subtly. I bought the frame at Michael’s, it is part of their everyday value collection, so it was only $12 in Canada.
I thought I would show you what it looks like outside of the frame so that you can properly place your elements on the 8″ by 10″ white insert. Would you like some measurements?
wine and scissors rectangles: 5 1/2″ by 2″ (white) 5 3/4″ by 2 1/2″ (black) each
spools: 2 5/8″ by 2″ (white) 2 7/8″ by 2 1/4″ (black)
Crafting and pens: 2 1/2″ by 2 1/4″ (white) each, 2 3/4″ by 2 1/2″ (black) each
get creative- 2 1/4″ by 4 5/8″ (white) 2 1/2″ by 4 7/8″ (black)
You can adapt this to your favourite colour scheme. For a complete list of products that I used, just scroll down. I was inspired by Chris Galbraith, you can find her sampler here.
I used an aqua painter to make a swoosh of smoky slate under the clay pot of brushes. SInce I was using regular whisper white cardstock I had to just make a quick swoosh. You do not want to add a lot of water to this paper or it will disintegrate. It might have been a better choice to just stick with Blends. You can see from the picture that some of the elements are popped up to add visual interest. I used the little background dots from Timeless Textures to add some interest to the scissors rectangle. I first stamped them in smoky slate (second generation stamping which is the new way of saying “stamped off”) I also used second generation stamping in daffodil delight and berry burst. I wanted to add some berry burst to the stamped images to tie in the berry burst metallic edged ribbon. This gorgeous ribbon is retiring, so get it before it’s gone!
Thanks so much for stopping by today, I hope you enjoyed this post. Happy stamping!


")
 Gingham Ribbon")


")


")


 Metallic-Edge Ribbon")


