Hello stampers and happy Monday to you. Masking Paper and Blending Brushes add up to a lot of fun AND some pretty awesome cards. I will be teaching these cards tomorrow in person and I am so looking forward to that. Today I also made one of these cards for my weekly Cheer Corner which is live on Facebook every Monday at 10am EST or 4pm Central European Time.
Video Tutorial
Three More Cards with Masking Paper
I must admit that I used our retired layering ovals dies to make the mask for these cards. Here’s hoping that they end up in our new annual catalog on May 1!
Thanks for joining me today. If you live in Canada you can get these products in my online store by clicking the links below. Live in Europe? Then you can shop with me here or join my team. Have a super day!!
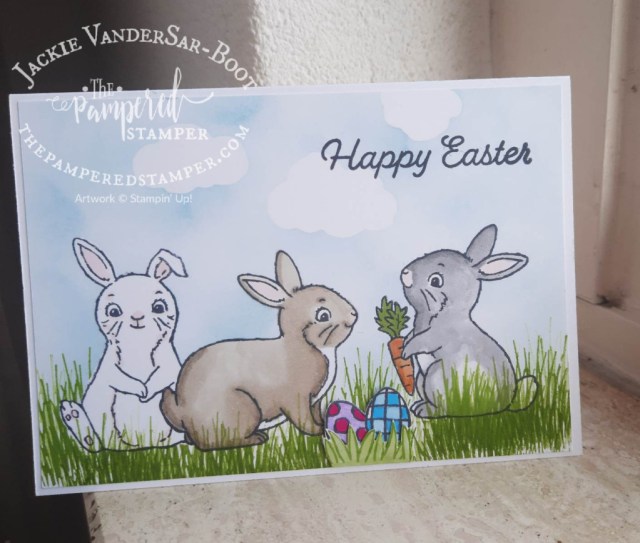
Hello stampers and happy Friday to you. Today I am sharing a masked Easter bunny card with you. If you don’t celebrate Easter or send cards for Easter, you could also use this for a spring card, thinking of you or birthday. I used a simple masking technique to create this scene. The masks were used in two ways. The first was to make it look like one bunny is sitting in front of the other one. Secondly, I used die cut clouds with masking paper to make the beautiful sky.
Masked Easter Bunny: With or Without the Carrot?
Which white bunny do you prefer? The one above holding the carrot, or the one below without a carrot? Little details can really make a difference. In the bottom card I decided to add some Easter eggs in the grass but they looked funny just sitting on top of the grass. What did I do? I cut a slit in the card with my paper trimmer and tucked the eggs in to the grass that way. Then I stamped some grass, fussy cut it and put it in front of the eggs for a more realistic look.
Easter Bunny Class in Chatham, Ontario
On March 29 my team member Kylee McCutcheon is teaching a class with the Easter Bunny bundle. She still has room for you!! Here is one of the cards that she will be making along with two treat holders and a second card. You can find the link to the event page here where you can comment below the class that you like and the person teaching that class will contact you to arrange payment and other details.
Thanks!
Thanks so much for joining me today on my blog. Leave a trace that you were here and take a moment to comment, that really makes my day. The bunny punch is backordered right now and will be available in the middle of May but the stamp set is still amazing to use without the punch. Click on the images below in the product list if you want to shop with me in Canada. Easy-peasy and you will get a free tutorial bundle if you do so! Have a super day.
Hello stampers and happy Tuesday to you. Today I am sharing a gorgeous vintage Abigail Rose card with you. Vintage cards usually have lots of layers and more muted colours as well as distressing, torn and curled edges as well as linen thread or lace trim. My card uses the lovely Abigail Rose paper. For a complete list of the products used just scroll to the bottom of this post to the product list.
More than just a product list
Here is a closeup of the vintage Abigail Rose card. You can see the background stamps in crumb cake. I spritzed the paper with rubbing alcohol and then scrunched it up into a ball. Carefully unscrunch it and then let it dry. You can do the same thing with water but the alcohol will evaporate more quickly. Use your blending brush and crumb cake ink to distress the paper. The ink will gather in all the creases for a great vintage look.
Back to that product list. Did you know that it not only a convenient list for you to see what I have used? If you are a Canadian you can click on these links and you will be automatically transported into my online store. Of course I would be thrilled if you did order from me and then I would send you at least one free tutorial bundle as a thank you.
Free Tutorial Bundles?
Which free tutorial bundles do you get with a purchase? Good question. I am a member of three tutorial teams. The first is the International Create With Us tutorial bundle team. This group has demonstrators from around the world, many of whom have been Artisan team members. These tutorials are free with a $60 purchase but also free to team members. The second team is the Demo Design Dream Team which is mostly Americans with two token Canadians, also free with a $60 purchase. The last one is the Bundle Bonus group which is free with a $35 purchase. Let me know which one you want if your order is close to $60. If it is over $120 you get all three!
Video Tutorial
Here is the video I did showing you how to make this fun card. For your information, the Bundle Bonus group has a tutorial bundle on this bundle for this month! Happy stamping!
Have you subscribed?
If you haven’t subscribed to my channel yet, be sure to do so! If you subscribe, please let me know in the comments here and comment on your favourite video. You will then be entered into a draw for the Eden’s Garden bundle. When I get to 5400 subscribers I will do the draw. Thanks so much for joining me today and have a super day.
Hello stampers and happy Wednesday to you. Sweet Citrus is just such a fun bundle to work with. Did you know that it has a hybrid embossing folder? That means that it can cut and emboss at the same time. It’s even more special than that! You can also stamp your image first, then cut and emboss at the same time for incredible results. I had SO much fun playing with this Sweet Citrus bundle.
Sweet Citrus Hybrid Embossing Folder Cards
Let’s take a look at a bunch of cards that I have made in the last little while. I even have more than one video tutorial using it, that’s how much I loved it!!
The card on the top left with all the different citrus is a private video on my Prime Time group. If you want to join this group, you can read out it here.
The detail in the Sweet Citrus suite is just incredible. You can almost taste the lemon!!
Video Tutorial
It’s a bit over the top to share two videos in one blog post, but now you are getting all things citrus in one fell swoop!! I hope this brings a fresh foretaste of spring into your day. Here in the Netherlands the daffodils are blooming and spring is in the air!
More Inspiration from the Web
I was browsing online looking for an Easter Bunny card for one of my team members when I came across this amazing gift card holder. Guess what? It also uses the Sweet Citrus bundle so be sure to check it out and be blown away. Click here and thank me later.
Thanks for joining me today. Just a gentle reminder that saleabration is almost over, so be sure to get your freebies while you can! Live in Europe? Shop with me here or join my team for your own discount! To see all the offerings in Canada, just click here. Have a super day!!
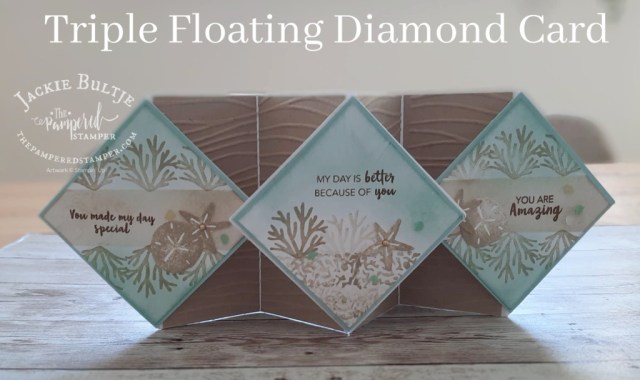
Hello stampers and happy Friday to you. Today I am going to share the Triple Floating Diamond card that my team member Barb Gourlay taught at my team retreat a couple of weeks ago. It’s a stunning card and with some clear instruction it is not that difficult to make. This blog post will include Barb’s written instructions as well as my video. I hope it inspires you to make your own card, and if you do, please share it with me, I would LOVE to see your work. Let’s take a look.
Triple Floating Diamond Card
Here is the photo of my triple floating diamond card. This style of card was designed by Scrimpingmommy from the UK. I have been unable to find her video or blog post on this card, but that is what Barb used as her inspiration. She changed up the measurements so that the card would fit in a regular North American envelope that Stampin’Up! sells.
Edited: one of my followers found the link to the original video, so if you want to make this card in metric you will find it most helpful. Just click here.
Barb’s Instructions
Here is a copy of Barb’s instructions, I hope you find them helpful!
Triple Floating Diamond Card Video Tutorial
Here is the video tutorial. The nice thing is that you can pause it whenever you need to or you can go back and watch a part again if you didn’t understand it clearly. I hope you also subscribe to my channel so you don’t miss any of my videos! There is a red subscribe button on the bottom corner of the video. It also helps if you click “watch on YouTube” when you click on the video in my blog post. Hope that makes sense!
A Little Smile Kit on Sale!
Good news! The kit that I used to make this card, A Little Smile, is on sale! All kits in the Stampin’Up! kits collection is buy one get one half price until the end of June. If you want to check out the selection, just click here. Remember, there are two different categories of kits so be sure to check them both out. When you put in your order be sure to make the second kit the more expensive one since it will be the one that gets reduced by 50%.
Thanks!
Thanks so much for joining me today, I hope you enjoyed this card. Happy stamping and have a super day!


")


")


")
")
")


")
 Designer Series Paper")
")
")


")


")


")


