Hello stampers and happy Monday to you. Today I have a very fun technique to share with you. I call it the Diagonal Stack and Shuffle technique. It was my squirrel friend and fellow Canadian demonstrator Tamara Bertram who first showed me this style of card. What fun!! Just like her. To make it even easier for you I have also made a diagram to show you how and where to cut your patterned paper to make it work. Further on in this blog post you can also watch the YouTube tutorial that I made to make three lovely cards using Winter Meadow designer series paper. Not only is this paper gorgeous for Christmas cards, it is also great for sympathy and get well cards. Shall we take a look??
Here you can see a closeup of how well the “bling” matches the paper. They are called Tinsel Gems.
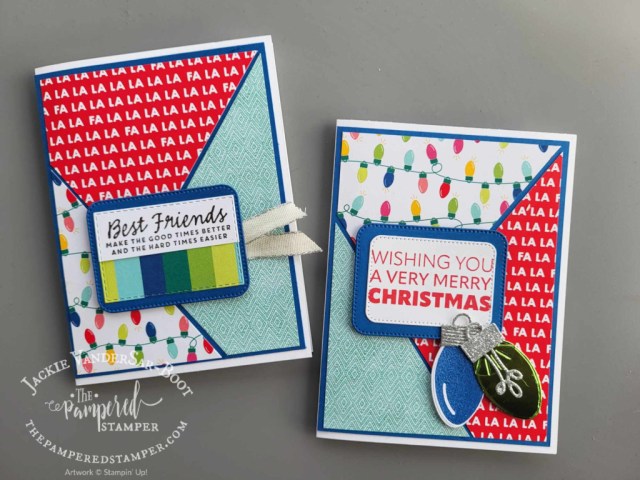
Diagonal Stack and Shuffle cards with Christmas paper
This technique is also fantastic for Christmas cards or just a thinking of you card. The sentiment on the one card comes from Nested Friends and the other is from Joy to You.
Video Tutorial
In this video I not only show you the diagonal stack and shuffle technique, I also explain a family favourite game. This dice game is great for all ages and has provided countless hours of joy for my parents. Gerard and I even played this game with Messenger video chat during COVID. Enjoy!!
Diagram for Measurements: Diagonal Stack and Shuffle Technique
Here is a diagram that I made to help you “see” it rather than just watch the video. I think it is a helpful tool.
Thanks!
Thanks for joining me today! I hope you were inspired and that you have fun with this technique. Below you will find a product list that is also a link to my Canadian online store. Have a super day. Hugs from Holland,
Hello stampers and happy Monday to you. I hope that you had a wonderful weekend. Mine ended with a phenomenal Christian concert called Young Messiah. I had never heard of it before, but I love anything to do with Handel’s Messiah. Fun fact about me. I once joined a choir just so I could sing in this beautiful oratorio. Every minute of it was just wonderful and now I am listening to it on Spotify as I write this blog post. SEO analytics will tell me to put the key word in the first sentence, but I am rebelling a bit. The blog post today is about Winter Meadow, which is a stunning designer series paper from Stampin’Up!
Winter Meadow Designer Series Paper
Do you know why our patterned paper is called Designer Series Paper? It is because there are actually in house artists, or designers, that create this beautiful paper. It is often referred to by its shortform, dsp. Just one of the many things that give Stampin’Up! its own lingo. Newbies can be confounded with all the terminology including the two word colour names! My cards use primarily Bojo Blue, Misty Moonlight and Basic White. If you want to see how I made the card below, please check out this YouTube video.
The card above uses the Dutch version of Autumn Wishes called Herfstwensen. I added a layer of torn vellum behind the Bojo Blue cardstock to soften up the patterned paper and also to symbolize the tearing away of a life, of a loved one. The pearls were coloured with Bojo Blue Blends, which is a great trick to coordinate your gems with your patterned paper or cardstock.
Same Layout, Different Paper
I also made this card using our lovely All Autumn Autumn paper which is now back in stock. You can see that video here. Here is a closeup of the card, just enough so you can see how beautiful the paper is.
My Tutorial and Other Great Fall Card Tutorials!
I participated in a blog hop with the Dreamgirls Dutch team from Maaike deRidder-Sack. What an honour!! You can check out it below.
My Last Winter Meadow Card
This card was inspired by a card sample in the holiday mini catalog. You can find the card that inspired me on page 36, top left.
I forgot to add the Deckled Circle Dies and the Nested Essentials dies to the supply list but they are essential to the card above. Both are fantastic and highly recommended. At the risk of sounding like a broken record, I still want to urge you to take advantage of the starter kit. It really is the BEST deal ever. You can put $165 worth of products in your kit and you pay only $135. NO shipping and no tax in most of the provinces. Super great deal. Plus you get to be on my team!! How amazing is that? No need to do what I do, that’s for sure.
Video Tutorial
Here you can see how the card above was made and also see each of the stamps and dies in the Magical Meadow bundle.
Thanks!
Thanks for joining me today, I really appreciate you! I hope that I have inspired you today. Happy stamping, and remember, together we CAN change the world, one card at a time. Hugs from Holland.
Well hello stampers and happy Tuesday to you. Have you seen all the buzz about the One Horse Open Sleigh suite from Stampin’Up! Trust me, it is worth it! I got right on the bandwagon as soon as I saw the paper. You see, I had the paper before I got the bundle. It wasn’t really affordable to have the bundle in the Netherlands AND in Canada, so I ordered the paper in the Netherlands knowing that I was going to Canada soon where I could pick up the bundle. This paper makes it very easy to make a beautiful card. Check out the photo below of all the cards that I have made so far.
A Very Special Deal
I believe in this suite so much that I am offering a five card (yes, FIVE!) in the mail to everyone who orders the suite through me. You will also get the free pdf tutorial that I wrote for the 8 cards shown above. Check out the graphic below and you will see the five cards that you will get for free in the mail. The kit will include card bases, all cardstock layers and any die cuts that are not included in the One Horse Open Sleigh suite. You will also get the embellishments and ribbon or twine. No stamped images will be included as that is not allowed by SU policy. The measurements for the patterned paper will be found in the pdf tutorial.
Inspiration from Berdien Weideveld
I first met Berdien at OnStage in Vienna and she is a lovely and talented Stampin’Up! demonstrator who is also a member of the Artisan Design Team. She made such a beautiful card with the One Horse Open Sleigh suite that I just had to case it. There is also a video tutorial for you to watch so you can make it yourself.
Video Tutorial
This is a casual video tutorial that I originally made for my team July meeting. You will gain some insight into how to case a card! Case means Copy And Share Everything. Thanks Berdien for your wonderful inspiration. You can find Berdien on Instagram here.
Time to Connect
Would you like to connect with other demonstrators and paper crafters? We still have room for you in our St. Jacobs Ontario, Canada retreat from September 22-24. Read all about it here
You can also fill out the registration form here. I really hope to see YOU in September!!! Have a super day!
Hello stampers and happy Wednesday to you. I am really excited to share these cards with you today. Embossing on patterned paper is so much fun! These cards combine two of my favourite things: patterned paper and Memories & More cards. The large Memories & More cards measure 4 1/4″ by 6 1/4″ so they are bigger than our standard sized cards. This means you have a bigger “canvas” to show off our beautiful patterned paper!
Embossing on Patterned Paper
To keep the focus on the patterned paper and on the striking die cuts, I decided to simply emboss right on the patterned paper in white. Don’t you just love the look of this?
The Process
Here you can see my desk with some of the elements that I used to make these cards. The key is to cut the patterned paper into 3/4″ strips. I started with a 4″ by 6″ piece of patterned paper. You will end up with 8 strips but you only need 7. The big decision is whether to discard the top strip or the bottom one!
For the pink card above, I first embossed the flowers in black before cutting into strips. All of the cards had the sentiment embossed after the strips were adhered to the coordinating cardstock which measures 4 1/8″ by 6 1/8″. You could choose to emboss your sentiment first as well before cutting into strips. Take a look at my last card. You will see that there are bits of embossing in between the gaps of patterned paper. If you don’t like that look then emboss your larger sentiments before cutting your patterned paper into strips.
Video Tutorial
Seeing is believing and it is also easier than reading instructions, so feel free to take a look at my video. I would love it if you would also subscribe to my channel and leave a comment and a thumbs up!
Shop with Me!
You may not be aware that I am trying to live in two countries! Most of my time is spent with my husband in the Netherlands, but I travel back to Canada frequently to visit my mom, siblings, children and grandchildren. This craziness makes it difficult to schedule regular classes, so I rely on online sales to keep my business afloat. That means that YOUR online order would be greatly appreciated. You can shop with me in Canada by clicking on the links below OR you can click here to shop with me in Europe.
Thanks for joining me today! If you enjoyed these cards, leave a comment below so that I know you were here. Have a super day.
Hello stampers and happy Wednesday to you. Today I have some super simple cards for you that I made with Day at the Farm paper. This paper is one of the FREE choices with the saleabration sale from Stampin’Up! This sale ends on February 28, 2023. When the paper is this cute, all you need to do is add your sentiments and call it a day.
Day at the Farm Cards
My Favourite Day at the Farm Project
Are you a parent or grandparent? Want to make a true labour of love? I saw a project made by an Australian demonstrator Catherine Proctor and I absolutely adore it. She made a counting book for kids and has video tutorials for it right on her blog. You can see it here. Happy stamping and let me know if you end up making it!
Hello stampers and happy Friday to you. Happy Canadian Thanksgiving to you too! I was hoping to host a Canadian Thanksgiving dinner here for my Dutch friends a week later but when I went to order a turkey I had a little sticker shock. A 12 pound turkey was going to cost me 120 euros. That’s about $160. I couldn’t do it. Instead I will share a few of my creations from the last month that have a nice fall vibe.
Apples Make Me Happy
Thanksgiving needs to have pie and one of those pies should be an apple pie. The other two should be pumpkin and pecan because we all know that you need at least three pies to choose from! I made this fun apple card a couple of weeks ago and I just love how the apples turned out.
When the kids were little we used to go apple picking at the local orchard and then we would go home and make a ton of applesauce together. Of course there would also be a few delicious apple pies made. Great memories and great scrapbook pages!
It’s hard to believe but these cards are almost exactly the same size. One is American sized and the other European A4 size, so a little longer and narrower. Which one do you like better? You can see the video tutorial here.
Matchbook Treat Holders
Looking for a super simple treat holder? This matchbook treat holder is so easy but so very cute. I used the Hello Harvest bundle to make them and the Rustic Harvest paper.
This is what it looks like in the inside:
Distressed Gold Season Of Chic Card
My last fall creation has more subdued and antique looking colours. I am curious to hear what you think about this one.
If you purchase the Season Of Chic bundle then you are in for a treat! I am going to give you a 13 project tutorial bundle and each of the cards features this Season of Chic stamp set. How awesome is that?? You can see the video for this card here. I hope that you discover my YouTube channel and subscribe. It is one of the main ways that I now teach my people the art of card making!
Thanks!
Thanks so much for joining me today, I am thankful for YOU. I hope that you choose me as your demonstrator and if that is not possible, please support me by purchasing my awesome tutorials. You can find them on my blog as well, or just click here for some instant gratification. I hope you have a fantastic weekend. The links to my online store can be found below.


 Designer Series Paper")
")


 Foil Sheets")
 Designer Series Paper")
")

 Designer Series Paper")


 Textured Ribbon")


")
 Specialty Designer Series Paper")
")
 Adhesive Backed Glimmer Paper")

 Sheer Ribbon")


")
")


")


 Specialty Paper")


 Designer Series Paper")


")


 Designer Series Paper")
")


")


")
")
 Specialty Paper")
")


