Hello stampers and happy Tuesday to you. I know, I know. Blog posts are never on Tuesdays. This one is. Today I am sharing with you some simple cards with Fancy Frames dies. I hope you love them as much as I do!!
Fancy Frames Dies
What makes these dies so special is that they make it so very easy for you to make a stunning card with very little effort. No one will know how easy it was for you to create your masterpiece! No fussy die cutting, no cranking of lots of dies, just some pretty paper, coordinating cardstock and a few pretty gems. Sound unbelievable? Take a look!
Card Samples
Here are a few cards that I have made this week using these lovely Fancy Frames Dies. I also made a video tutorial that I will include at the end of this post.
Here is a closeup of the Abigail Rose card. I love how this card came together with all those subtle tones! The roses on the front were fussy cut from the patterned paper. “You’re always so good to others…” comes from In The Moment stamp set. The brushed metallic dots are the perfect finishing touch.
Using Leftovers
Do you see the cards above? I found some leftover Hues of Happiness paper and played with them to make these cards. The polka dot paper is one of the free saleabration items which I coloured with blending brushes and Balmy Blue ink. I love the crane turned into a stork for the baby card!
Video Tutorial
Here is a video showing you how I made some of these cards. Enjoy!! If you haven’t already, please subscribe to my channel. It’s a wonderful to stay in touch with what I am sharing. Lately it seems that Facebook is making it more difficult to find older posts and videos, so YouTube is a great alternative!!
Don’t Forget About Saleabration!
Summer saleabration is in full swing! You can order your Christmas stamps (or anything else!) and get free items as a bonus with each $60 purchase. You can see all the offerings here.
The current host code is 3S2AFM37.
Thanks so much for joining me today! I appreciate that you are a part of my stamping community, have a super day!
Hello stampers and happy Wednesday to you. Today I am going to share with you “romancing” Timeless Tulips. Timeless Tulips is a stamp set and coordinating punch that has been with us for a while. Last year it even had coordinating paper during saleabration that had tulips that could be punched out. Truth be told I was not in love with the images in this set. They were too “geometrical” for me. Not enough romance and softness. What’s a girl to do?
Romancing Timeless Tulips
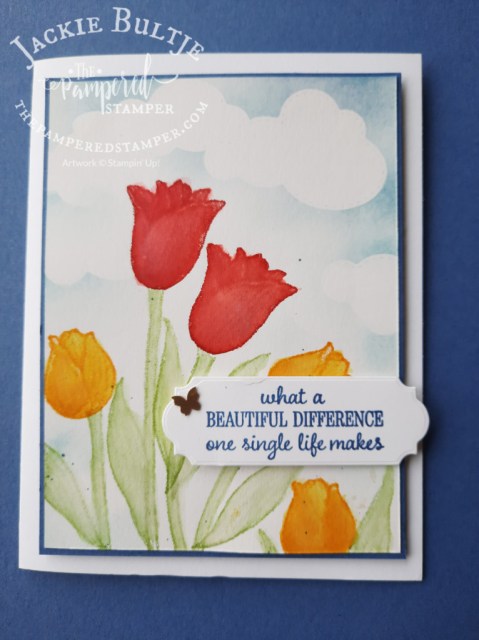
After having visited the famous Keukenhof gardens for a spectacular display of all flowering spring bulbs, I was inspired to make a tulip card. Since I had not used this stamp set in such a long time, it was time to dust it off. I realized that the sentiments in this set are truly wonderful AND it is also available in Dutch. But what to do about those “severe” tulips?
I decided to stamp them on shimmery white cardstock and then soften them with a water painter. The results were even better than I had hoped for. Not only did it give a lovely, soft look, it also curled the paper just a little for a nice 3D effect. Let’s take a look and then you can tell me what you think too!
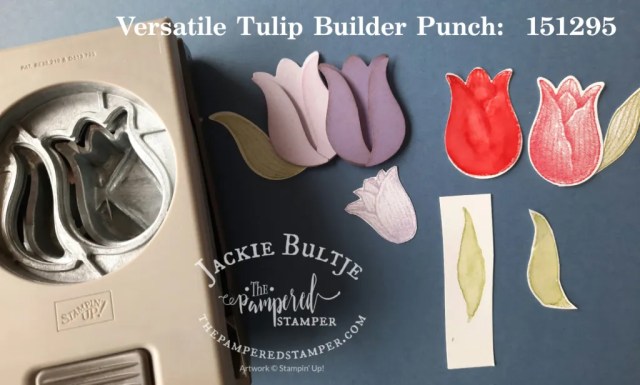
Here you can see the tulips closeup. The tulip builder punch makes a tulip and a leaf. The leaves can also be used to make a tulip. How amazing is that? I show you how to do that in my video which you can click on below to watch on YouTube.
Video Tutorial
If you want to see how this card came about, take a look at the video below. If you click “watch on YouTube” that would be the best!!
One More Card
I decided to make one more card showing the tulips and leaves stamped directly on shimmery white cardstock. No fussy cutting, no punched tulips or leaves. My cousin Martin was a lover of nature so this card is a tribute to his memory.
Punched and Stamped Tulips and Leaves
I thought it might be helpful for you to see some of the punched images and the difference between regularly stamped and “romanced” tulips. You will agree that this is a very versatile stamp set for many different occasions! The punch also can be used to create a solid cardstock tulip without stamping. I see that I forgot to add the brushed brass butterflies to the supply list, so you can see them here. (click on the blue text) If you live in Europe and want to shop with me you can click here.
If you want to see some cards made with the non-stamped tulips, check out this blog post here.
Get Them Before They’re Gone
When I decided to use this stamp set and punch for my Cheer Corner card I had no idea that they were retiring. Now I know, so I can remind you to get it while you can. Check the product list below and then you can see all the sentiments that are included in this stamp set. It’s a good one!!
Items that are retiring are only available while supplies last or until April 30, 2022. You can see the list for Europe here and the list in Canada here.
Thanks so much for joining me again today, hope you were inspired! Have a super day and hugs from Holland.
Hello stampers and happy Wednesday to you. On Monday I was able to ink up this gorgeous set for the first time. I just happened to have a customer drop by and she had not yet seen this stamp set. When she saw me stamp it, her jaw dropped and she said “WOW”! The wildlife stamps just jump off the page because they are very realistic looking due to the distINKtive technology of the stamps.
Wildlife Wonder: Some “Beary” Good Tricks
When I get a new stamp I ink up all the stamps in a few different colours and strengths. This gives me a good idea as to the versatility of the stamps. I also wanted to try stamping directly on the New Horizons paper. At first this seemed like a bad idea. You could see the patterned paper right through the bear. Then the magic happened. I grabbed a blender pen and went all over the bear image with it. Worked like a charm!
The other great trick with the bear is to fussy cut him close to the stamped image. When you do this he or she blends in better with the scene on the paper.
Clever trick number three is to be sure to “ground” the bear. There is a long skinny stamp that looks a bit like a cirrus cloud; use that to make a base for your bear like I did in the first card.
Clever trick number four has nothing to do with the bear. This time the wolf is the star of the show. I used a scrap of leftover patterned paper and fussy cut the grass to make a bit of a hiding spot for our resident wolf. Don’t you think it worked well?
Clever trick number five. If you watch my video you will see that the owl used to have a prominent place on the wolf card. Trouble is, it was a bit TOO prominent. The owl was simply too large. Instead I made a focal point for the sentiment which I punched out with a 2″ circle punch. The owl was stamped off in Crumb Cake to the left of the sentiment. Very effective, I think! These cards were made “on the fly”. If I would do the wolf one again, I would not use a scrap, but I would make an entire border across the front to camouflage the wolf a bit.
Video Tutorial
When you watch this video, please click on the brown box that says “watch on YouTube”. That way you can give me a thumbs up, subscribe or perhaps even leave a comment. Trust me when I tell you that it really makes a difference in my day when I see you do any of these things. There is also a “share” button under the video and then you can choose whether to share to Pinterest or to Facebook. Yay!!!!
Thanks for joining me today. If you want to purchase any of the products I used for these Wildlife Wonder cards, the links are below in the Product List. Have a super day!
Hello stampers and happy Wednesday to you. Today my post features Grassy Grove. I am on a simple kick lately. Beautiful cards can be simple. Often they are even more beautiful due to their simplicity. These cards fit the bill. Let’s take a look shall we?
Grassy Grove Cards
The Grassy Grove bundle includes a stamp set with beautiful words and images as well as dies to take your breath away!! When you combine the stamps and dies with the New Horizons paper it doesn’t take much to make a stunning card.
I made these cards in my Stamping Through My Stash weekly video. The card at the top was made as a result of many mistakes. I am sure you never make any mistakes stamping, but you can live vicariously through me!!
I think these cards would be particularly suited for sympathy cards or thinking of you. They evoke calm and peace. Trust me when I say that they are even nicer in person.
This last card is made by layering two die cuts over each other for a shadow effect. Evening Evergreen is layered slightly offset over Soft Succulent.
New Horizons Scenic Paper
I find that it is always hard to see how beautiful our paper is in the catalog. I took some pictures as well so you have a better look. If you like it, trust me, when you get it you will LOVE it!! The first picture is of the inside of my “mistake-filled” card.
Video Play Date
If you want to join me for my Stamping Through My Stash video featuring the Grassy Grove bundle and the New Horizons paper, then watch this video which goes public at 10am EST today. When you watch it be sure to give me a thumbs up if you like it and click the red subscribe button on the bottom left hand corner. The reason I keep asking you to do this is because it can really help my business. I love making cards, but this is not just a hobby for me, it is my livelihood! Thank you for your support, it really does mean the world to me.
I published the video early just so I could include it in my blog post and you don’t have to wait until 10am to see it!! Thanks so much for joining me today. The wind is picking up and I am driving to my parents place shortly and then tomorrow to the airport to pick up Gerard!!! Yayayayayay!!! We will be sure to do a video together to say hello. Have a super day.
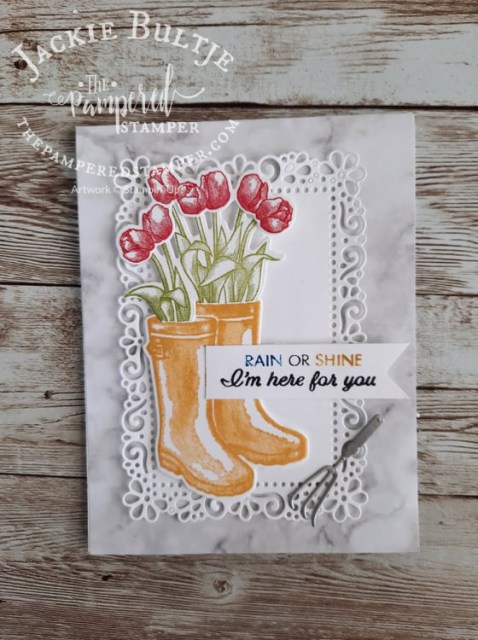
Hello stampers and happy Wednesday to you. Today I am sharing the Flowering Rain Boots that make me smile. The sun has decided to shine gloriously this afternoon and that also makes my heart happy. Let’s take a look at this cheerful bundle.
Flowering Rain Boots
There is something whimsical about a bunch of tulips or daisy in a pair of old rain boots isn’t there? I might be a little strange, but just looking at a colourful pair of “Wellies” makes me smile. My grandkids love my tall red rainboots. I think they think it is funny that a grownup can have rainboots too. My friend Yvonne told me today that in Britain they all rainboots “wellies” because the Duke of Wellington used to wear them a lot. I never knew that!
Here is a closer view of the card that I made in this morning’s Stamping Through My Stash video on YouTube.
Video Tutorial
Here is the video tutorial for making this card as well as a small Memories & More card. You will learn some great colouring tips for the saying and for the tulips.
Memories & More Cards
I always make sure that I have at least one package of Memories & More cards on hand. They are wonderful for making a quick and easy card. Your card base and envelope are all ready to go and that can make all the difference between making and sending a card at the last minute or not!
Do you see those little black flecks in the background? You make those by flicking the tip of your Blends marker against the inside of the lid. Be sure to use the brush tip!
Two More Cards Exclusively for Prime Time
Each week I do an exclusive video for my Prime Time group. This group has been with me since COVID began and they pay $10 a month. It’s actually a steal of a deal because included in this fee are four video tutorials, one prize drawing AND a free 16 project pdf tutorial. What are you waiting for? Click here to join!
Here is a close-up of the tulips.
I just made this card in my Prime Time group and I changed the boots to Bumblebee and added a little pop of red ribbon from the Playful Pets Trim Combo. I LOVE it!!
Thanks!
I hope that you have enjoyed my Flowering Rain Boots cards. It made me ever so happy to be playing with this bundle today. Why not add it to your order and get some free saleabration products as well? Just click on the links below. You can also choose this stamp set as one of your two free bonus stamp sets when you get the starter kit! Click here to get started and have some fun choosing all your other items!
Hello stampers and happy Monday to you. I am squeezing in a New Horizons -Fold Card yet today. It really is much too late to write a blog at 8pm but I haven’t blogged in almost a week and I know I will feel much better if I get one written today. This card is simple yet stunning. I hope you will agree.
New Horizons Z-Fold Card
I made this New Horizons Z-Fold card this morning for my weekly Cheer Corner video. The New Horizons paper is simply stunning and it doesn’t need much extra to turn into a beautiful card. I decided to add some stamps from the Grassy Grove stamp set. Of course you could really step it up with die cuts and embellishments and I am sure I will do just that on another day. Let’s take a look.
If you want to see how easy it is to make this card, just watch this short video. The card is 5 1/2″ by 8 1/2″ scored at 2 1/8″ and 4 1/4″. Trim your New Horizons paper to 5 3/8″ and then cut at 2″ and 4″. Add a strip of basic white that is 2″ by 5 3/8″ and you are all set!
If you would like to see another type of Z-Fold card that showcases pretty paper, check out this blog post.
Saleabration Ends February 28
Did you know that you can get a free item with each $60 purchase? I will also give you an amazing pdf tutorial. One features all saleabration products and the other one is all 3D items, just let me know your preference, or with a $120 you will get both. The bonus this month is a Daffodil 12 x 12″ sampler tutorial!
Your Very Own Discount!
Did you know that you can get the starter kit from Stampin’Up! just to get your own discount? It starts with the amazing deal on the starter kit. The name is a little misleading because it really isn’t a kit. It is just an order that you can put anything you want into for a total of $165, not a penny more. You only pay $135 AND you get to choose TWO bonus stamp sets of your choice. In most provinces you do not pay and shipping or tax on this purchase which is an additional savings. I think the best part is that you get to join my fun and amazing team which comes with a lot of perks.
Still not sure if this is for you? Message me and we’ll set a time to talk so you can have all your questions answered. Remember, this is all about YOU, what you want. I am only here to help you make that happen. With 15 years of experience there isn’t much I haven’t seen or dealt with.
Thanks for joining me today, I really do appreciate you so very much. I am also very thankful for all of you who have subscribed to my YouTube channel. The number of subscribers continues to grow and I am loving the interaction there. If you haven’t already subscribed, I would be most honoured if you did. Have a super day and happy stamping. If you want a super easy shopping experience, just click on the links below in the product list and follow the prompts.


")
")
")
 Designer Series Paper")
 Designer Series Paper")
 Designer Series Paper")


")

 Designer Series Paper")


")
")
")
 Designer Series Paper")


")


 Layering Designs")
 Designer Series Paper")


")


