Hello stampers and happy Friday to you. Today I am so very excited to share a fun card with you that I designed last week. I call it the Patchwork Effect card using the Nested Essentials dies. The second card that I am sharing uses the pieces that I had made when playing with the design for this card. Always take time to play my friends, that is when the magic happens!
Patchwork Effect Card
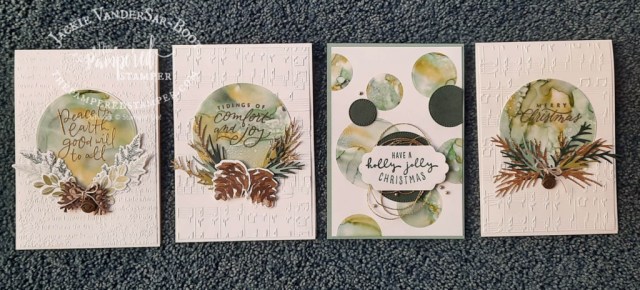
I made these cards for my exclusive Prime Time group. Each Thursday I made a video just for them! This group was started during COVID19 to keep my business going when I couldn’t do my weekly coffee and a card classes. Membership is only $10 a month (in three month instalments) and members also get a monthly pdf tutorial bundle worth more than that, so it is a really great deal. Want to join too? Click here. You will be glad you did!
I forgot to add the embossing folders to my product list. For the patchwork effect card I used the Fern 3D embossing folder and for the other card I used the Basics 3D embossing folders that are only available as online exclusives. Click on the blue words (the link) and you will be in my Canadian online store.
One More Idea for the Nested Essentials Dies
I was going to write a separate blog post with this card, but then I thought, why not spoil you with lots of great ideas for both the One Horse Open Sleigh paper AND the Nested Essentials Dies? Which card is your favourite?
Video Tutorial
I DO have a video tutorial for you for this card. Have you checked out my YouTube channel? It’s like having a free class every Monday, Tuesday and Wednesday with a video being posted at 10am EST which is 4pm in the Netherlands or 3pm in the UK. That is probably around midnight down under depending on where you are in Australia or New Zealand!
Have a Great Weekend!
I hope you all have a great weekend. Are you going to be adding the Nested Essentials dies to your next order? If you are, I hope you choose me as your demonstrator! Everyone who orders through me gets a free pdf tutorial bundle. At least one, and up to three! Have a super day.
Hello stampers and happy Monday to you. Today I have a fun technique with you that I call Blown Alcohol technique. I did something similar this summer but it was WAY more complicated. You can see that post here.
I was reminded of this technique by my European team leader Michelle Last and you can see her blog post here.
Thankfully I have also made a video for you to see how it is done. I also show you how NOT to do it and what happens when you mess up. Always fun to see someone else’s mistakes isn’t it?
Blown Alcohol Technique Cards
To do this technique successfully you need vellum cardstock, 90% or above isopropyl alcohol (you might just know it as rubbing alcohol in North America) and Blends markers. It is helpful to have a stampin’ spritzer as well as these little bottles from Amazon.
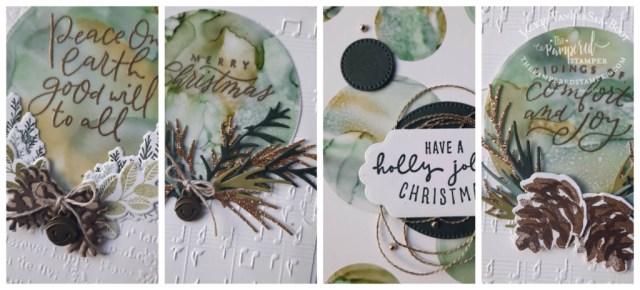
Here’s a close-up of the cards so you can see the detail:
Little Tip
What makes the blown alcohol focal point so vibrant is the use of adhesive sheets. When the blown alcohol technique is complete you put the entire sheet of vellum onto an adhesive sheet and then you can adhere it to a sheet of basic white cardstock. Use your layering circles dies to cut out circles and stamp your sentiment in versamark and emboss in gold. Remove the adhesive backing and add to your card front. Accessorize with die cuts, flat jingle bells or stamped and die cut pine cones.
Video Tutorial
Here is a video tutorial that I made. It is in typical Jackie fashion with some trial and error but I think it will make you feel totally at home. My wish is that when you watch my video you will be empowered to give it a try yourself. I used the following Blends colours: Soft Succulent, Old Olive, Just Jade and Evening Evergreen. Just Jade has been retired so if you don’t already have it you could try and substitute with a different shade of green.
Thanks!
Thanks for joining me today, I hope you were inspired. Please leave a comment so I know you were here and if you really want to show me some love, pin some of your favourite photos so more people will find my blog. Every little bit helps. The links to shop with me online in Canada are below.
Hello stampers and happy Friday to you. Some people think vanilla is boring but today I am going to share with you Very Classy Very Vanilla. I have made a very elegant monochromatic card combining the Festive Florets dies and the Merriest Moments Hybrid Embossing folder. Add in some gold embossing and the result is rather stunning if I do say so myself!
Very Classy Very Vanilla
Did you know that the oval dies in the Festive Florets collection layer together beautifully? The insides of the detailed ovals cut out for plain ovals on which to stamp your greeting and the detailed ovals can be layered as well with a stunning effect. I was inspired by Gail Ellis to layer these oval over the Merriest Moments Hybrid embossing folder. It’s a little counter intuitive since that folder has a rectangular opening in the middle but it works perfectly as you will see for yourself.
Tone on Tone Poinsettias
For this Very Classy Very Vanilla card I kept the poinsettias monochromatic as well. I stamped the poinsettias in Versamark on very vanilla cardstock and embossed with white embossing powder. A few pearls were added to the centre of the flower for a lovely effect.
Prime Time With the Pampered Stamper
When COVID started I began Prime Time as a way to keep my business afloat. Members pay ten dollars a month in three month increments and in exchange they get a weekly exclusive video tutorial and a monthly 16 project pdf tutorial. The videos are posted each Thursday and the supply list and measurements are posted on Wednesdays. Members tell me that this is like a weekly class and because they pay a small monthly fee, they take it seriously and it keeps them stamping and using their supplies. It makes me so happy to hear that! You are also most welcome to join! You can do it here. This was the card that we made this week.
Thanks!
Thanks for joining me today, it’s always nice to see how many people come and read my blog posts each day. Did you know that I also have a YouTube channel? Every Tuesday and Wednesday I post videos there at 10am EST. Teaching the joy of card making is what I love to do and I hope you join me and subscribe! Just click on the red subscribe button on the bottom right hand corner of the video.
Hello stampers and happy Friday to you. Today I am sharing a lovely card using Friends are Like Seashells. What a beautiful suite of products this is! It will be the focus of my next Parcels in the Post.
Friends are Like Seashells
I love walking along the beach and I am always on the hunt for pretty shells. Nice ones are often hard to find, you need to be persistent and watchful. This is just like friends! The older you get the more you realize how important true friendship is and the more you value your good friends. You also realize that sometimes friends can show up in unexpected places and times in your life. Before I wax too philosophical, let’s take a look at my card.
When I made this card I discovered that the large die cuts out the embossed images from the embossing folder. What a great feature!! The other discovery was that the pearlescent paper embosses like a dream AND you can sponge colour on it for very realistic looking shells. I made this card again with just a few embellishments and I really like it that way too. I played around with a sheer pool party bow but did not like that look as much.
Stamping on Watercolour Paper
I have one piece of important advice when stamping on watercolour paper. Use your stamparatus!! Watercolour paper is quite porous and rough so you need to put on several layers of ink to really make your sentiment pop. I used early espresso and stamped three times with the stamparatus.
Colour Wash Advice
Making a colour wash background seems very simple, but it is also very easy to get wrong. Let me show you!!
Do you know what I did wrong here? I did wet my watercolour paper first but then I added a few drops of reinker and there still wasn’t enough water to make it “wash”. Instead it soaked into the watercolour paper and I wasn’t able to dilute it and move it around.
The solution? Really, really wet your watercolour paper on both sides. Then dilute your reinker with a bit of water with your water brush and add it to the wet paper with the brush.
I hope it makes you feel better that I also have things that totally bomb! If you don’t play and experiment, you don’t learn and you will never fail. Failure is a stepping stone to success and discovery.
Be sure to check out the product list at the bottom of this blog post. If you click on the images you will see them in my online store and then you can see all the wonderful sayings that come with this stamp set too.
Thanks!
Thanks for joining me today. There are only nine days left in saleabration so make sure you take inventory of your basic supplies. It’s best to order them now and earn a freebie along the way. If you don’t like ordering online but would like your order shipped straight to your door, message me and I can do it for you. The gift for ordering online this month is the elegant faceted gems. Have a super day!!
Hello stampers and happy Wednesday to you. Today I am sharing with you a gold embossed vintage tree card that was inspired by Joanne French, a fellow demonstrator from Ontario. She did a Facebook live video showing different things she had done with the Tag Buffet kit and this card was one of them. I think you will agree that it is beautiful even though I forgot to add the gold pearl embellishments.
Gold Embossed Vintage Tree Card
Joanne shared that the Tag Buffet kit comes with five extra tree die cuts, so that is perfect for making cards like this while still being able to make all thirty tags in the kit. I started by inking up my Tin Tile embossing folder with versamark. After running it through the die cutting machine with soft sea foam cardstock I embossed with gold embossing powder. Take a look!
Gilt Edging
Do you see the edges of my stitched rectangles? It looks like gild edging doesn’t it? Do you know how I did that? Simply run your versamark pad along the edges of your cardstock and then pour on some gold embossing powder. Heat set with your embossing tool. The sentiment was also embossed in gold and it comes from the stamp set Positive Thoughts. Isn’t it a great idea to use a Christmas product for a thinking of you card? Joanne had embellished her card with some gold pearls but I forgot and it still looks nice.
Double Embossed Gold Tree Card
For this card I used two embossing folders and the same technique of inking up the folder with versamark before embossing the cardstock. I used Tin Tile for the inside piece and the Subtle embossing folder for the frame. The little star on top of the tree is from the Most Wonderful Time Product Medley refill kit. Both the gold twine and the sentiment are from the Tag Buffet Project Kit and stamp set.
A New Event
If you have been following my blog and my Facebook page for a while, you may already know that I love to bake. I am finally going to share my love of baking with you in an official stamping event. It is aptly named as #itsallaboutthetreats and it will take place on Tuesday December 15 at 9:30am. You may also realize that this is not a coincidence; it is at coffee and a card time!
It is going to be a Zoom event and we will be making some great gift packaging using the Heartwarming Hugs suite. If you purchase the suite from me online, this event is free for you. Otherwise it will be $20. Besides crafting we will be baking some of my favourite Christmas treats: cranberry bliss bars, shortbread cookies and nanaimo bars. I have created an event on Facebook which you can see here and I will soon be creating a page on my blog as well so you can sign up!
Thanks!
Thanks for joining me on my blog today, I really appreciate it. If your order from me online you will receive a free pdf tutorial with 16 projects made by the Demo Design Dream Team. Do you love the Snow Wonder bundle? Order it online from me and you will get my tutorial with 10 cards and a home decor project for free as well. Tutorials make stamping quick, easy and effortless. Your success is guaranteed.
Hello stampers and happy Monday to you. Today I am going to be showing you a card that I made with the dry embossing technique. This dry embossing does not use an embossing folder. What you need is a stylus, a paper piercing mat and a mister with rubbing alcohol.
Dry Embossing
This dry embossing technique adds amazing texture to your stamps and is actually quite easy to do. First stamp your flower image and then cut it out with a coordinating die or by fussy cutting with scissors. Turn the flower upside down on the paper piercing mat, also affectionately known in my circles as “the foamie”. Spritz the flower lightly with rubbing alcohol. Then press the bigger end of the stylus on to your flower moving it in small tight circles. You will see the edges of the flower curling up. Continue doing this everywhere except the centre of the flower.
A Few Tips and Tricks
Adhere the flower with a glue dot in the centre and dimensionals along the outer edges to support the curves.
After you are done dry embossing with the stylus (take your pick tool has a stylus attachment, I used a retired version by accident) use your fingertips to manually curve the paper even more.
Use Wink of Stella to give a special shine and shimmer to your flower. You could also apply a thin coat of crystal effects.
Play around with different colours for your flower, you never know which combination will be your favourite.
Here you can see two slightly different versions of the same card. The one uses bolder tones with the addition of gorgeous grape. Other colours used are highland heather, purple posy and granny apple green.
More Options with To A Wild Rose
I did make one more card with this set and truthfully, I was itching to make more but I wanted to get outside for a walk as well. There are more dies in the bundle that I haven’t used yet, but maybe that will be good for another blog post. Patience, patience my friend (I actually mean me!!)
For this card I took a piece of whisper white cardstock 3 5/8″ by 4 7/8″ and I repeatedly stamped the large open floral image in highland heather. This was mounted on a piece of gorgeous grape cardstock 3 /4″ by 5″. The gorgeous grape die cut was adhered to a purple posy strip measuring 4 7/8″ by 1 1/4″. I tied a piece of crinkled whisper white seam binding ribbon around the main panel and adhered to a thick whisper white card measuring 11″ by 4 1/4″ scored at 5 1/2″. The sayings were stamped in gorgeous grape, fussy cut and popped up with dimensionals.
A Helpful Video
If you are a visual learner, you might just want to watch this video where you can see me build the card from scratch. You can see how mistakes were turned into opportunities to simply make the card a little differently. I hope it helps you feel connected to the stamping community and brings a smile to your face.
Thanks!
Thanks so much for joining me today. If you are feeling anxious about the current world situation take a few deep breaths and let your neck and shoulders relax. Find your favourite stamp set and your favourite colouring tools, Blends, watercolour pencils or an aqua painter and have a little stamping and colouring therapy. Here is a great fun post with some inspiration for colouring.
Thank you also for the happy mail in Canada cards you have sent for Gerard. He is supposed to come at the end of March, but who knows now if that will be possible? My philosophy is to simply take life one day at a time and to try not to borrow the troubles from another day. God is in control. He has the whole world in His hands and He has promised to never leave or forsake us. That brings me great comfort. If you need to be reminded about how awesome Jesus is just pick up your Bible and start reading the gospels like they are a novel.
The Best Opportunity
The best way to get your crafting supplies is by ordering online so that it gets delivered straight to your door. I would recommend that you check out which tutorials I have for sale and then pick those products to buy so that I can send you a free tutorial to go with your products. Of course you will also get the free Demo Design Dream Team tutorial for March. By now you already know what the best deal in the catalog is. That’s right, the starter kit!! If you want LOTS of fun free stuff AND pay no shipping or tax, just click here to start the fun. There has never been a better time to indulge yourself.


 Designer Series Paper")
")

")


")


 Specialty Paper")
")
")


