Well hello stampers and happy Monday to you! Today I am going to share the first projects that I hope to share with you in conjunction with my Parcels in the Post. Parcels in the Post is a kit program that I am offering to make it easier and more affordable to create along with me. I remember when I first started papercrafting that I was often missing something when I wanted to recreate a card. There is only so much you can buy and I was sad to miss out.
How Does Parcels in the Post Work?
With the Parcels in the Post I will be putting together a package of basic supplies including patterned paper, cardstock, ribbon and perhaps other accessories. I will then use this package as a source for my projects. Every Tuesday I will share some projects that I have made using these Parcels in the Post. The other thing that I will offer you is a supply list of the main stamp sets or bundles that are featured in my kit. To save you money, I will suggest that you put these items in a starter kit so you can get your own discount.
How Will This Save You Even More Money?
Stay with me here. It gets better. When you get your starter kit you will also get 8 catalogs. If you share my YouTube videos with Parcels in the Post with your friends, chances are they will want to join you in this fun journey. You can then give them a catalog, show them the list of supplies needed to play along and then you will have orders from them so that you can keep your discount. If they love it, then you can have them get the starter kit with you! You won’t have to do anything except share what I do.
That also means that you will be a part of my Beyond Pampered Team and you will be able to join me on fantastic retreats like the one happening from June 3 to June 5 2021. There are still 8 spots available. Check out the link to this gorgeous retreat cabin here.
Parcels in the Post Inspiration Projects
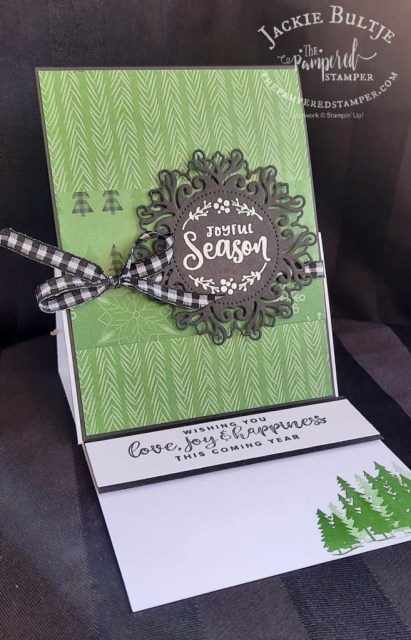
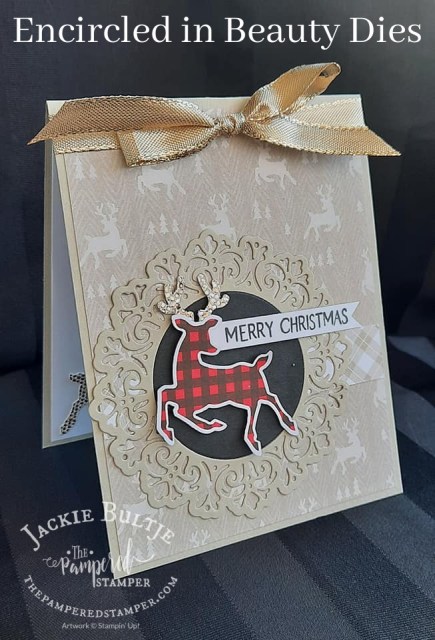
Here is the first card that I made for my Parcels in the Post projects. Many of my projects use the Encircled in Beauty dies. They are actually part of an Encircled in Friendship bundle and there is also an Encircled in Warmth set to go with it as well. That is the stamp set that I used for these cards. Check it out!
The next Peaceful Deer Parcels in the Post inspiration card uses a neutral Sahara Sand palette. I love how the buffalo plaid deer just pops with his Be Dazzling antlers.
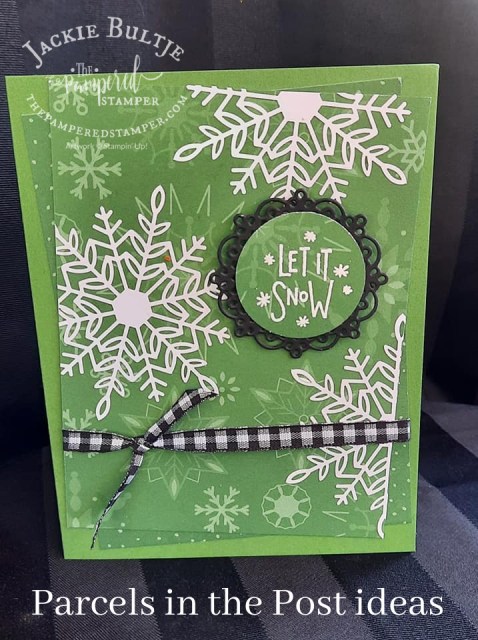
The next card was inspired by Heather Forgan. It uses the beautiful snowflakes that are included in your Parcel in the Post. This is my “Where’s Waldo” card. That crumb is not on your computer screen, it is on my card!! It really is all about the treats!
The last project that I am sharing today is a gift bag and it continues the garden green theme as well as the Encircled in Beauty dies. On Wednesday we will switch to the real red and cherry cobbler palette for the remainder of the projects.
How to Get Your Parcel in the Post
If you want to get your Parcel in the Post, don’t delay. There are three options. $25 for porch pickup, $32 for mailing anywhere in Canada and $40 mailed to the US. Here is the PayPal link. I did tweak my prices a wee bit. Not the base price, but the shipping included prices. It was time to be realistic and stop eating the extra shipping costs myself. Thanks for understanding!
A PDF Option
There will also be a pdf only option, but it is not available just yet. You will get notified once it is my tutorial store. You can check out the ones that are available now, there are lots to choose from!
Get Your Own Discount
I know that I am in danger of sounding like a broken record, but I am truly passionate about this. If you love stamping and card making or scrapbooking, you deserve your own discount. It is honestly so easy to introduce this fun hobby to your friends without ever having to do a class. Simply invite them over to help you make the cards in your Paper Pumpkin kit that is included in your starter kit.
For the month of November this kit is only $100 and you get to fill it with $165 worth of products of your choice. Click here to get started or message me if you have questions.
Thank You!
Thanks for joining me today, I hope you have a super day. Take a good look at the supply list below, that is what I used to create the projects from my Parcels in the Post for my December videos. Just so you know (I did a little math for you) if you get the Peaceful Deer bundle, the Encircled in Beauty Dies, the Encircled in Warmth stamp set, the Snowflake Wishes stamp set and a spool of either gold shimmer or black gingham ribbon that totals exactly $165. If you would put these on a normal order it would be $202.95. Until the end of November you pay only $100. Tell me that doesn’t just blow your mind?! That’s all for now….
Hello stampers and happy Wednesday to you. Today I am sharing with you a gold embossed vintage tree card that was inspired by Joanne French, a fellow demonstrator from Ontario. She did a Facebook live video showing different things she had done with the Tag Buffet kit and this card was one of them. I think you will agree that it is beautiful even though I forgot to add the gold pearl embellishments.
Gold Embossed Vintage Tree Card
Joanne shared that the Tag Buffet kit comes with five extra tree die cuts, so that is perfect for making cards like this while still being able to make all thirty tags in the kit. I started by inking up my Tin Tile embossing folder with versamark. After running it through the die cutting machine with soft sea foam cardstock I embossed with gold embossing powder. Take a look!
Gilt Edging
Do you see the edges of my stitched rectangles? It looks like gild edging doesn’t it? Do you know how I did that? Simply run your versamark pad along the edges of your cardstock and then pour on some gold embossing powder. Heat set with your embossing tool. The sentiment was also embossed in gold and it comes from the stamp set Positive Thoughts. Isn’t it a great idea to use a Christmas product for a thinking of you card? Joanne had embellished her card with some gold pearls but I forgot and it still looks nice.
Double Embossed Gold Tree Card
For this card I used two embossing folders and the same technique of inking up the folder with versamark before embossing the cardstock. I used Tin Tile for the inside piece and the Subtle embossing folder for the frame. The little star on top of the tree is from the Most Wonderful Time Product Medley refill kit. Both the gold twine and the sentiment are from the Tag Buffet Project Kit and stamp set.
A New Event
If you have been following my blog and my Facebook page for a while, you may already know that I love to bake. I am finally going to share my love of baking with you in an official stamping event. It is aptly named as #itsallaboutthetreats and it will take place on Tuesday December 15 at 9:30am. You may also realize that this is not a coincidence; it is at coffee and a card time!
It is going to be a Zoom event and we will be making some great gift packaging using the Heartwarming Hugs suite. If you purchase the suite from me online, this event is free for you. Otherwise it will be $20. Besides crafting we will be baking some of my favourite Christmas treats: cranberry bliss bars, shortbread cookies and nanaimo bars. I have created an event on Facebook which you can see here and I will soon be creating a page on my blog as well so you can sign up!
Thanks!
Thanks for joining me on my blog today, I really appreciate it. If your order from me online you will receive a free pdf tutorial with 16 projects made by the Demo Design Dream Team. Do you love the Snow Wonder bundle? Order it online from me and you will get my tutorial with 10 cards and a home decor project for free as well. Tutorials make stamping quick, easy and effortless. Your success is guaranteed.
Hello stampers and happy Friday to you. Today I will be talking about La Dame Blanche, the white lady. If you are a fan of Outlander you will recognize this as the name that the French people gave to Claire because they thought she was a white witch. Isn’t it the perfect name for our new Stampin’ Cut & Emboss Machine? It is white and it does magic!
La Dame Blanche: A Great Machine!
Ok, so maybe I am a little nuts but I can’t call it the Big Shot and I really don’t want to use the long official name “Stampin’ Cut & Emboss Machine” every time. So, La Dame Blanche it is. Sounds sophisticated too don’t you think?
Well, the bottom line is, this machine is truly awesome. I LOVE it. Why?
It looks great on my stamp room table.
La Dame Blanche is compact and folds up great for when it is not in use or you need to take it somewhere.
It is simple to use with each plate being numbered and instructions clearly written on the platform and on some of the plates.
La Dame Blanche comes with all the plates except for the magnetic plate.
The magnetic plate is flexible and dies don’t skitter around on it, so no need for washi tape to hold your dies in place!
The handles feel great and turn easily.
Dies cut great and don’t need to placed a certain way to work. No more fussy poking either.
Save Shipping and Tax and Get More!
Did you know that there is a great deal on the starter kit right now? It is available for everyone and it is priced just right so that you can get this new machine, La Dame Blanche in your kit. How? Well, while you pay only $135, you get to choose $165 worth of product to put in your kit and this machine is $163. You also get two free stamp sets and 16 card kits as well as a package of rhinestone gems AND a coupon for a FREE Paper Pumpkin.
There are no strings attached to this deal. That means you can just get it because it saves you a lot of money. It does however entitle you to a 20% discount on future orders. This discount will be available to you until the end of January for sure. If you want to keep your discount indefinitely OR you want to turn this into a business or just some extra income, THEN you need to sell or buy $400 every three months. If that doesn’t happen you will simply drop as a demonstrator. No worries.
Video on La Dame Blanche
Prime Time With The Pampered Stamper
Of course I have to share my new venture with you since it really is just so much fun. In response to COVID and the lack of income from this I have had to come up with a sustainable way to stay in business. I love doing video tutorials and making cards with you with live videos but they take a lot of time and are quite intense. It was too much to continue doing for free. For less than the cost of one class you can join for a whole month!
What do you get? You get a weekly live video every Wednesday at 3pm. There is also a monthly 16 project pdf tutorial. I will also post throughout the week just for fun. Since it is a private group it is also a safe space for you to engage. If you have been following me but not feeling comfortable to post comments, this is the space for you. I post the list of supplies the day before so you can create with me if you like.
I will also do weekly prizes because everyone likes to win something! If you would like to be a part of this, you can! Just click on this link to get started.
Thanks!
I’m so glad you stopped by today! If you are still happy with your Big Shot, that’s great. Just know that the cutting plates and the new magnetic plate also work in the new machine. How awesome is that? I hope you have a super day.
Hello stampers and happy Tuesday to you. Today I am featuring Magenta Madness, In Colour number four. Not all in colours are created equally and after a while we all have our favourites. Do you already know which one is your favourite? The jury is still out for me as I think I need to play a little more with all of them before I make up my mind. What really makes a difference for me is which patterned paper has the in colours in it. Let’s take a closer look at Magenta Madness.
Magenta Madness
Truthfully I wasn’t too sure about Magenta Madness. It is a strong colour to be sure! Then I saw this adorable patterned paper from Flowers for Every Season and it changed everything.
This is very much a monochromatic card except for the strip of patterned paper which really pops against the Magenta Madness background. The saying from Tasteful Touches is also stamped tone on tone with Magenta Madness. Meadow Moments is the name of the embossing folder that I used at the top of this card. It is a narrow embossing folder that measures 6 1/4″ by 3 3/8″ so that it fits into the Mini Stampin’ Cut & Emboss Machine and it comes in a set of two.
A Travel Story or Two
Yesterday we came back from our long weekend away in Germany. What an amazing weekend we had!! Of course after being separated for five months and not being able to travel at all, it was even more special. I can only say that if you ever get a chance to go to Germany, be sure to go to the Middle Rhine Valley. Within a one hour drive from Rudesheim there were at least thirty castles!! That was only going in one direction, I didn’t count the ones driving the other way. Here are just a few pictures from inside the last castle we visited: Burg Rheinstein.
What I loved most about this castle is that little stairs up to the pinnacle of the tower. I walked up those stairs and boy is it far, far up!! I didn’t look down until I was at the top protected by a small wall. The other amazing thing is that it built right on the rocks of the mountain making it look like it is carved right out of the stone itself!
Do you see the ink well and the feather pen on the desk? Just like the stamp set Beautiful World on page 26 of the annual catalog!!
View from the other side of the Rhine
Part of our “romantik” tour was a chair lift down the mountain to a “red wine village”. On the chair lift there was a stunning view of the two castles on the other side of the Rhein river (yes, we spell it differently in North America) The other castle that you can barely see on the right hand side of my photo is called Burg Reichenstein.
So Much Beauty
I could just keep posting more pictures of all the beauty that I saw this past weekend, but I will end with a picture of the two of us and then one of me in my “little black dress” that I promised I would share with you. There is a little bit of a story behind that dress. I bought it from my cousin Yolanda who owns a fashion boutique just north of Guelph three years ago right before I went on my trip to France and Thailand.
This was the first time that Gerard saw me wear it because I felt a little self conscious in it. As women we are often way too hard on ourselves and by doing so we miss out on some great things. I’m so glad I mustered the courage to wear this dress, and when I look at this picture of me, I think, what is wrong with me that I didn’t dare wear this?! So I will try harder to practice what I preach and be kinder to myself.
Magenta Madness Geraniums
Thanks!
Thanks for visiting my blog today, I hope you are also starting to fall in love…with magenta madness that is. I just noticed that the colour of the geraniums in my picture with Gerard are exactly that colour too!! How amazingly coincidental is that? Have a super day, and don’t forget that if you live in Canada, you can shop with me simply by clicking on the links below.
Hello stampers and happy Wednesday. I am actually writing this on a Monday night knowing that I will hopefully be traveling on Wednesday but not wanting you to miss out on a post. We had so much fun making these cards today during my Facebook live! That hedgehog from Walk in the Woods is just so very cute. I have now done two Facebook lives featuring this cute critter from Walk in the Woods. Today I also used the glycerine technique for background sponging.
Masking with Walk in the Woods
The cute little hedgehog looks best when he is masked because then it looks like he is nestled in the woods amidst the grass and the toadstools. This is such a gratifying technique that elicits a wow from beginners and avid crafters alike.
The images on this card were coloured using watercolour pencils and a blender pen. “Everything will be okay” has been embossed in white on early espresso cardstock.
Here is the video showing how I coloured this cute hedgehog.
Glycerine Sponging
In my Facebook live video you can see how wonderful it is to mix your ink with a little glycerine before sponging. The glycerine makes the ink sponge on so, so smoothly for a beautiful suede like finish.
I love the card without a sentiment and simply on a misty moonlight background. The following card is on a very vanilla card base with a real red mat for a totally different look. This time I embossed the toadstools and the grass but the hedgehog was once again masked off so that he is a real part of the scenery.
Emboss Resist with Walk in the Woods
Two of the three cards use the emboss resist technique. Simply put, the images were stamped in versamark on shimmery white cardstock and embossed with white embossing powder and a heat tool. I then used an aqua painter to do a colour wash over the embossed image.
Video Tutorial
Here is the video from my Facebook live showing you how to do the glycerine technique.
Thanks!
Thanks for joining me again today. I am so very excited to be finally traveling to Holland to be reunited with my love. It will be great to share with you all the wonderful things I will experience over there. I hope to do live videos but I am not sure how often they will happen. Stay tuned for the details, I am sure you won’t miss me too much.
Happy Mail in Holland Contest
I really love receiving happy mail in Holland and I also like blogging about the cards I receive. To make it worth your while and also to make it fun, I will once again offer a prize! The winner will get to choose a stamp set worth $30. I will send it anywhere in the world. Here is the address that you can send your cards to: Jackie Bultje, Bloemenlaan 6, 2691 JC s’Gravenzande, the Netherlands. Please mail your cards any time in July. I hope to be in the Netherlands until August 29.
Hello stampers and happy Tuesday. Today I am going to share with you the Bargello technique, and yes, it is not Monday. Yesterday was my birthday and I took the day off! Despite the COVID pandemic, I had a most wonderful birthday. The only thing missing was the presence of my love, Gerard. Now, back to card making. Have you heard of the Bargello technique? Neither had I, so let’s see what it is all about.
Bargello technique
How did I discover this? Quite simply I saw this card from Tracy Tucker using strips of shimmery white cardstock that she had sponged in gorgeous colours. When I made the card in a video I was informed by my viewers that this was the name of that technique. Basically you cut strips of paper and then arrange them so that they are offset from each other. Here is a tutorial from Splitcoaststampers and I will also share the video that I did.
My Card of Many Colours
I like calling this card “my card of many colours”, it reminds me of a song by Dolly Parton, Coat of Many Colours which I really love.
Here is the card before I put the sentiment on. I chose to remove the coastal cabana mat from the card that I cased from Tracy. The colours uses are melon mambo, pumpkin pie, mango melody, granny apple green and coastal cabana.
Here you can see the two cards together. I accidentally flipped the card as well! Do you see that I embossed the flower on the melon mambo section instead of the coastal cabana? Which one do you like better? It was a happy accident.
Video
If you watch my video you will see how it is done. I really like the splatter at the end to make water droplets which are echoed by the Flowers for Every Season gems OR the frosted and clear epoxy droplets.
Shimmery White Cardstock
This is a fantastic product that I really, really love. It is great for sponging and for watercolouring. Here is another post that I did with shimmery white cardstock. It just so happens that I have more of these stamp sets AND the paper in stock if you are interested. Just message me and we can negotiate!
Thanks!
Thanks for joining me today and for all the lovely birthday wishes. I had a wonderful day yesterday and it was great to not work at all and just enjoy the way the day evolved. Here is a picture of me and my son Oliver. He was the organizer for the kids to get the gifts and to spoil me along with Laura.
No, I am not drinking four glasses of wine! This cute table came with the picnic bag, isn’t it adorable and ever so functional? I also got silicone baking mats, a bicycle pump and a harness to hold my weed whacker so that my arms don’t almost fall off every time I do this garden chore.


")


")


 Gingham Ribbon")
 Mini Ruffled Ribbon")

 Shimmer Ribbon")


")


 Designer Series Paper")


 Designer Series Paper")

 2020–2022 In Color Ribbon")
 2020–2022 In Color Ribbon")
 2020–2022 In Color Ribbon")
 2020–2022 In Color Ribbon")


")


")
")


