Hello stampers and happy Friday. I just couldn’t help declaring toilet paper essential for cards! Isn’t it just the perfect title for these COVID times? Truly, toilet paper is an essential component for the card that I am going to show you today.
Embossing With Toilet Paper
Yesterday for my daily Facebook live video I showed you how to emboss with toilet paper. I will include the video here but let me start by sharing a few simple instructions.
Use two ply white toilet paper.
You need four layers to make this work, you can just fold the toilet paper, no need to separate and tear the sheets.
Spritz the toilet paper lightly with a fine mist of water. You do NOT want to saturate the paper.
Place the toilet paper in your embossing folder, but not right up to the “hinge”, you don’t want it to bunch up.
Run through the die cutting machine and prepare to be impressed!
Allow your embossed toilet paper to dry for about fifteen minutes before altering it.
Do NOT use a regular paper trimmer to cut your embossed toilet paper, it will tear. Use a guillotine cutter or a rotary cutter or even a pair of scissors with long blades.
My Card
I thought it would be fun to share a card that I did not make during the video yesterday. On Monday I will share the cards from the video. This cards uses a beautiful new suite from the annual catalog that will go live on June 3. It is called World of Good. The coordinating embossing folder is called Old World Paper. There is brass foil sheets but they were not available when I ordered so I used copper on my card. I can’t wait to see the brass foil sheets!
This card base is the new Misty Moonlight as is the globe image. The words and the sponging were done in crumb cake. Do you see the nice detail beside the patterned paper strip? That is a die from the World Map dies. Isn’t it amazing how textured the toilet paper became? This is such an impressive technique, I can’t wait for you to try and let me know how it turned out.
Close-up of Embossed Toilet Paper
This picture really shows the depth of the embossing with toilet paper. I sponged crumb cake ink over it with a sponge dauber being sure to “land lightly” and use a circular motion.
This technique is not my original idea, it has been around for a while, but I was recently inspired by British demonstrator Terri Pocock. You can check out her blog here. Thanks so much Terri for your inspiration.
Technique Video
Here is the Facebook live video that I did showing you how to do this technique. Seeing is believing! I try to post most of my videos to YouTube, so feel free to subscribe to my channel so you don’t miss any.
New Catalog Goes Live June 3
You will be able to get these products on June 3 when the catalog goes live. There are two great things happening to make this even more special.
If you host a workshop, and yes, you can host a virtual workshop, you will get $30 extra host dollars if you have a $300 workshop.
If you choose to get the awesome deal on the starter kit you get to choose a bonus bundle. That means any stamp set with a coordinating punch or any stamp set with the coordinating dies. Wow!
Both of these deals are available until June 30.
Thanks so much for joining me today, I hope to see you for my Facebook live video at 1pm. Before I sign off, I thought it would be fun to share my most popular blog post. It features the Birthday Memories cards that I made for my first ever OnStage presentation the day after my first grandchild Leo was born. You can see it here.
Hello stampers and happy Monday to you. Today I will be featuring the last batch of happy mail for Gerard cards. I want you to be able to enjoy them all and I don’t feel like drawing out the process any longer. By now you know that I am not a very patient person!
Barb Gourlay’s Card
Barb got very creative and used lots of different products on this lovely card. Let’s see if I can figure it all out. First I will show you the card and you can think along with me!
Barb embossed her images in gold on vellum cardstock and she used Grace’s Garden on page 13 of the mini catalog as well as My Meadow from page 23. Just so you know, the dies from Grace’s Garden are available again! The “welcome” is from the Well Written dies and the birds are contraband (I think!). Barb stamped the coloured images on whisper white cardstock underneath and they are from My Meadow. Thanks for this beautiful, intricate card Barb. What a fun technique! I haven’t tried this yet, but I think you first stamp your coloured images and then lay the vellum over top and stamp your outline images in versamark so they are placed correctly.
Barb comes from Chatham, Ontario and I am blessed to have her on my team!
Faye Molsberry’s card
The next card is from Faye Molsberry and it is a lovely vintage card using the Come Sail Away suite. I love everything about this card, the attention to detail on the die cut with the sentiment, the colour scheme of soft suede, mossy meadow and very vanilla, and the braided linen trim. Thanks so much for your beautiful card Faye. Faye participated in the happy mail in Holland contest too, so you can read about her hometown and see her other card in this blog post. She is from Central Butte Saskatchewan which is quite far north.
Here you can see the detail that I love so much.
Shelly Merkin’s Card
Shelly’s card came late, but it was a lovely surprise. It is a fancy fold card that uses The Sailing Home stamp set as well. Let’s take a look:
If you want to make this card you will need two pieces of patterned paper 5 7/16″ by 1 15/16″. The card is 5 1/2″ by 8 1/2″ scored at 2 1/8″ from either side of the long edge.
I love how Shelly brought the party to the inside of the card. Don’t you just love this suite? That gorgeous rope accent is made using one of the Smooth Sailing dies. The anchor was embossed in silver as was the lighthouse on the outside of the card. The oval is adhered to one side of the flap using dimensionals so that the belly band can slide underneath to keep the card closed.
I have lost the envelope from Shelly’s card so I can’t tell you where she is from, I only remember that it is from somewhere in the States. Maybe Shelly will share that information with us in a comment. Thanks so much for your card Shelly, Gerard loved it too.
Fancy Fold Card Contest
My next card contest is a fancy fold one. You need to use Stampin’Up! supplies for your card, but they can be retired. I want you to be able to use up your stash. Cards should be received by May 31. You will be entered into a draw for the Little Ladybug stamp set and I will feature your card on my blog. If you could include a link or information on how you made your card and what the fold is called that would be ever so helpful. Please mail to Jackie Bultje, 81 Delaware Ave, Chatham, Ontario N7L 2W3.
More Inspiration
If you want more inspiration, be sure to check out this blog post where I have used the Come Sail Away Memories and More cards to make a beautiful sampler. This sampler was inspired by my friend and fellow demonstrator Marion Greenlund. Want to kill some time and binge on Stampin’Up! videos? Check out my YouTube channel here and subscribe. Share with your friends too and spread the joy.
Please Order Online
With the COVID19 crisis, my business is entirely online, so I appreciate your business more than ever. It would make my day to receive an online order notification. The current host code is TKU2XM4H.
If you live in Canada then you can order through me simply by clicking an item on the supply list below. Not from my beautiful country? You can support me by purchasing one of my pdf tutorials. They are only $15 each and they will help you get the maximum use from your products. Thanks so very much, I appreciate you.
Hello stampers, I’m back!!! So sorry for dropping off the face of the earth with no notice. After an amazing week of true winter vacation including snowshoeing, ice skating and snow tubing I am going to do a blog post on the Tropical Oasis pineapple. Quite the contradiction but it feels good.
Tropical Oasis Pineapple
When I first saw the tropical oasis suite, it was the pineapple die that really caught my attention. There is a separate die for the pineapple fruit and the pineapple greenery which I think is simply fantastic. This arrangement really allows the textures to pop. The pineapple greenery die embosses and cuts at the same time and it also has little slits in it that allow you to “peel” bits of it forward to create depth and texture. Did you know that the pineapple is a symbol of hospitality? That is why it is often featured as an ornate carving on newel posts and on doorways.
Tropical Oasis Suite
The tropical oasis suite has so many great things in it. I don’t know about you, but I am really loving this suite approach from Stampin’Up! Creating is so much fun and also easy when you have so many coordinating products. The following closeup shot will let you see the great texture in the braided burlap trim and the coastal weave 3D embossing folder. Antique bronze trinkets are also available in these fun shapes: pineapple, hibiscus, ukulele and leaf. There are twenty four in a package. One thing that you might not notice right away is that the flower has been stamped in saddle brown Stayzon ink which gives it a great vintage feel. I was very, very impressed with this ink!
A Few Tips and Tricks
After cutting out the pineapple bottom I did a colour wash with it using an aqua painter and crushed curry ink. Just smush the ink pad onto a clear block and then pick the ink up off of that with an aqua painter.
Notice how the braided burlap trim is a little wider at the ends? Yes, you can tease it apart to give even more texture and interest.
After running the very vanilla cardstock through the Big Shot with the coastal weave embossing folder I sponged it with some saddle brown stayzon ink to make it look more vintage.
The flower was stamped off in saddle brown stayzon and then I used an aqua painter with calypso coral ink to colour wash it.
Fluff out the pineapple greenery to make it more lush.
Cards for Coffee and a Card and Facebook Live
Here are all the cards we will be making at coffee and a card tomorrow and I will also be doing a Facebook live at 7pmEST so you can see how I did it. I will blog about the other two cards tomorrow and Wednesday.
Happy Mail for Gerard Contest
Did you know that I am doing another happy mail contest? I love the great energy this creates among the stamping community and even more, I love how much Gerard gets into this. He loved the happy mail in Holland contest and he was even more excited than I was when cards arrived in the mail. I thought it would so wonderful to surprise him with a stack of happy mail from all of you when he comes to visit on March 29. If you would like to participate you can send your masculine card to Gerard van der Sar c/o Jackie Bultje 81 Delaware Avenue, Chatham, Ontario, N7L 2W3. I will blog about your card and you will be entered into a draw for the masculine stamp set of your choice from the Handmade for You mini catalog.
Winner of Blog Candy
Congratulations to Debbie Colquhoun who won the Valentine’s Paper Pumpkin stamp set I’ll Bee Yours. Thanks to everyone who took the time to comment on my blog and share my post on Facebook or Pinterest. You wouldn’t believe how much it means to small business owners when people help share their work.
Thanks so Much!
Thanks so much for stopping by today, I really appreciate you. I had a fantastic time away at a cottage in Huntsville with my kids and grandkids enjoying a real Canadian winter. We had so much fun in the snow! This cottage is available for rent for the rest of the winter, so let me know if you are interested and I will let the owner know. Here are a few pictures so you can appreciate the view and the solitude.
Being here was so soul restoring. The peace, tranquility and serene beauty of nature all around you is balm for the soul. Spending time with family here was priceless. I am so thankful for the opportunity to have been able to do this. It is great to be back, now it is time to get stamping and to organize all the club orders. If you would like to order online please use the current host code available on the right hand side of every blog post! Have a super day.
Hello stampers and happy Monday to you. Today I am going to be sharing with you a truly spectacular card using Lovely Lily Pad. This card was a gift from Tammy Bendel, a fantastic demonstrator from Sarnia. If you live in the Sarnia area and are looking to attend or host a class, contact Tammy!
Lovely Lily Pad Embossed
Tammy embossed all the elements in white and then coloured them with Blends for a very striking effect. That is only the beginning of what is all happening on this card. The card has a standard white base, 8 1/2″ by 5 1/2″ scored at 4 1/2″. There is a mango melody rectangle 3 5/8″ by 5″ and a blackberry bliss rectangle that is 3 1/2″ by 4 7/8″. The white rectangle has been cut using the stitched rectangle dies.
The stitched white rectangle has added interest with embossing paste , gold metallic thread, gold rhinestones and a vellum die cut. This would be a super card to make on a lousy weather day when you just want to play and make something special. I love the unusual colour combination!
Timeless Embossing
Embossing really never gets old. It is one of the first “tricks” that I learned as a newbie and I still love it. Have you ever embossed? It is such a simple concept, but truly brilliant. You stamp your image in Versamark which is a sticky watermark ink. After that, sprinkle on embossing powder, tapping off the excess with an aggressive flick of the pointer finger and thumb. Then you use a heat tool or embossing gun to heat set it. What that does is melt the powder which is sticking to the versamark and you get a shiny, raised image that you will really want to run your finger over multiple times!
Embossing Paste
Embossing paste is a whole other element. It comes in a jar which you need to seal tightly when you are finished or it will dry out! Simply place a stencil over your cardstock and using a palette knife (a regular bread and butter knife will work in a pinch too) spread the paste where you want it to go, keeping a firm grip on your stencil. It doesn’t have to be super thick. Carefully lift the stencil straight up when you are done and then let the paste dry for an hour or so. In the meantime, you can assemble the other elements for your card.
Bucket List Item
For years now I have been wanting to see a snowy owl. There have been sightings in Chatham-Kent, but despite numerous lengthy drives throughout the countryside, I was never able to find one. Finally yesterday I got to see this magnificent creature! I went out early in the morning and I saw two different ones. My heart was overflowing with joy. I was positively giddy. I had my binoculars, but I had forgotten my good camera. No worries, I had amazing images forever in my brain.
Twice in One Day
Later on in the day I got a little greedy. What if he was still there? I really wanted to see him again and this time I would take my good camera. Well, guess what? He was still there!!! In my excitement I left my camera on the wrong setting, but I still managed to get some decent shots. Here they are. We have an amazing God who has created such diverse and beautiful creatures. Wow!!
For some reason this owl reminded me of a cat. Just the way he was looking at me and the shape of his body. I think when my mom drew cats she would first draw the body and it was in this shape!
My camera on manual focus so it was really tricky to get a picture when he flew away but at least it captures the magnificence of his big talons and the underparts of his wings. I may just be addicted.
The eyes on this snowy owl are really quite spectacular. It would have been great to have a tripod and my camera on the right setting! It was on landscape instead of the little flower icon. I am totally giving myself away here with my lack of technical terms. Someday I will take a photography course. In the meantime, I am just having a LOT of fun.
Thanks!
Thanks so much for joining me today. If you want to hear me talk about how important it is to share your love of stamping and card making, be sure to check out this video. It was done on a Saturday night with me in my pajamas but I was simply overcome with passion for Paper Pumpkin and with the importance of bringing more joy to people’s lives by sharing what we love. In the end I couldn’t help but mention that if you get the starter kit, then you also get 20% off your Paper Pumpkin subscription and anything else on your wish list. How awesome is that?
If you are ready to do some binge stamping without having to do any measuring, be sure to check out my tutorials section at the top of the page. Right now there are three to choose from but by the end of the month I hope to make that four! If you order from me this month, then you get the amazing February Demo Design Dream Team tutorial for free with 16 projects. It is also a free gift for you if you join my team!
Hello stampers, happy Tuesday to you. The day has flown by and here I am starting my blog post after 4pm!! I am missing the six hour head start that I had on you when I was in Holland. I can’t trick you any more into thinking that I am on top of my game. So what is the buzz about bees? They sure are trendy right now. Not only are they cute, they make great honey and they pollinate our flowers and crops.
We have made such a mess of our environment that we have endangered our bee population, and in response many people have taken up backyard beekeeping. I think it is a great hobby, not as wonderful as card making, but I am willing to swap cards for honey!
Two Adorable Bee Cards
Today I am going to share with you two adorable bee cards, neither of which I designed. I received them as swaps and in typical squirrel fashion, I no longer have any idea who made them. The cards went in one stack and the business cards that were supposed to be attached to them went into a separate pile. There is no time to go and watch my own video to see which one belongs to whom. To add to the drama, there is no also one missing bee die and it has yet to be found. I have cleaned and tidied and swept. No die and a late blog post!
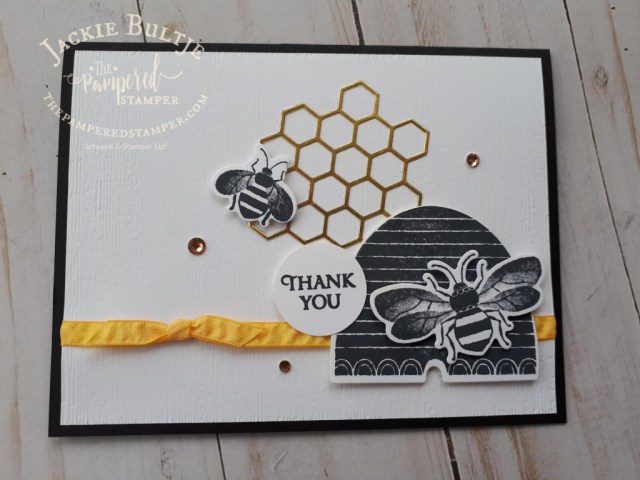
If you look closely you can see that the white cardstock in the background was embossed with the Subtle embossing folder. The honeycomb element is cut with a die using gold foil paper and the rhinestones are from the Parisian Blossoms suite. You could choose to colour the stripes on the bee with a daffodil delight marker or blend for a pop of colour. The daffodil delight mini ruched ribbon is actually from the Birthday Bonanza suite on the next page of the mini catalog. Aren’t the bees adorable? I love the DistINKtive effect of the stamps making them ever so realistic. The bees are either stamps or dies, and together they are simply wonderful.
This second card oozes gold. The sentiment and the hive are embossed in gold and the honeycomb element and the big intricate bee is gold foil paper. Doesn’t it pari wonderfully with the Golden Honey paper that you can get for free with Saleabration? I have to say, I LOVE this sale and I LOVE this paper. I know I am going to get lots of it so I can create with abandon. Funny thing is, I’m not even a “gold” girl, I much prefer silver. I do however love coordination and since the Golden Honey paper has lots of gold in it, you just have to pair it with our gold foil paper.
Golden Honey Paper
This is the beautiful paper that is available for FREE with a $60 purchase during saleabration which goes until March 31 2020. I am not a fan of high pressure sales, but I do need to tell you that these free items are only available while supplies last. If you have your eye on something, please don’t delay. I would hate for you to be disappointed.
Spread the Word
One thing that comes naturally to some people is to share what they love. Other people need to be reminded to do this. When you are making cards and thinking to yourself what an awesome hobby you have and how much joy it brings to your life, think, who else could use this joy? The best way to bring this happiness to other people is to invite them to stamp with you. They simply don’t know what they are missing! One of the people at my coffee and a card class said to me this morning, “I think everyone was made to want to create something” and I think she is right. She was a first timer and she was thrilled at how friendly everyone was and how warmly they welcomed her into the group.
Last night I hosted a private class which was in fact a birthday party for the girl who invited all her friends to celebrate with her by making cards together. What a joy it was for me to see them relaxing, creating and having fun together. They were all in their late twenties and early thirties and I know that they are busy with careers and young families. It felt so good for them to do this and I was happy to provide the space and materials for them to do so.
Book a Class
If you are looking for some meaningful fun in your life and quality time with your friends, book a class with me. Engaging in a fun activity together while socializing is so meaningful and fun. I do all the prep work, you just come with your friends and have fun.
Get the Starter Kit
Better yet, get the starter kit and get a jump start on your own creativity. This is the best deal in the catalog by far and it really has NO strings attached. No pressure from me or from Stampin’Up! It is simply the most economical way to get started on this fabulous hobby.
Now that you know what a wonderful opportunity is available to you, what are you waiting for? What is making you hesitate? Most importantly, what do you have to lose? Absolutely nothing; and so, so much to gain. I would love to help you get started. If you have questions, message me. Otherwise, make your list of what you want plus add in one more stamp set that you get absolutely free. Your list can total $165 but cannot go over. You will only pay $135. That’s right, no shipping and no tax. That always feels good.
In addition to your list of goodies you will also get an adorable mini paper trimmer and an assorted pack of 6×6″ paper. And a Paper Pumpkin, plus a bunch of catalogs to hand out to your friends so that they can be inspired as well. Yay!!! Click here to get started.
Thanks!
I’m so glad you stopped by today, it makes me happy when I hear from you. I hope you have a wonderful day and that you feel loved. Don’t forget about the Happy Mail in Canada contest. Make a masculine card for Gerard by March 29 and you will be entered into a contest for the masculine stamp set of your choice. Mail your cards to me at 81 Delaware Avenue, Chatham, Ontario N7L 2W3. I can’t wait to see his face when he sees all the cards waiting for him. I will do a video so you can see it too!
Hello stampers and happy Wednesday. The title of my blog post is a beautiful quote from the inside of one of my happy mail cards. This is just more proof that happy mail is amazing, not only for the beautiful cards that are made, sent and received, but also for the handwritten message within. Are you curious?
Tricia’s Card
Tricia Minturn from Durand, Wisconsin sent me this beautiful Christmas card. Inside she wrote: “Through your posts I know you are a Christian and would not mind receiving a late Christmas card because Christ is never too late or out of season.” Wow!!! How true is that? The stamped saying inside is also so true and heartwarming: “Wishing you a season of joy as we remember the night when Love came down to earth and became our song of celebration.” Thanks so much Tricia for your wise words and your beautiful card!
Tricia used the Merry Christmas dies, the beautiful Feels Like Frost paper and the Woodland embossing folder. I am trying to guess how she did the unique background. It looks like she sponged seaside spray over whisper white cardstock and then added some sponging with either silver metallica ink or a shimmer paste. Clever girl, you will have to reveal your secrets in the comments. I absolutely love how you used just a small strip of this gorgeous paper for the focal point of your card. It really makes the white Christmas pop! The silver metallic thread in behind that centre panel is also a nice subtle touch.
Durand, Wisconsin is a small rural town. The Durand area was first settled in 1856 when 21-year-old Miles Durand Prindle came up the river in a keel boat named the “Dutch Lady”. This little trivia fact made me smile because of the Dutch connection which was a total surprise to me. Durand is located on the Chippewa River and is close to the border of Iowa and Minnesota.
Sally’s Card
The next card comes all the way from New Zealand and it is a breath of spring with its lovely cheerful tulips. Quite fitting since it is actually summer in New Zealand right now. Thank you Sally Wheoki for this beautiful card. There are so many things I love about Sally’s card. She made the tulips pop by colouring the background with balmy blue Blends. One of the tulips is popped up and extends slightly past the edge of the card but not so much that it won’t fit into the envelope. The sentiment is popped up over the calypso coral twine and it was cut using the stitched rectangle dies.
Sally also used the rule of odd numbers to keep her card artistically pleasing. There are five tulips and she incorporated three different colours for the flowers. So clever. All the tulips have a lovely shimmer to them because of the Wink of Stella clear glitter brush that Sally used to accent her blooms. #itsinthedetails
I just realized that this card also perfectly fits the theme for today. It is also never too late because it uses Timeless Tulips!! I do love words. The happy mail envelope was also worthy of a picture as it reminds me of the global nature of our stamping tribe. Sally was also very clever because she used the mini catalog as a source of inspiration. Check out the gorgeous card on page 43! I know that I sometimes forget to do this, but our catalogs are great idea books too.
Thank you so much Sally for your lovely card. I love that you have been such a loyal FB follower and training team member too. We are definitely stamping family. It was heartwarming to read about the personal changes you have seen in me over the last year and that my happiness is so evident. I am blessed!
I am hoping that there will be more happy mail tomorrow for me to blog about, if not, there are still some cards that I have not shared from my ten card collection using Botanical Prints product medley.
Thanks
Thanks for joining me today! Tomorrow I will share some pictures of my afternoon. I had the distinct pleasure of having high tea with my Tante Nel. There is of course a story to share about this and why it happened. In the meantime, happy stamping. I hope the happy mail cards inspired you today. It’s never to late to send happy mail to those you love, and it’s never to late to start a new hobby or a new career. Don’t forget about the amazing deal on the starter kit or the beautiful stamp set you can get for free if you host a qualifying workshop.


")
")


")
")


")
")

 Braided Burlap Trim")


")


 Ruched Ribbon")


")


 Designer Series Paper")


