Hello stampers and happy Tuesday to you. With company over from Canada it is still difficult getting into a normal routine. Here is a short blog post featuring a very fun Triple Pocket Fun-Fold Card. Here are some photos as well as a video showing you how to put it all together.
Triple Pocket Fun-Fold Card
Triple Pocket Fun-Fold Video Tutorial
Seeing is believing and it is really nice to see how to make this easy fun fold. Do it a few times in a row to make sure it sticks in your brain.
A Great Day to Stock Up!
Today is a great day to stock up on your stamping supplies or to spoil yourself with a few new items. Do you know why? It’s free shipping today, for one day only on orders of $100 or more. Want to save even more? The best way to do that is to get the starter kit which is a super fantastic deal for the entire month of October. Get $206 worth of products for only $135. You can join my team here.
Thanks!!
Thanks for joining me today, happy stamping and happy shopping too. Have a super day!
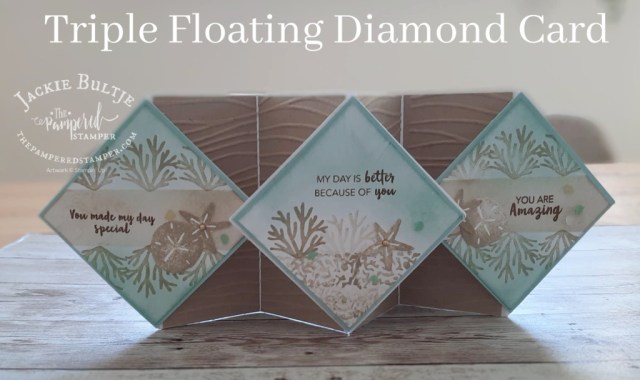
Hello stampers and happy Friday to you. Today I am going to share the Triple Floating Diamond card that my team member Barb Gourlay taught at my team retreat a couple of weeks ago. It’s a stunning card and with some clear instruction it is not that difficult to make. This blog post will include Barb’s written instructions as well as my video. I hope it inspires you to make your own card, and if you do, please share it with me, I would LOVE to see your work. Let’s take a look.
Triple Floating Diamond Card
Here is the photo of my triple floating diamond card. This style of card was designed by Scrimpingmommy from the UK. I have been unable to find her video or blog post on this card, but that is what Barb used as her inspiration. She changed up the measurements so that the card would fit in a regular North American envelope that Stampin’Up! sells.
Edited: one of my followers found the link to the original video, so if you want to make this card in metric you will find it most helpful. Just click here.
Barb’s Instructions
Here is a copy of Barb’s instructions, I hope you find them helpful!
Triple Floating Diamond Card Video Tutorial
Here is the video tutorial. The nice thing is that you can pause it whenever you need to or you can go back and watch a part again if you didn’t understand it clearly. I hope you also subscribe to my channel so you don’t miss any of my videos! There is a red subscribe button on the bottom corner of the video. It also helps if you click “watch on YouTube” when you click on the video in my blog post. Hope that makes sense!
A Little Smile Kit on Sale!
Good news! The kit that I used to make this card, A Little Smile, is on sale! All kits in the Stampin’Up! kits collection is buy one get one half price until the end of June. If you want to check out the selection, just click here. Remember, there are two different categories of kits so be sure to check them both out. When you put in your order be sure to make the second kit the more expensive one since it will be the one that gets reduced by 50%.
Thanks!
Thanks so much for joining me today, I hope you enjoyed this card. Happy stamping and have a super day!
Hello stampers and happy Friday to you. I have finally finished the cards for my Tulip Fields class and I hope that you love them as much as I do. By popular demand, I will also be writing a pdf tutorial that includes the class cards and more! My blog post will be short today as I am having an “oma day”.
Tulip Fields Cards
I chose the Tulip Fields bundle to include with this class because it has the amazing windmill dies with it. We will also be using the Flowering Tulips stamp set for the sentiments. Here is a photo of most of my cards. I will let you know which ones are included in the class. They will ALL be featured in my weekly Parcels in the Post videos so you could also choose that option. Get the Parcels in the Post and order your bundles and stamps online if you are not comfortable attending a class.
For the class we will be making the top four cards and the bottom left card. That card was a gift to me from my friend Pat Skirtschak. The other cards will be featured in the pdf tutorial so you can easily make them at home. If you prefer to pay for this class with PayPal, then check out the blog here which has the PayPal button. Deadline to sign up for this class is coming up soon, February 20.
Starter Kit Deal
I fully realize that I may sound like a broken record, but the song is a good one!!! The most bang for your buck is always the starter kit. During saleabration it is an even better deal. How does it work? You choose $165 of product. You pay only $135. Then you get to pick out two bonus stamp sets as well. After you get the starter kit you can order more products with a 20% discount. Stampin’Up! hopes that you continue to do that. If you choose not to, that is perfectly ok. No penalties, no problem.
Social Insurance Number: Why?
You WILL get asked to give your social insurance number when you sign up. The reason for this is two fold. It proves who you are. If you do turn it into a small business and get orders they may need to send you a T4 slip for tax purposes. For most people this is the biggest hurdle to getting the deal on the starter kit. Message me if you have more questions.
You know that I would LOVE to have YOU on my team and that it will be an amazing place to be. Here is the link.
YouTube Tutorials
You can follow me on YouTube for video tutorials on these great cards. It’s all free and they happen each Tuesday at 10am EST. Click on the red “Subscribe” button on the bottom right hand side of the video and you won’t miss any more videos. I have a playlist called Parcels in the Post and that’s where they are. Just click here.
I hope you have a super day and thanks for stopping by today.
Hello stampers and happy Wednesday to you. Today I am featuring a bunch of cards all made using my Penguin Playmates Parcels in the Post. What on earth is “Parcels in the Post”? It is a package of supplies that I make each month to coordinate with the video series I am doing on YouTube.
The purpose is to make stamping more affordable and easy. Instead of having to buy full packs of cardstock and full packs of designer series paper, you get a collection of coordinating paper and cardstock as well as ribbon and embellishments. You also get inspiration for what to do with these supplies. Do you want to see what you get in the Parcel in the Post?
Penguin Playmates Parcels in the Post
Here is a photo of what you get in your Parcel in the Post. If you would like to see the videos that I have already done in this series, click here.
It’s hard to see in the photo, but you get 12 6″ x 6″ pieces of patterned paper and ten sheets of coordinating cardstock, three yards of ribbon and about 40 iridescent rhinestones and six iridescent snowflakes.
Penguin Playmates Cards
I must say that I have thoroughly enjoyed making cards with this cheerful, fun paper. Looking at those creatures as you create just brings a smile to your face. These cards were just what I needed after a busy holiday season and recovering from a nasty cold (not covid thankfully!)
These adorable cards are NOT my original creations but were cased from the very talented Cindy Brumbaugh whose blog post you can find here. Cindy’s cards are so gorgeous that I could probably just stop blogging and just case her work!!
The small 4″ square card at the bottom was made when I made a mistake cutting the patterned paper for the card on the top left. The strips were supposed to be 1 1/2″ by 3 1/2″ but I had cut them too short at only 3″. Necessity is the mother of invention and I was really pleased with my extra card!
Penguin Place was available in the holiday catalog and has been carried over and will once again be available in the annual catalog of June 2022. As you can see it is also available in Dutch. I had a lot of fun stamping the penguin in the inside of the card with all the accessories. The curvy “snow line” is especially fun to work with.
Saleabration Freebies
Saleabration means free products! I know that there has been an unfortunate delay in the shipping of the spring mini catalogs and the saleabration flyers. If you have not yet had a chance to see them, check them out online or on the side of my home page on this blog. This is the best time to update your stamp and paper collection and to stock up on adhesives. Are you from Europe? You can shop with me here!
This card is a Spinning Tower card and is much easier to make than it looks. The stamp set beside the card? Did you know that you can get it for FREE with a $120 purchase while saleabration lasts. Saleabration is a special sale that goes until February 28, 2022. Want to know how to make the card? Here is my video from yesterday. You can tune in every Tuesday at 10am EST to see a video made with this month’s Penguin Playmates Parcel in the Post.
If you want to stay informed, it is important to click on the red “Subscribe” button. After you do that, click on the bell icon that shows up beside it so that you will be notified whenever I post another video. It’s amazing what you can learn from these simple videos.
Do you want to see another photo of the Spinning Tower card? If you want step by step directions on how to make this card, it is available in my Gingerbread and Peppermint tutorial. It is chock full of great ideas AND it is on sale right now too! The focus of this tutorial is on the stunning Gingerbread & Peppermint suite and the Strong of Heart stamp set. You can easily substitute with other products, just like I did with this adorable Penguin Playmates card. Click on the links below in the supply list to shop with me online.
Thanks!
Thank you for joining me today. I appreciate your involvement in the stamping community that I have created. Your pins, your comments and your shares mean a LOT to me. We need each other and the world needs us. Together we can change the world, one card at a time. Have a super day!
Hello stampers and happy Monday to you. Today’s blog post is about a beautiful and meaningful Bay Window Fold Card. Thanks very much to Ina Eisen for sending me this lovely “Happy Mail in Holland” card. Can you believe that I have not yet made a Bay Window Fold Card?? It is definitely time to give this fold a try. Ina was very smart in that she wrote on the back of the card that it was this type of fold. If you aren’t immediately aware you might be a bit confused when you first look at it folded flat. People who don’t stamp will definitely be even more clueless that I was in the first ten seconds!
Ina’s Bay Window Fold Card
Here is Ina’s card. What makes it even more meaningful and special is that she put a photo of Elora in the inside of the card. Elora is my hometown and where my parents still live today. I am going to take this card home to show them, I know Mom is going to love it. Many people love using their favourite photos as cards, this is a great way to do just that!
Create With Us International Tutorial
Did you know that in our latest Create With Us International Tutorial bundle there is a Bay Window Card by our very own Tamara Bertram? You can get this tutorial for free with a $60 purchase which just happens to be the amount that you need to spend to get a free saleabration item. If you have not yet received your saleabration brochure in the mail or picked it up from my tote on the front porch, you can see it online here.
Just click on the blue word and then you will have a new tab open on your computer and you can see the two categories of. free items. Some are free with a $60 purchase and some are free with a $120 purchase. Below is a sneak peek of all the projects in our Create With Us Tutorial. The theme is Blessings of Home. If you would rather just purchase the tutorial, you can do so here.
Are You Missing Out?
Do you watch YouTube videos? Do you sometimes wish that you could get more information about the projects that were made? Well, you might be missing out because you didn’t know you could click on those small words “show more”. Here is my short little video that I did with Screen Castify. I couldn’t figure out how to end the video so it gets a bit weird at the end.
Thanks!!
Thanks for joining me today. On Wednesday I will be blogging about my Penguin Place cards that are part of this month’s Parcels in the Post. This is a great way to get a package of assorted coordinating supplies so that you can play along with me for a month of cardmaking. It is only $25 for porch pick up or $32 mailed anywhere in Canada. Check it out here.
Please let me know if you received your spring catalog and/or saleabration flyer in the mail. Stampin’Up! was super late in mailing them out and I am so very sorry that you have not received them yet. Nothing I could do about it!!! Have a super day and happy stamping my friends. Hugs from Holland.
Hello stampers and happy Wednesday to you. Today I have two Valentine’s Triple Cube Pop-Up cards for you. Isn’t that a mouthful? I am super happy with how they turned out and I hope that you are too. There is even a video showing you how to make it so that you can see it isn’t too difficult. The fun part of this video is that it is part of a Global Video Hop Collab Group, so you will be able to see videos from around the world all showing fun fold cards.
Valentine’s Triple Cube Pop-Up Cards
For these cards I used the Sweet Conversations bundle and the Sweet Talk paper. It really is quite adorable. One of the cards is more simple than the other one with less layering.
The one on the left is without the layering and has a basic white base, the one on the right has a highland heather base and has that extra layering as well. Which do you prefer?
Here is a shot of all the pieces that you need to layer on to your card base. Can you believe that I started with these pieces before making the actual base? I find it easy to get all the fiddly bits out of the way first. The card base is actually really simple. If you would like to see another card like this, check out this blog post from a while back.
Video Tutorial
Want to learn how to make this card? Just watch this video and you will be all set!
Measurements
All measurements are all included in my video. The purpose of doing a video is to save time writing a tutorial! It is also helpful to see a card being made rather than just reading about it. I hope you enjoy it and I look forward to seeing your comments! If you like it, please share so more people can see it too. Thanks so much!


")


 Designer Series Paper")

 Designer Series Paper")


")


")

 Braided Ribbon")


")
 Designer Series Paper")
")


