Hello stampers and happy Monday to you. Today I am sharing a card that I call Dragonfly Garden: The Magic of Mist. Truth be told there was a reason this stamp set had not seen ink for almost a year! I didn’t love it, largely because of the patterned paper that was included in the suite. It didn’t appeal to me, so this bundle sat on the shelf. Today it has been transformed and I like a lot more!! Simply by adding a little mist, these stamps were softened and transformed into a work of art that I love. Let’s take a look.
Dragonfly Dreams
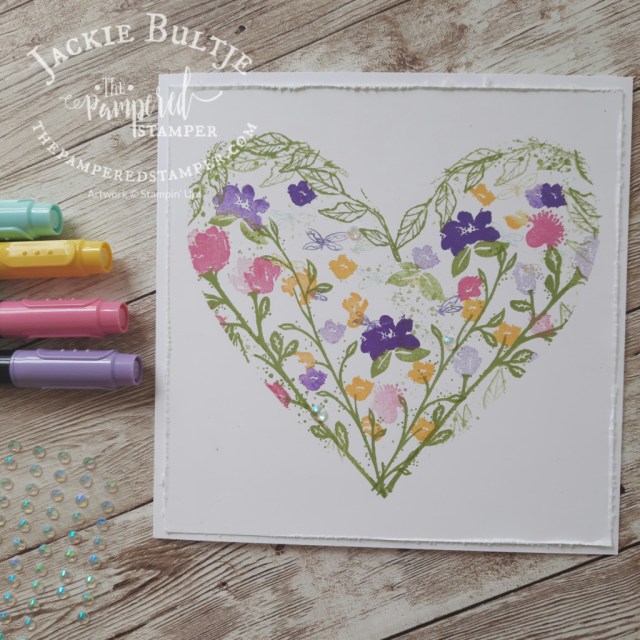
For this card I used two very important products: the stamparatus and shimmery white cardstock. Without those two things you will have limited success. I Inked up the floral image with retiring In Colour Stampin’ Write Markers: Just Jade, Misty Moonlight, Bumblebee, Cinnamon Cider and Magenta Madness. Before stamping I would lightly mist or spritz the inked stamp. Be sure to wipe off with your shammy in between inking up again and stamping multiple times.
I did end up using the grass stamp from Wildflower Path to fill in the bottom of my scene. Did you notice that I used all the retiring In Colours? This was a happy coincidence but also a timely reminder to check your supplies in these colours. Make sure you have enough cardstock and ink refills and of course the markers!
Video Tutorial
I love watching a video to see how a card is made, it is much easier than reading a written description. Be sure to click on the left hand corner of the video that says “watch on YouTube”.
No Blog on Monday!
Since I will not be blogging on Monday as it is March Break and the littles will have moved in with me, I am going to make this an extra long blog post. I want to share some similar cards also using Wildflower Path. For these cards I did not use “the magic of mist” but I did use my stamparatus!! I used grid paper to create a heart mask. My exclusive video tutorial for these cards is on my Prime Time group. This is a very affordable private group that you are welcome to join! It’s only $10 a month, the price of a fancy drink and a treat. You also get a free monthly 16 project pdf tutorial that is worth $20 so you are getting double the value and then some for your investment. I must be crazy!! Click here to join.
Heart Mask Collage Stamping
For my flowers I used the following markers: highland heather, daffodil delight, polished pink and gorgeous grape. The leaves and stems were stamped in pear pizzazz. The question is, do we like it better plain or with a sentiment?
Here you can see the card with two different sentiments. The long skinny one is from Waves of the Ocean. The die from the other card is also from Waves of the Ocean bundle.
Here you can see the gorgeous detail in this closeup of the heart collage card.
A Little Addicted!
I think I may be a little addicted to this technique. A special thanks to Gez Carpenter for sharing this on the Demonstrator Planning Place on Facebook. You can find her blog here.
I made this last card using a very beloved stamp, Free as a Bird. What do you think? This time I used Pool Party and Balmy Blue Blends to colour the birds.
Thank you!
That’s it for today, it should give you lots of ideas for inspiration. I hope you have a super day and don’t forget to get the great deal on the mini die cutting machine! I used it last night to do some embossing and it was such a pleasure to work with. (just a heads up the natural tones Blends are backordered until April 4- bummer!)
Hello stampers and happy Monday to you. Last week I realized that I had totally forgotten to blog about this beautiful Coming Home Bird House Card. I am thrilled to share it with you today.
The Story Behind the Card
This card is not my original work. Not at all. I saw this card on a Facebook group called the Demonstrator Planning Place and it was getting a lot of attention. No wonder. It is a fantastic card and I love everything about it. This card was made and designed by a German demonstrator named Jana Müller. Here is Jana’s blog. I watched her video tutorial but of course it was in German, so I thought it would be a good idea to make and share this card myself. Here it is:
I did make a video tutorial on this card and it is posted in my Prime Time With the Pampered Stamper group. If you want to join this private group, that would be awesome. You can read all about it here.
Close-Up View and Special Trick
Here is a close up view of this great card. There is are three simple tricks that make this card stand out.
Create “berries” for the branches from the Gorgeous Posies stamp with a cajun craze marker.
Make little background “stipples” by flicking the tip of your sahara sand marker against the inside of the marker lid.
Add a spritz of white dots to the background using your Water Painter, a few drops of whisper white craft reinker and a bit of water from the Water Painter and flick over your card. Be careful not to smear afterwards as this white craft ink takes a while to dry.
The Little Details
Here is one more picture that show some details in this card. Dimensionals make all the difference as does the addition of white craft ink. The leaves were punched out using the Autumn Punch pack and then they were colour washed with white craft ink and a water painter. I used a white gel pen (contraband because Stampin’Up! no longer carries one) to make hearts on the little birdhouse hearts. That cute little bird comes from the stamp set Free as a Bird and the “greenery” is from the Sunflowers dies.
There’s more! Do you see the little “droplets”? They are from the Frosted & Clear epoxy droplets in the annual catalog on page 156. If you want them to be a bit smaller you could also use the Flowers for Every Season gems on page 158. That cute striped paper? It’s from Gilded Autumn, but it is backordered until the end of November. Be sure to order it then because it’s awesome!!
Fifteenth Anniversary Celebrations
Did you know that I just celebrated fifteen years as a Stampin’Up! demonstrator? Incredible really. The stories I could tell about this journey are truly amazing. Thanks for being a part of this journey and for supporting me in this business. As a thank you I am offering a FREE Press On stamp set with a $100 online order if you use the current host code SS6VVFCF
The reason I chose this stamp set is because it features lots of coffee images and the class that launched my business was indeed my coffee and a card class. Here is the stamp set so you can see what you will get.
Thanks so much for joining me today. If you want to see all the products used in this card be sure to check the product list below. Click on any of the images and you will be in my online store. Happy shopping!! Have a super day.
Hello stampers and happy Wednesday to you. Today I am sharing two Happy Mail in Holland cards, one uses Posted for You and the other uses Free as a Bird. Posted for You is on my wish list and Free as a Bird was and still is one of my favourite stamp sets. Let’s take a look!
Posted for You by Jean Saunders
Jean Saunders is one of the most wonderful people I know and is very dear to my heart. She is on my team and would make a fantastic demonstrator but she has a busy enough world as a very active mother, grandmother and great-grandmother. Shis has many talents including sewing, knitting, painting, cooking, baking, gardening. If there is a craft then Jean can excel at it. She is also a lot of fun!! Jean lives in Chatham, just five minutes away from me.
Jean stamped this great sentiment, which is also from Posted for You, on the back of the envelope. Feeling the love!! Postage for You has a coordinating
Free as a Bird by Shelley Merkin
I love Shelly’s card, especially the way she stamped on the designer series paper and used a no line stamping technique. In this technique you stamp with a very light colour so that you can barely see the lines. It makes it look like you drew the image yourself!! I love that idea but it is more difficult than you might think. You have to colour very carefully, so I am quite impressed with Shelley’s card. She nailed it!
Shelley was so kind as to include the details about her card. She used the following markers to colour the birds: calypso coral, pear pizzazz, taupe, chocolate chip, dapper denim and pacific point. She added wink of stella to the birds for some subtle bling. The envelope and the inside of the card also had flowers stamped in flirty flamingo. So pretty!! Thank you Shelly for this lovely card. If you want to see more Free as a Bird cards check out this blog post.
Lawrenceburg, Indiana
Shelley’s card is postmarked as Lawrenceburg, Indiana, so let’s take a look at what this place is all about. It is a small town located on the Ohio river and is also known as Whiskey Town since Seagram’s has a distillery there. Sounds like it is also a great place for winter sports with the Perfect North Slopes located there.
Judging by the location on the map, I have driven very close by in the past on my way to Tennessee. Small world indeed!
Some Photos of Holland
These three pictures just summarize a few of my favourite things while I am here. Eating good food. Seeing beautiful art. Enjoying the expansive outdoors.
Tasting platter at my favourite local restaurant, de Jutter in Hoek van Holland.
This painting is from the 1500s. I know that is rather vague, but I don’t know which painting it is! It is a Winter Scene, but I will have to research which one it is, my photos are not clear. See the photo below and you will know it is either one or the other! I love the winter scenes and the age of this masterpiece is just staggering to me.
Ok, I decided not to be lazy and I did my homework. It turns out that the painting is indeed Winter Landscape by Hendrik Avercamp.
This is an Impressionist painting from 1879 by Auguste Renoir called Banks of the Seine at Ruiel.
We walk the beach every day with Bailey the dog and almost every time I feel compelled to take a picture. The beach is usually deserted unless it is above 26C. There are usually some kite surfers, dog walkers and a few fisherman but as you can see it is an expansive beach. This photo makes the dunes look flatter than they are. I will miss this happy place.
Thanks!
Thanks for joining me today, there will be one more blog post on Friday finishing up the Happy Mail in Holland contest as well as my stay here in the Netherlands. I have loved getting your feedback on my travel stories and of course all the cards. If you haven’t left a comment yet, I would love to hear from you! If you live in Canada you can shop with me by simply clicking the pictures of the supplies below. Everyone who places an online order using the host code will get a paper sampler in the mail from me in September.
Hello stampers and happy Wednesday. Have you noticed these days that it truly is the little things that make a difference? I find that when I am in a funk it is time for me to get into nature and be still. To commune with God and soak in His peace. When you slow down and rest, when you breathe deeply you also become more aware of your surroundings. All of a sudden you will see things that you didn’t see before. The buds opening on the trees, a tiny white-breasted nuthatch flitting from tree to tree. Here are some pictures that I took on my recent walk in town.
Spring Dutch Door Card
My leisurely walk through nature restored my soul. At one point I laid on the ground with my binoculars looking up at the great horned owl perched on a branch way above me. I saw it move across the branch and tilt its head down to peer at me to discern my intent. She was keeping a watchful eye on her improvised nest a few trees away and she wanted to make sure that I wasn’t a threat. When I got up, there were leaves caught in my hair but that’s ok. It was good to feel like a kid again. I sat down on a culvert in the shade and was able to see lots of bird activity. This inspired my spring card.
If you would like to know how to make this card you can check out this blog post or watch the video below.
Fancy Fold Card Contest
I am super excited because the first cards for this contest have arrived. Instead of waiting till they all come in, I will blog about them as they arrive. Stay tuned for the first card by Ina Eisen on Friday. How appropriate! Ina was the one who inspired this card and her Dino Days card will be a treat for all of you. If you want to participate in this contest, please send me a card by May 31 to Jackie Bultje, 81 Delaware Ave, Chatham, Ontario N7L 2W3. You will be entered into a contest to win the Little Ladybug stamp set.
Ornate Garden Suite
Stampin’Up! has released this beautiful new suite and I have told you nothing at all about it. I feel really badly about that because it is full of beautiful things that you might want to have. Truth is, with this Corona virus pandemic I have been super focused on helping families with my #kitsforkids. Please watch this video as it really shows how beautiful the products are. I even forgot to provide a link below in the product supply list, so you can just click here if you want to order it.
Here is an image that shows you a little more. The cards I have seen online with this suite are beautiful and I have heard nothing but good things about it. It might be the perfect #covidbuster for you.
If you click on this link you can go crazy and order whatever your heart desires. Shipping is faster than Amazon!!
Have a super day and thanks for dropping by. Stay safe. Be patient. Be kind.
Hello stampers! Did you know that this is the first time that Stampin’Up! has offered a coordinating combination of dies and embossing folders? Yes, this brand new product has dies that cut out an oval and a rectangular frame as well as embossing folders that transform these frames into works of art. I am even more excited to use the heirloom frames dies and 3D embossing folders now that my new 3D embossing plate came in. It is so easy to use with just the Big Shot base. At the end of this post I will share a video so that you can see it in action.
Why Get the new Embossing Plate?
When Stampin’Up! announced that they were no longer going to be selling the Big Shot I was rather alarmed. What were we going to do without a die cutting machine? It is true that they are working on a new machine but it will not be available for a while. I firmly believe that it will be a superlative product just like our Stamparatus is way better than any other product in its class. However, I am frugal and I didn’t really want to spend any more money making the Big Shot work for me. Our new 3D embossing folders are made to work in the new machine that is being developed and they will only work in the Big Shot with some tweaking. I used two pieces of thicker cardstock that come in our specialty designer series paper to create a shim. What a nuisance!! It was tricky to use and boy was it getting ugly. For $13 I have a beautiful 3D embossing plate which works like a dream. I can totally vouch for it as it will just make your life so much easier. No muss, no fuss. Yay!!
The Cards
What I like most about this card is the duplication of colour between the designer series paper and the stamped birds in the frame. It highlights one of the best features of Stampin’Up! products: colour coordination. You never have to guess. Your cards always look professional even if they are very simple. Colour coordination saves you time and simplifies the creative process.
Do you notice that this card is larger? That is because it is! It is a large Memories and More card measuring 6 1/4″ by 4 1/4″. I wanted a larger card to better showcase the pretty feather paper from the Bird Ballad suite. Otherwise the pretty grey heirloom frame would cover most of it up. the bird was fussy cut from the Bird Ballad paper as well.
The Opportunity
Did you know that the starter kit is also an option for someone who has no intention of becoming a demonstrator? Furthermore, did you know that you can put whatever you want into this kit? Yes! It is totally customizable to whatever you want and it costs only $135 in Canada with no shipping and tax. Normally you would get to choose $165 worth of products to put in your kit, but for the month of August you can choose $205 worth of product. There is an “Extra, Extra” promotion going on right now where you get an extra $40 worth of free product and then in September you get an extra $14 coupon code to use on your order.
You can get the kit just to get the great deal, but after that you will have until the end of December to use your own 20% discount. If you want to stay active as a demonstrator or keep getting your discount you need to spend or buy $400 each quarter. If you order the starter kit through me that automatically makes you a member of my Beyond Pampered Team. We have free monthly gatherings where we get together to stamp and enjoy treats. I also have a team training page that is free. My goal is to help you meet your goals and to live your dreams. Click here if you want to get started. You will be asked if you have a host code, click “no”, then click “apply”. The only time you have a host code is if you hosted a workshop and you wanted to use your host rewards towards the purchase of a starter kit.
The Video Must-See
Here is the video I made to show you a very important trick to using the Heirloom Frames Dies and 3D embossing folders without messing up. Without this trick it can be troublesome indeed, in fact, I wasn’t sure if I was going to promote this product until I discovered this trick. Happy stamping and thanks so much for stopping by.
Hello stampers! Do you ever have a product that you keep reaching for? Stitched Nested Labels might just become one of those.I know it has been for me. These lovely dies are perfect for adding a distinctive focal point to your card. They are big enough to stamp an image on as well as a sentiment. Stitched Nested Labels are also part of the Free as Bird bundle, so it is a win win situation don’t you think?
Two of the cards use the Stitched Nested Labels, but they all use Free as a Bird which is one of my favourite stamp sets and suites in the catalog. Have you seen the gorgeous paper that coordinates with this set? Oh my!! So many possibilities. These dies are really wonderful to use, much easier than our earlier stitched dies. I don’t know if it is just me, but the other stitched dies are really hard to get out and some of my people are afraid of tearing their cardstock when doing so. The Stitched Nested Labels pop out really easily and cut perfectly as well, so I consider them a good investment.
This is a close up of the first card so that you can see the great coordination of the in colour designer series paper. You can also see the lovely stitching in the Stitched Nested Dies here. No fussy, time-consuming poking here, you just run the die through a die cutting machine and it comes out like this! I used the largest die here and I used a scrap of white. Here is a picture so you can see how it is done.
This pool party card uses tone on tone stamping in the background and it also uses the second largest die from the Stitched Nested Labels. The bottom piece of patterned paper measures 4 1/4″ by 2 3/4″. Do you notice that the flowers on the stamped image perfectly match the patterned paper? I love using the designer series paper as inspiration for colouring.
So Thankful For My Team
Actually I didn’t make these cards at all, my team member Alison Reid did. What a blessing to me! Alison brought a box full of cards that she had made in the last month to our team party on Wednesday night. Her timing was perfect as I had just found out that my Pap was in the hospital and was planning to go visit him first thing Thursday morning. That meant I had no time to design cards for my coffee and a card class. Thankfully I had taken pictures of Alison’s cards and decided to use the three she had made using the Stitched Nested Labels. I sent the pictures to my other team member Yvonne Macfadyen who then made the cards and prepped them for my class. I am so blessed to have such a great team. These two have been on my team for ten years now and we were actually celebrating that on Wednesday night. One of the things that many team members shared that night and then later on our team page was how thankful they all were for the meaningful friendships formed through Stampin’Up!
This last card doesn’t use the Stitched Nested Label dies, but it does use the Swirly Frames stamp set and the layering circles dies. When you look at the crumb cake circle it makes you think that a stitched die was used, but that is actually the stamp. I got this stamp set at a Prize Patrol at an OnStage event. OnStage is a local Stampin’Up! event that used to happen twice a year and Prize Patrol is when a select group of people win a prize. We are given wristbands or stickers with different colours and when a certain colour is announced, then those people win a prize. It’s a lot of fun. I may have overlooked this stamp set in the catalog, but it is one of those great foundational stamps that can really make a big difference in your card making. The rectangle in the background is also from this set.
This card actually has a lot going on in it. Alison cased this card straight from the catalog. You can see it on page 117. I actually like Alison’s card better. She used the Subtle embossing folder on the so saffron background rather than the stamped image in the catalog. The flowers and the leaves are fussy cut. You can join me at my weekly Facebook live video on Tuesday night at 7pm EST when I will be making these cards and sharing any tips and tricks we learn at class.
Starter Kit Opportunity
Thanks for joining me. I appreciate you ever so much. If you live in Canada and want more excitement in your life, you may wish to consider joining my team. Whether you only want your own discount or you want to build a stamping empire, the starter kit is the golden ticket. Click here or message me if you need help. And yes, you can add pre-order items from the holiday catalog to your starter kit!! Until the end of August the starter kit can be totally customized with up to $205 worth of products in it as well as a Paper Pumpkin kit, 8 annual catalogs, 8 holiday catalogs and 50 order forms. You pay only $135. Wow! What are you waiting for?


")
")


")


 Polka Dot Tulle Ribbon")
 Braided Linen Trim")


 Designer Series Paper")


