Hello stampers, I’m back with a gorgeous Come Sail Away sampler. It is so hard for me to stay away from this Come Sail Away suite as I am always drawn to the water and to all things nautical. I also love samplers! What about you? What’s your go to set in this catalog? Do you love making samplers too? This one is a 12 x 12 and will fit in either a regular frame or a shadow box. Mine is in a dark shadow box and I think it might look nicer in a simple white frame.
The Sampler
What makes this Come Sail Away Sampler so awesome is that it is so very easy and quick to make. The Memories and More pack make it this way. Three of the sections are made using the beautiful laser cut cards in this kit. I simply matted them with night of navy 1/4 inch bigger than the cards. I will include a list of supplies that you will need to make this sampler yourself at home. The whole thing took me about an hour to make.
Some Tips
Did you know that this sampler was made using no stamps at all? This is a great beginner project for that reason. I also thought it would be very nice to include a memorable picture in the bottom panel where it says celebrate today. That would add the perfect personal touch. These cards were designed to be used for scrapbooking but they can also be used for cards. In fact, Stampin’Up! makes special cards and envelopes to coordinate with these cards. If you are like most people and sometimes find yourself wishing you had more hours in a day, you might want to check out this product line. You can keep it simple or you can go fancy, but either way it is a wonderful time saver!
Facebook Live
Every Tuesday at 7pm EST I do a Facebook live video showing the cards that we made at coffee and a card that morning. This time we used the Come Sail Away suite. Here is the link so you can check it out too.
Thanks so much for joining me today, sorry it has been a while since I posted. This was due to my wanting to spend the last week of vacation with my kids and grandkids but also because I needed to rest my wrist and thumb some more. The healing is simply not happening. Tomorrow I am going to try acupuncture for the first time!
I always look forward to seeing your comments and every online order excites me and brings me deep gratitude.
Hello stampers! Here is my summer sampler. It has the exact same measurements as the Spring Sampler I posted yesterday. I love the fresh vibrant colours in this one: coastal cabana, bermuda bay, pool party, daffodil delight and a pop of calypso coral all on crisp whisper white background. This one has a lot of texture with embossing folders, popped die cuts and white emboss resist with the lighthouse. I also love the fact that the letters in SUMMER are all different. I totally cased this from fellow demonstrator Cathy Casey whose creation you can see here. I also used her idea for the daffodil delight panel. Here is my work.
I just love playing with different stamp sets and small vistas. Each little rectangle is its own masterpiece. If you have never made a sampler before, you should try it. It’s a lot of fun!! I love the crisp contrast with the heron on the top left corner and the dreamy quality of the lighthouse panel. I embossed it in white and then sponged over it with coastal cabana and then a little touch of calypso coral and daffodil delight to create a sunset look. The stamp sets that I used work very well together: Lilypad Lake, Beautiful You, Colorful Seasons, High Tide and Come Sail Away.
Don’t you just love how I turned the girl in the dress from Beautiful You into a girl in a bikini? I think I did a video on that a long time ago. It wasn’t my original idea but it sure is fun! First you add the belly button, then draw a line to make a bikini top. Then draw on a bikini bottom and give her some legs! I can hardly draw at all and I managed to do this without a problem. Have fun and play, you will be amazed at what can happen.
The measurements for this sampler are almost exactly the same as the Spring Sampler from yesterday’s post, but I will include them here to make life a little easier for you.
Measurements
frame: 8″ by 10″
bottom panels: coastal cabana 3 5/8″ by 2 7/8″ white: 3 3/8″ by 2 5/8″ scrap of crumb cake torn to look like sand
centre panel- : 2 7/8″ by 7 1/2″ whisper white: 2 5/8″ by 7 3/8″ The letters are daffodil delight, coastal cabana, bermuda bay, granny apple green and balmy blue.
top panels: 2 3/8″ by 3 1/4 ( two are coastal cabana, one is daffodil delight) one white and one bermuda bay 2 1/4″ by 3 1/8″
I hope you enjoyed this summer sampler and that you are inspired to create your own.
I will most likely be absent from this blog for the next ten days. Tomorrow I am going to Detroit to meet with a fellow demonstrator. We are hoping to collaborate together as cross border buddies. I will fill you in on all the details when I get back. Even more exciting, Gerard is coming for an 8 day visit for my birthday which is on Saturday. I want to spend every minute with him, so work is going to take a back seat. I know you will understand. That is the beauty of owning your own business and doing what you love. #workhardplayhard #familyfirst I will try to stay on top of emails and orders and I will post on social media a little bit too. Thanks for all your love and support, it means so very much to me. Enjoy your new catalogs, I have left some on my front porch if you need to pick one up.
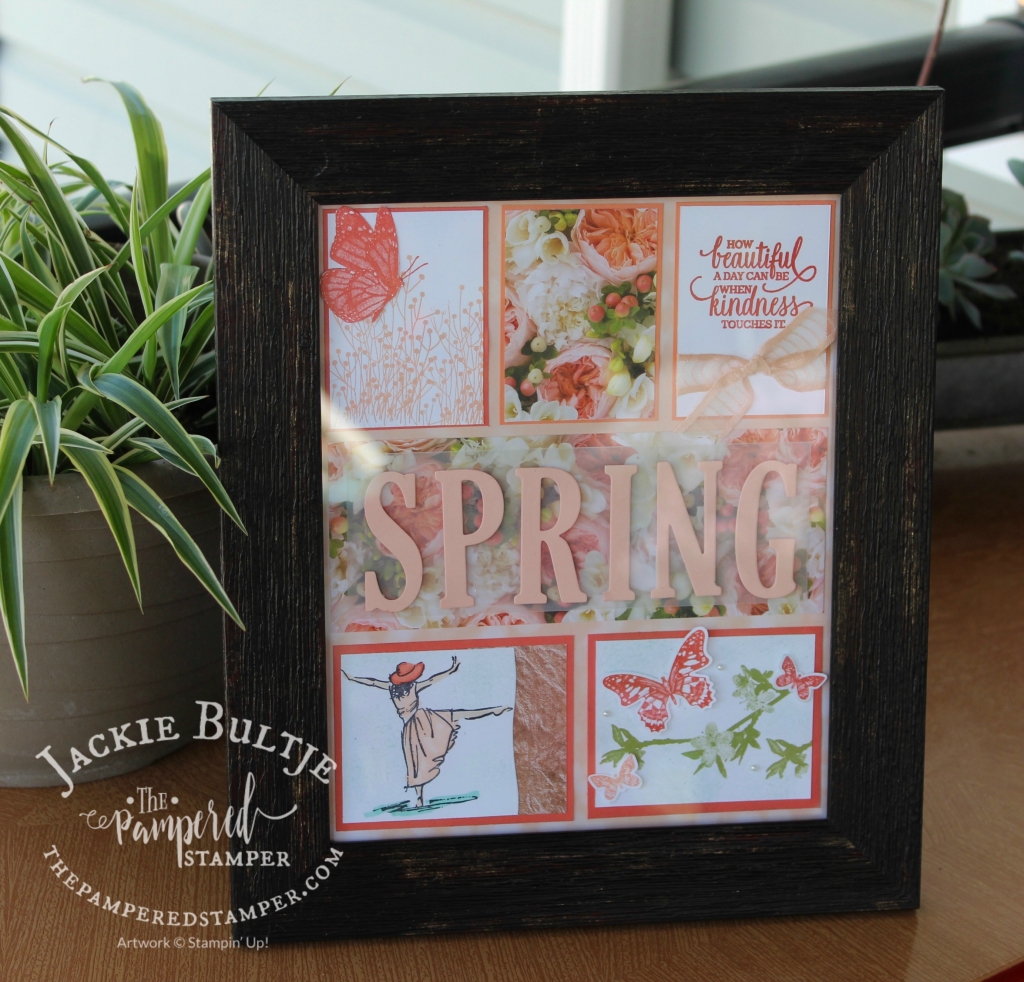
Hello stampers. This Spring Sampler is a little late, but it is officially still spring! Last year I made samplers for each season and my customers were requesting more of them. They are such fun to make! While making cards is very gratifying, they get sent away. A sampler is your creative work framed for all to see. Do you want to see what I made?
I didn’t have time to take pictures of each individual rectangle but I can tell you which stamps I used and the colours. The colours are whisper white, petal pink, calypso coral and pear pizzazz. I used a new stamp set called Butterfly Wishes as well as Enjoy Life, Beautiful You and the Large Letter framelits. The letters are popped up with mini dimensionals over vellum which was layered on the Petal Promenade designer series paper. With the new catalog going live today both the letter framelits and this pretty paper is now discontinued.
Measurements
frame: 8″ by 10″
bottom panels: calypso coral 3 5/8″ by 2 7/8″ white: 3 3/8″ by 2 5/8″
centre panel- petal promenade paper: 2 7/8″ by 7 1/2″ vellum: 2 1/2″ by 7″
top panels: 2 3/8″ by 3 1/4 (one was calypso coral, two were grapefruit grove) white or patterned paper 2 1/4″ by 3 1/8″
The panel with the lady from Beautiful You was a happy accident. I used the wavy framelet from Lilypad Lake to make an intricate design on the one end but instead it cut it right off leaving a nice wavy edge, so I just added some pretty paper from the Petal Promenade collection to add interest. It is 2 5/8″ wide and is tucked behind the white panel.
I added a scrap of ribbon to the top right panel that has the saying from Enjoy Life. Tomorrow I hope to share my Summer Sampler. We will be making this sampler on Saturday June 15 at 1pm. the cost is $25. I can make a kit that you can order but I cannot include stamped images. Thanks for dropping by and remember the new catalog goes live today!! What is at the top of your wish list?
Hello stampers. Happy Monday!! Good Things Grow was a Paper Pumpkin kit from March 2018 and I loved it so much that I ordered quite a few, enough to make samplers with it. The first one I made had a lemon lime twist background and I just made a second version with a daffodil delight background with a lace overlay. The good news is that they are available as kits!! They are only $20 each. Not sure yet on the shipping cost. I think it will be quite cheap if you provide your own background because then the package will be smaller, but I will definitely look into it.
Here is a closeup of this one. I added a gold foil acetate overlay for even more luscious texture. I have four kits with this available.
When I was at Art in the Park on Saturday selling these kits among other things I had the inspiration to add a yellow background. I decided on daffodil delight with a lace overlay. This was super easy to do by simply adding spray adhesive to the back of the lace paper.
Here is a close up so that you can see the detail from the Delightfully Detailed laser cut paper I used for the background.
The best part is that I used a Paper Pumpkin kit from March 2018 called Good Things Grow to make this sampler. The kit was a beautiful card kit, but I turned it into a sampler instead using even the envelopes which I thought were too pretty to mail!! Be sure to subscribe to this amazing monthly kit before the price goes up in June.
That’s all for today, my wrists are still terribly sore. My new keyboard tray is coming Wednesday so that will make my desk work ergonomically correct. Thanks so much for stopping by and don’t forget to get your Paper Pumpkin Subscription before the price goes up. You need to get a prepaid subscription in either 3, 6 or 12 months to lock in the low price. Here is a quick link to make it easy for you, or message me if that is easier. Let me know if you want a sampler kit and together we’ll figure out the details of shipping and payment. Some day I will have a simpler PayPal button process. That is on my to do list in the coming week(s).
Here is a sneak peek for June, just to give you an idea of what to expect.
Hello stampers, I’m back after a busy weekend. Not only was it Mother’s Day, it was also my daughter Rachel’s 20th birthday! So we had a weekend of celebrations with the family which was really, really nice. The weather even cooperated on Saturday with some nice sunshine. Today it is raining again, I swear even I am going to start growing moss! Today I want to share with you some more home decor frame inserts. In the winter we made this home decor frame for the first time with the promise that more inserts would be made as we needed them. This is such a nice easy project to do and to change up for the different seasons. If you look at this blog post you will see the original. Here are the latest additions:
I made two different floral ones for spring and the reason for that is that one is using a framelit and the other is fussy cutting, so there is a suitable option for different crafters. I also realize that my summer insert with the leaf and chair does look a little bit like fall. It is just that I love red and also love the real red and crushed curry together. I might have to make a different summer insert, but do you think this is a good one for Canada Day? The apron with the barbecue tools is also a favourite of mine. Do you want to see what they look like in a frame?
The daffodils in this frame were fussy cut and they come from the stamp set You’re Inspiring. I coloured with Blends and added a few pearls. The frame comes from Michael’s from their everyday value collection so it is almost always in stock and only costs $10 in Canada.
The flowers here come from Lovely Romance which is now sold out, but at least you can use this easy version in my class if you don’t want to fussy cut the daffodils!
Here is a close up of the barbecue apron and tools which I made using Apron of Love. This set is also retiring so get it before it’s gone. It is perfect for scrapbooking and also for mother’s day or father’s day cards.
The paper for the apron comes from Best Route and the strawberry is from the retired set Fruit Basket. The fruit punches are on the clearance rack right now! The galvanized metallic paper was on the clearance rack for a super deal so I scooped up several packages. It’s always a good idea to keep an eye out on the clearance rack. There are super deals, but it is like Costco, if you see it you need to get it right away or you will miss out.
I think this last one is perfect for Canada Day although you could definitely use it for fall as well. The red leaf is symbolic of our solid red maple leaf on the Canadian flag. I might have to make a beachy scene yet to appease my summer lovers. I don’t know if we have a current set that has a sand bucket, but I am going to use the set Beach Happy and see how that turns out. Did you know that it is retiring too? If you want to add any of these retiring products to your collection and you live in Canada, just click on the images below and you can start shopping with me. I will be even happier if you also use the current host code TXE4JNCY.
Thanks so much for stopping by. Have fun making this super easy home decor project. This makes a fun and memorable gift for your friends as well.
Hello stampers! My heart is full of gratitude today as I write this. I don’t usually make a big deal of my Stampin’Up! anniversaries but this year marks thirteen years of doing what I love. I can honestly say that I love it even more than when I first started. The main reason for that is YOU!!! It is because I now have so many amazing people in my life that my work is even more rewarding. My customers, my team members and my fellow demonstrators have become amazing friends. Especially in this last year when life has thrown me some curveballs I have had such tremendous support from all of you. For this I am grateful beyond belief.
Finding out yesterday from a fellow demonstrator in Toronto, Selena Merali that I had won some awards was just the icing on the cake. These things are important milestones in my career so I share them with you because you are also a big part of these accolades, I’m not trying to brag.
Number 4 in all of Canada!!!
Number 55 in all the world. There are more than 50,000 demonstrators just so you understand the magnitude of this number. It made me get goosebumps!!
In Canada I was also #8 in Leadership #9 in recruiting, and #13 in sales. Not too shabby at all. We have some amazing talent in Canada and around the world and I am humbled and honoured to be a part of it all. Thanks for letting me toot my own horn. I am “direct to the company” so I don’t have an upline who would to this on my behalf, otherwise I would let him or her do it for me.
Well, enough about me, and let’s talk about stamping shall we? Today I want to share with you an amazing home decor piece. I was inspired by fellow demonstrator and friend from Minnesota, Sandy Carlson. The neat thing about this framed art is that the “O” is interchangeable. It has a velcro backing so that you can switch it up according to season or mood. I have mind behind the glass right now to keep it from getting dirty, but some people omit the glass to make it easier to switch the decor piece. I used the Large Letter framelits to cut out the letters with both basic black cardstock and with a thin foam that you can get at the dollar store. This gives it added sturdiness and dimension. Let’s take a look:
Here is a cute Santa version. I also changed up the background a bit. I found it quite tricky to use the simple stripes embossing folder on a 5×7″ mat. It meant that I had to run it through the Big Shot with the stripes going vertically and that ruins the paper. There is no way to run it through horizontally. I used our retired corrugated paper and I think it looks quite nice. I love using my card making supplies for home decor and it sure is nice to have something on the wall or the mantle that you have made yourself. Being able to use it all year long with a simple substitution is also a huge bonus. With Christmas just around the corner this would also make a beautiful but inexpensive gift.
The last one I made is actually the one I cased from my friend Sandy. I love it!! I used the Rooted in Nature bundle as well as the Colorful Seasons bundle for the maple leaf. The “M” looks like it is shaded, but it was a cloudy rainy day here in southern Ontario and that is just a shadow, so just ignore it.
I will be teaching this as a class on Wednesday November 28 at 1pm and 7pm. Cost is $30 and it includes the frame. Number of spaces depends on how many frames I can source. Here is a short video showing how the velcro piece works. I didn’t take a picture of the velcro on the “O” pieces, but the video explains it for you.
I almost forgot to say that I would love very much if you would order from me if you don’t already have a demonstrator. I am also very happy to have you join my team and to share my 13 years of experience with you to help you succeed as well. If you do choose to order online, it is even nicer if you take the time to use the host code that is posted on the sidebar of the blog post. I appreciate each and every one of you so very much. Have a super day!


 Organdy Striped Ribbon")


 Braided Linen Trim")


 Specialty Designer Series Paper")


