Hello stampers and happy Wednesday to you. I just love this unique colour combo! Have you ever tried basic black with calypso coral and soft sea foam? Me neither. It was during a video making session for Stamping Through My Stash that I stumbled across it. today I am going to share my Just My Type card
The photo above shows the stamp “sampler” that is the end result of every Stamping Through My Stash session. Can you see how this little ritual can be inspiring? I really love sharing this with you every week. Have you subscribed to my channel so that you can see this every Wednesday? I hope you do. Click here to see my YouTube channel.
Video Tutorial
A few other Just My Type Cards
I made a few more cards with this great set at a stamping event with German demonstrator Jenni Pauli. She used a different colour scheme and size of card. These are slimline cards that fit into a business envelope. I realized that I forgot to take good pictures of these cards after my own stamp set came in, but at least this will give you some more inspiration.
Do it your way!
There are lots of possibilities with this stamp set. Just pick your favourite colour scheme and start playing. I love all the options and look forward to doing more things with it. If you would like to order these product and you live in Canada, you can just click on the images below to shop with me. I hope that I have inspired you today! Have a super day and thanks for taking the time to read my blog post. If there are any errors it is because I am typing away whilst on the train and it wobbles a lot!!
Hello stampers and happy Saturday to you. Today I am going to show you how you can change your exploring in color cards with these great dies! Which dies? Why, the Deckled Rectangle dies. They are so vintage looking and not only are they great for this card technique, they are also fantastic for scrapbooking. With the deckled edge, they are reminiscent of a by-gone age. Do you remember old photos and postcards with this deckled edge? Let’s take a look.
Exploring In Color Cards with Deckled Rectangle Dies
To make these fun cards, I first cut the card in half. Then I used the third largest die to cut out the centre of the card front and the second largest die to cut out a piece from the back of the card. Layer these two over top of each other and put on the card front, trim it a little and layer on to your desired card front.
You can use either the bicycle die from Fun on Wheels or an image from Beside Me that has been coloured with In Color blends and then fussy cut with paper snips. Which one is your favourite?
Falling in love with In Colors
Colouring these images with the in color blends that coordinate with the cards has made me really fall in love with them. I used Pebbled Path, Bojo Blue, Wild Wheat, and Copper Clay. The only colours that were not “in colors” were Night of Navy, Mossy Meadow and the Medium and Medium Light blends. Have you been inspired to add these colours to your Blends collection?
Video Tutorial
Watching a video to see how it is done is always a nice bonus. I hope you enjoy this one. Please subscribe to my YouTube channel and perhaps even leave a comment there for me. Let me know if you have arrived there after reading this blog post!!
Cash Back in August?!
Did you know that each month I feature a different bundle or suite with my Sweet Suite Tuesdays? If you order the featured suite you get 20% cash back from the catalog price, so be sure to order your Fun on Wheels bundle in August. You will then have four video tutorials on my YouTube channel to give you lots of inspiration. Happy stamping my friends, and thank you so much for joining me today. Have a super day.
ps. did you know that if you live in Canada and click on the photos below in my product list you will automatically be in my online store? Try it, and see how easy it is!!
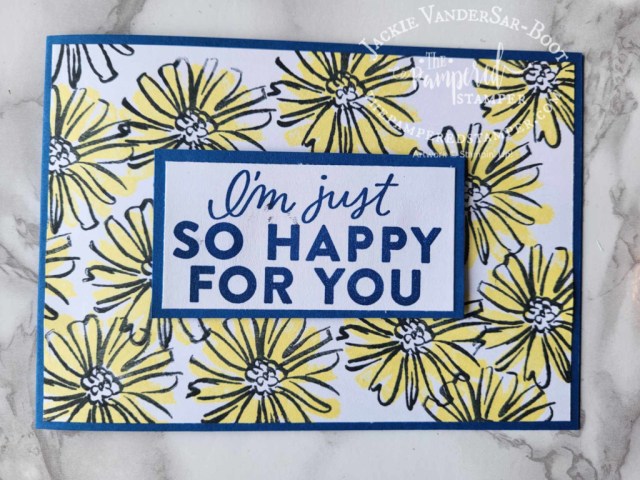
Hello stampers and happy Monday to you. Simple stamping for easy backgrounds! Today I am sharing some easy cards that you can make with creating your own stamped backgrounds. I used the Color & Contour stamp set with Blueberry Bushel and Lemon Lolly.
Here is a closeup of the stamped background. You could do it with or without the dotty stamp.
A few more simple stamping for easy backgrounds ideas
Do you see the blue mat behind the “I’m just so happy for you”? That is the piece that was cut off from the card above! This was the result of my impatience. I needed a mat for my sentiment but the only piece of Blueberry Bushel cardstock that I had nearby was already cut and scored into a card! I cut a piece off the one end and then couldn’t bear to throw the rest of the card away or cut it up, so I designed the card above with it. Here you can also see what the background stamping looks like without the “dotty” stamp. Which one is your favourite?
For the card below I chose to keep it cleaner by omitting the blue mat and using a scalloped stitched die instead from the Scalloped Contours dies. I also fussy cut one of the flowers from the stamped background to pop up on the lower left hand corner. This is a stepped up version of the last card. Do you know where the saying is from? Check out the Good Feelings stamp set and see how you can use it for background stamping here.
Video Tutorial
Here is a video tutorial for these cards, but you can also check out this “short” on YouTube to see the background stamping done in Berry Burst.
So easy to shop with me!
Did you know how easy it is to shop with me? If you live in Canada, you can just click on the images in my product list to shop with me. If you live in Europe, you can click here to shop with me, join my team or host a workshop. Thanks so much for joining me today, I hope I have inspired you to do some simple stamping and make your own backgrounds! Have a super day.
Hello stampers and happy Friday to you. Today I am so very excited to share a fun card with you that I designed last week. I call it the Patchwork Effect card using the Nested Essentials dies. The second card that I am sharing uses the pieces that I had made when playing with the design for this card. Always take time to play my friends, that is when the magic happens!
Patchwork Effect Card
I made these cards for my exclusive Prime Time group. Each Thursday I made a video just for them! This group was started during COVID19 to keep my business going when I couldn’t do my weekly coffee and a card classes. Membership is only $10 a month (in three month instalments) and members also get a monthly pdf tutorial bundle worth more than that, so it is a really great deal. Want to join too? Click here. You will be glad you did!
I forgot to add the embossing folders to my product list. For the patchwork effect card I used the Fern 3D embossing folder and for the other card I used the Basics 3D embossing folders that are only available as online exclusives. Click on the blue words (the link) and you will be in my Canadian online store.
One More Idea for the Nested Essentials Dies
I was going to write a separate blog post with this card, but then I thought, why not spoil you with lots of great ideas for both the One Horse Open Sleigh paper AND the Nested Essentials Dies? Which card is your favourite?
Video Tutorial
I DO have a video tutorial for you for this card. Have you checked out my YouTube channel? It’s like having a free class every Monday, Tuesday and Wednesday with a video being posted at 10am EST which is 4pm in the Netherlands or 3pm in the UK. That is probably around midnight down under depending on where you are in Australia or New Zealand!
Have a Great Weekend!
I hope you all have a great weekend. Are you going to be adding the Nested Essentials dies to your next order? If you are, I hope you choose me as your demonstrator! Everyone who orders through me gets a free pdf tutorial bundle. At least one, and up to three! Have a super day.
Hello stampers and happy Wednesday to you. Today I have a beautiful tinted embossing paste butterfly card for you. If you have been following me on my YouTube channel, then you might know that I have been a little obsessed with embossing paste. Once you open a jar, you just want to keep playing. Want to see what I made??
Beautiful tinted embossing paste butterfly
First off: a disclaimer. The Butterflies & Flowers layering decorative masks are no longer available. Every year Stampin’Up! “retires” some products and this is one such product. They have different masks available now but this was one I had on hand that would really show off the tinted embossing paste technique.
I first used a blending brush to make a solid butterfly image. Then I used the detailed image at the bottom to use with the embossing paste. Just two drops of pool party reinker were added to about a tablespoon of embossing paste. I put it in a little bowl and stirred it with the smallest palette knife. If you want to see the whole card being made, just watch the YouTube video tutorial at the end of this blog post.
Here you can see how nice the tinted embossing paste looks up close.
Video Tutorial
More Embossing Ideas
Did you know that I am a member of the International Create With Us tutorial bundle team? This month our tutorial bundle features embossing folders. You can get this fifteen card tutorial for free if you order online through me or you can purchase it in the tutorials section of my blog. Below is a sneak peek of our tutorial. PDF tutorials are a great way to jump start your creativity and to become a more talented stamper. Enjoy!!
Thanks for joining me today, I hope you have a super day!