Hello stampers and happy Monday to you. Today I am sharing a really lovely card that features a stunning fold with just one die!! This card looks so complicated but it really isn’t! That’s my favourite kind.
Why Grassy Grove?
I was checking the Inventory Status report to help me decide which suite to feature for August and I realized that all the suites that I wanted to use are backordered. Then I saw the beautiful Grassy Grove on my shelf and thought I would show it some love. It has long been a favourite of mine, and I just recently was able to purchase some New Horizons paper that coordinates with this suite perfectly. Take a look at the photo.
That’s right. If you don’t have this stamp set and dies yet, I will send you ten sheets of the beautiful New Horizons paper for free. Then you will be able to make this stunning card too.
Weekly Cheer Corner Video
Did you miss my weekly Monday Cheer Corner video? Every Monday at 10am EST I go live on my Facebook page to make a Cheer Corner card. You can nominate someone to receive this card; anyone who needs a little cheer. Together we CAN change the world one card at a time. Click below to watch the video tutorial. Please subscribe to my channel if you haven’t already. I would very much appreciate it if you would also click on the share button.
Hello stampers. Today I want to address the question, what is a Stampin’Up! demonstrator? A Stampin’Up! demonstrator is someone who loves to make cards and other papercrafting products and who has fallen in love with the line of Stampin’Up! products. Anyone who purchases the starter kit is considered to be a Stampin’Up! demonstrator.
What is a Stampin’Up! Demonstrator?
A Stampin’Up! demonstrator is an independent contractor with Stampin’Up! When you purchase the starter kit you are independent, so you can choose what you do with this kit. In your kit will be Stampin’Up! supplies that you have chosen yourself as well as an additional “business kit” that includes 8 annual catalogs, 8 mini catalogs, 50 order forms, and 100 postcard invitations.
You can choose to pursue your demonstratorship as a business, or you can simply enjoy the personal benefits. While you are referred to as a “demonstrator”, you do NOT have to DEMONSTRATE anything. This will come as a relief to many of you! You do not have to become ME!!!
Who can become a demonstrator?
I have the unique position of being a demonstrator in both Canada and the Netherlands. That means you can join my Canadian team if you are a Canadian and in Europe, the rules are a little different. Anyone in the Stampin’Up! European markets (the Netherlands, UK, Ireland, Belgium, Germany, France, and Austria) can join my team.
Becoming a Stampin’Up! demonstrator is completely flexible and personal; you do what YOU want. The only thing that is necessary to remain a demonstrator is to meet your quarterly minimums. That is the amount you need to buy yourself or sell to others every three months. Stampin’Up! measures this is CSV which is commissionable sales volume. One CSV is one US dollar. The value of your local currency will determine the amount you need to sell. For example, in Canada, that amount would be around $400, but in Europe it will be closer to €300.
I would say that there are three types of demonstrators.
Hobby Stamper
Loves card making and papercrafting
Enjoys having a discount on all their purchases
Loves the opportunity to connect with our fun community of other stampers
Loves having access to card making tutorials, exclusive video tutorials and online stamping events.
Receives early access to new catalogs, products and kits
Loves learning new stamping techniques and getting card making ideas.
Business Builder
They want to sell Stampin’Up! products to friends and family who will introduce them to new customers.
Join for the opportunity to share their love of stamping with others.
Choose to run their business by holding classes, hosting workshops, selling their cards, pdf tutorials, video tutorials online or in person.
Share the benefits of being a demonstrators with others and in doing so build a team of demonstrators.
Work as much or as little as you like with the goal of not having to meet the minimum sales requirement with their own purchases.
A “business builder” is the term we use for anyone who is doing more than just purchasing for themselves.
Everyone in Between
Some join for the discount and then end up placing a few orders for their friends.
Many join for personal benefits (mainly social) and then decide to hold the occasional class or start sharing online.
The Best Part!
The best part is that Stampin’Up! treats everyone the same, as do I! My Beyond Pampered Team is a great mix of business builders, hobby stampers and everyone in between. Everyone who joins is called a demonstrator. All demonstrators have access to the same resources and benefits. It is up to you what you want to take advantage of as a Stampin’Up! demonstrator.
How much money can I SAVE as a Stampin’Up! demonstrator?
Did you know that the reason that most people get the starter kit is to save money? Saving money and getting free products is one of the biggest reasons that people join.
The first savings is when you get the Demonstrator Starter kit. In Canada you can select $165 worth of products and pay only $135. There is also free shipping and no tax in most provinces. The free shipping is alone worth $18.15. In Canada you will also get a bonus Paper Pumpkin kit which is worth $35.
The second way to save is your 20% discount on all your purchases. If you choose to sell to others, you will earn a 20% commission. Depending on how much you buy or sell, you can increase this amount to 25%.
The third way to save is when you place your own orders you can get host benefits. That’s right! You don’t actually have to “host” a workshop to get host benefits. As soon as your order reaches $200 you earn host rewards. Host benefits start at 10% but can go as high as 16% when you get to $550. At this point you also qualify for a half price item.
How much money can I MAKE as a Stampin’Up! demonstrator?
We just talked about how much money you can save when you get the starter kit and purchase supplies for yourself. Really, why pay full price when you can get the discounts and freebies? However, saving money isn’t making money, and making money is really nice!
As a Stampin’Up! demonstrator you can also sell products to others by holding classes and events, both in person and online. You can create any type of business that you want, and when you do this you can also earn money. How much you earn depends completely on what you choose to do, how much time you put into it, and how hard you work. A little luck and a lot of blessings also go a long way!
Earn additional income bases on your sales and recruiting. Be sure to check out the Compensation Plan to see how Stampin’Up! rewards you.
Set your own schedule and put in as much or as little time as you like
Stampin’Up! offers a lot of support through training videos, a complete resource library and a demonstrator only online community with thousands of project and class ideas.
Access to regular promotions with graphics that you can use giving you an opportunity to make more money.
Opportunity to earn incentive trips.
Stampin’Up! only events, both locally and nationally. This is a great way to spend time with and meet other like-minded individuals, aka stamping addicts!!
Chance to learn creative tips and techniques, share ideas and come into contact with new friends who love papercrafting as much as you do. This is also a great opportunity to collaborate with other business builders and to learn from each other.
Who you join matters!
I am often asked if it matters who you sign up with, and the answer is a resounding YES!! Absolutely. The person you sign up with is called your “upline” and this is who will help you learn the ropes. Your upline is the one who will help you, answer your questions, provide you with training and support and will be there for you. You want this person to be knowledgeable and to have had some experience. Most of all you want to feel a connection with this person, to be comfortable with them and to feel safe.
You cannot in good faith sign up with one person and then expect a different demonstrator to answer all your questions and be your support person.
I have almost 18 years experience as a Stampin’Up! demonstrator and have been honoured with many awards including one of the top demonstrators in Canada and in the world! I have presented several times at official Stampin’Up! events and have been featured in the Stampin’ Success magazine. Also, I am part of a very small group (less than 1%) of demonstrators who have achieved the annual incentive trips offered by Stampin’Up! My Pampered Stamper Training Group is open to demonstrators all over the world for a $99 annual fee, but it is free to my team members. My team members also receive three pdf bundles a month from the various design teams that I belong to.
As you can see, I know what it takes to set and achieve goals, and I am also confident that I can help you set and reach your goals. Beyond Pampered is an amazing team and you would be most welcome to join us!
What is the commitment once you become a Stampin’Up! demonstrator?
To remain a demonstrator you must buy or sell 300 CSV before your discount each quarter (three months) That is about $400 Canadian. This can be from your personal orders or from others.
If you don’t meet this minimum, you are given one month to make it up.
If you cannot meet your minimum sales requirement then are simply deactivated as a demonstrator and you go back to being a regular customer. You lose access to the demonstrator website and to your discount. There is no penalty. You are able to join again right away as long as you join with the same upline. If you wish to choose a different upline then you have to wait three months. That is why it is important who you choose to sign up with!
When you first join, depending on the month of the year, you may have up to six months to meet the minimum quarterly requirement for the first time.
How to become a Stampin’Up! demonstrator
Joining is simple. First pick out $165 worth of products. You cannot go over this amount, so get as close as you can. You will only pay $135, plus you will get a free Paper Pumpkin kit and you get free shipping. Depending on your province, you will also pay no tax!!
What should you put in your kit? That is entirely up to you. What do you need? What do you want? If you are just starting with this hobby, then get the basics. A paper trimmer, a Memento black ink pad, a package of Assorted Memories & More cards and envelopes (they are such a great staple!) your favourite stamp set, a few ink pads or perhaps the Classic Assortment of 8 ink spots. It is helpful to have a list of what you want complete with item numbers and prices so you can keep a running tally of the total.
As you begin to work through the different pages of ordering your kit, they will ask you for different pieces of information. Make sure that at the top of the screen you see my picture and my name. That way you will be sure that you are signing up with me as your upline!
One of the pieces of information that they will ask you for is your social insurance number. Since Stampin’Up! is a direct sales company, everyone has the same opportunity to sell to others. This means that Stampin’Up! needs to have your social insurance number for reporting purposes in case you do end up making money and earning income. They do not distinguish when you are signing up whether or not you are joining just for your own discount or to make a business out of it. Therefore they need this information just in case you are going to be earning income. Everyone gets treated the same!
Another reason that I like to share is this. Stampin’Up! has to make sure it is a real person signing up. Otherwise unscrupulous demonstrators could sign up fake people, or even their dog or cat! Sometime we can earn bonuses for the number of people we sign up so Stampin’Up! needs to be able to regulate this. We can also only sign up people who live in our markets. Make sense?
You’ve signed up, now what?
After you complete your order for the demonstrator starter kit, you will receive a welcome email from Stampin’Up! It will contain your demonstrator ID number as well as your password. You will use this to sign into the demonstrator website.
You will first want to sign in and set up your demonstrator account. Start with changing your password to something you will remember. Keep it in a safe place with your other passwords! You will then be prompted to set up your banking information so that they can directly deposit your earnings into your account. Your credit card information is also kept on file so that when you place your own orders everything is already all set for you!
Once you have done all that the fun will begin. You can check out all the features of the site including making a practice order!
You will also get a welcome email from me as well as some personal questions asking you what you want from me and how I can best support you. I will let you know which online groups you can be a part of if you so choose including my team page, training group and private Prime Time group with a weekly exclusive video tutorial.
You are never alone! You can call demonstrator support at 1-800-782-6787 Monday to Friday from 9am to 7pm EST. You can also contact me or put your questions in the team page. Stampin’Up! is a very supportive family of demonstrators.
Thank you!
Thanks so much for your curiosity about the starter kit opportunity. I would love to have you join our Beyond Pampered Team and to allow me the privilege of being your team leader and upline. Becoming a Stampin’Up! demonstrator was one of the best decisions of my life. I have truly enjoyed it for the last almost 18 years and it keeps getting better. So many friendships all over the world have been made and I have grown incredibly as a person. If you have any questions, please reach out to me and ask. Together we CAN change the world one card at a time!!
I will finish this post with some of the benefits that are unique to the Beyond Pampered Team.
monthly team gatherings, either in person or via Zoom
dedicated team page on Facebook that is a fun, inspiring and safe place.
annual team retreats in a very fun location. We have staying in gorgeous cottages, quilting retreats and mountain cabins. Sometimes there are even two retreats a year. These are intimate with creative time but also time for connecting with each other around great food and conversation.
amazing training in a private training group with weekly training videos.
three month pdf tutorial bundles: Demo Design Dream Team; International Create With Us tutorial bundle team; Bundle Bonus Team
free membership in the exclusive Prime Time group with an exclusive video tutorial each Thursday.
I hope that after reading this you will feel both comfortable and inspired to join my Beyond Pampered Team. Oh the fun that we will have together and the places we will go! Have a super day.
Hello stampers and happy Friday to you. Today I have a fresh and vibrant card for you using Glorious Gingham paper. Gingham is always great for spring and summer and I really do love the combination of Lemon Lime Twist with Orchid Oasis, don’t you? Once again, you will see that I have pulled out the Nested Essentials dies. Did you know that these dies include three different shapes in four different sizes?
Video Tutorial
More Glorious Gingham Inspiration
Here are a few favourite finds of mine from other demonstrators who have used Glorious Gingham in their creations. Which one is your favourite?
This one is by Terri Lynn Bright and you can check out her blog post here.
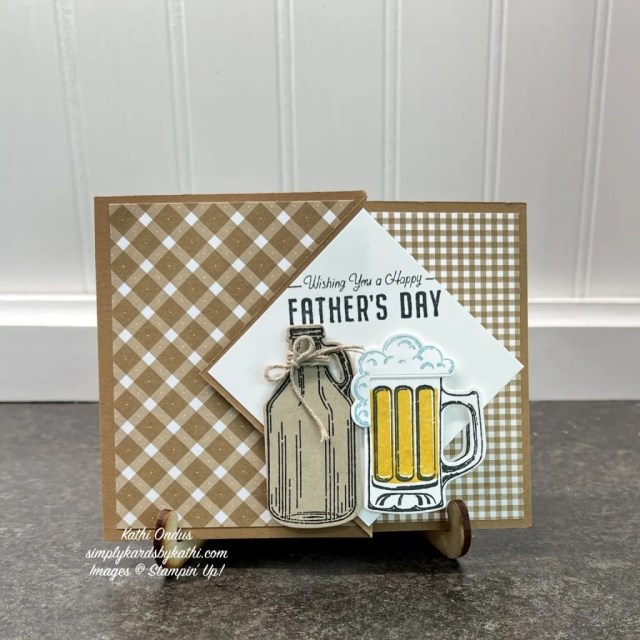
This Brewed for You fun fold card is by Kathi Ondus, and you can check out her blog post here.
This card is by Mary Brown and you can find her blog post here. I love how she used the die from the So Refreshing Bundle to make the gingham blanket.
Last Few Days!
Just a gentle reminder that you only have a few days left to get Bonus Bucks. With each $60 purchase you get a $6 coupon code to redeem in August. That’s a nice ten percent savings. If you choose to get my July special which is Timeless Arrangements, you will get a 20% cash back from the catalog price from me!
Thanks for joining me here today, I hope you have a super day!!
Hello stampers and happy Wednesday to you. Today I have another great card using the Masterfully Made designer series paper from Stampin’Up! When the paper packs such a punch, you don’t need much to make a stunning card. I used the dies from Timeless Arrangements to make a beautiful focal point. There is one thing that I did with this card that might surprise you!! Read on.
What’s Different?
If you look closely at my sentiment, you might see something different. I will include a closeup photo, maybe that will help!
Instead of stamping my sentiment on regular white cardstock, I stepped it up a notch and added a foam adhesive sheet. This makes the stitching from the die more prominent, it right away pops the whole thing up AND it now has a “sticker” back so that all the die cuts can be quickly and simply adhered. You can watch the card making tutorial on my YouTube channel. I will add it here too. Have you subscribed yet??
Video Tutorial
Who’s Your Person?
I am curious. Who is your person? Do you have a Stampin’Up! demonstrator? If not, I would be thrilled if you chose me. You could also choose to shop with your own discount. You can do this by joining my team. Here is the link if you live in Europe, and here is the link if you live in Canada. What fun!!!
Thanks so much for joining me today, I hope you have a super day.
Hello stampers and happy Monday to you. If you follow me on YouTube then you already know that I have been having a lot of fun with embossing paste. In fact, my container is almost empty! The last trick I want to do with it is to tint it with re-inkers. In the meantime, here are two cards that I made with embossing paste. The first one was in my Sweet Suite Tuesday video. Since embossing paste takes a few hours to dry completely, I needed to have an extra one on hand to be able to finish my card during the video.
An Extra Piece for Inspiration
I had the lovely problem of having an extra piece of embossing paste background. If you look closely at the next card you will see that has the same pattern but I turned it sideways. The open space left just enough room to stamp the sentiment. Don’t you think that it makes a very lovely sympathy card?
Here you can see the closeup of this lovely card. Do you see the ribbon? It is frayed because I ripped off the one side to make the pretty bow on the pool party card in this post. You will see how I did it in the video tutorial.
Embossing Paste with the Truck Bundle
A week or so ago I made a trio of cards using the Trucking Along bundle. You can see those cards here.
Video Tutorial
Here is the video tutorial for the embossing paste background card. Maybe you will be inspired to try something new when you see how easy it is.
Curious about the “patterned paper”?
Actually, it isn’t patterned paper, it is a background stamp set called Berry Harvest. I tried colouring it with various combinations of Blends and I made a handy little chart to show you the results. Which colour combination is your favourite?
It was a lot of fun to play with the different colour combinations. There is still one stamped image waiting for me. It is stamped in Stazon so that I can colour it with blender pens and watercolor pencils. Stay tuned for when I finish playing with that.
Thanks for joining me today on my blog. If you don’t already have a Stampin’Up! demonstrator, I would love to be yours if you live in Canada or Europe. Just click on the links below to shop with me in Canada or click here if you live in Europe.


")


")


 Designer Series Paper")


")

 Designer Series Paper")


 Metallic Edge Cotton Ribbon")
 Bordered Ribbon")


