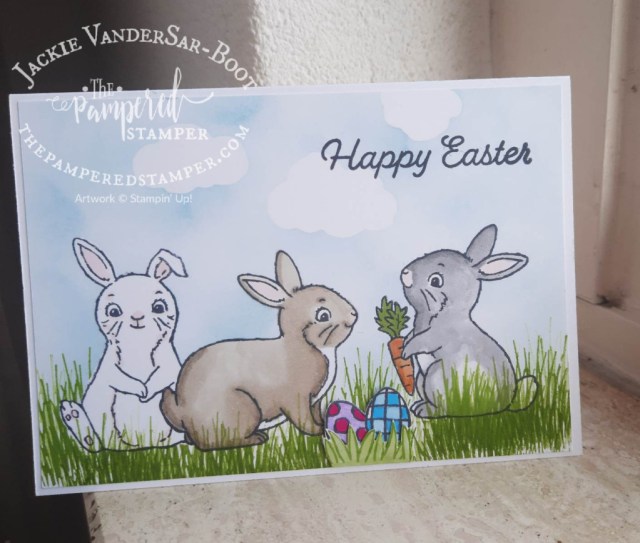
Hello stampers and happy Friday to you. Today I am sharing a masked Easter bunny card with you. If you don’t celebrate Easter or send cards for Easter, you could also use this for a spring card, thinking of you or birthday. I used a simple masking technique to create this scene. The masks were used in two ways. The first was to make it look like one bunny is sitting in front of the other one. Secondly, I used die cut clouds with masking paper to make the beautiful sky.
Masked Easter Bunny: With or Without the Carrot?
Which white bunny do you prefer? The one above holding the carrot, or the one below without a carrot? Little details can really make a difference. In the bottom card I decided to add some Easter eggs in the grass but they looked funny just sitting on top of the grass. What did I do? I cut a slit in the card with my paper trimmer and tucked the eggs in to the grass that way. Then I stamped some grass, fussy cut it and put it in front of the eggs for a more realistic look.
Easter Bunny Class in Chatham, Ontario
On March 29 my team member Kylee McCutcheon is teaching a class with the Easter Bunny bundle. She still has room for you!! Here is one of the cards that she will be making along with two treat holders and a second card. You can find the link to the event page here where you can comment below the class that you like and the person teaching that class will contact you to arrange payment and other details.
Thanks!
Thanks so much for joining me today on my blog. Leave a trace that you were here and take a moment to comment, that really makes my day. The bunny punch is backordered right now and will be available in the middle of May but the stamp set is still amazing to use without the punch. Click on the images below in the product list if you want to shop with me in Canada. Easy-peasy and you will get a free tutorial bundle if you do so! Have a super day.
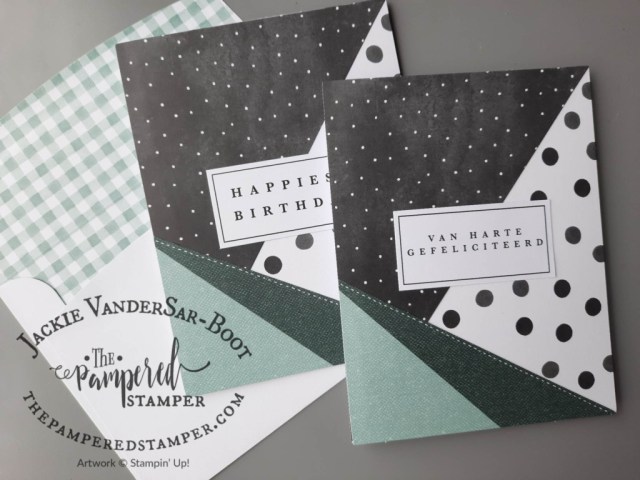
Hello stampers and happy Thursday to you. Today I am sharing with you the Birthday Card Organizer Kit. It is one of my favourite kits this year because it is so practical and so beautiful. The cards are fresh and crisp and let themselves to easy alteration. The sturdy organizer album is perfect for keeping your birthday cards organized for the year. Step up your game with remembering to give birthday cards to all the important people in your life!
Birthday Card Organizer Kit
Why I Love This Kit
The reason I love this kit so much is that it has a great purpose! It is beautiful AND functional. Keep your birthday cards organized in this great spiral binder which comes with pockets to hold your finished or unfinished cards, stickers to mark the months and a space for each day of the month to write the names of your loved ones. Great for yourself, great to give as a gift.
The kit comes with twelve cards, six each of two designs. There is no stamping involved for the original cards, instead there are die cuts in four different languages: English, Dutch, French and German. Coordinating envelopes are in crumb cake stripe or mint macaron plaid. If you did want to stamp in the inside of the cards, our Cottage Rose stamp set coordinates beautifully.
If you look closely at the photo below you will see that I made two alternative cards, one with Legendary Ride and the other with Queen Bee. I think I should take another close-up photo of these two cards. Scroll to the bottom of this post to see them.
Twelve Local Kits
I just happen to have twelve of these kits on hand for my local people. My plan was to have them at my event on March 29th so that the attendees can have some instant gratification when they leave. This kit has so much potential! Not local? You can purchase the kit by clicking this link or the one below in the product list.
Zoom Class April 19
I am also offering a Zoom class for this kit on April 19 at 1pm EST or 7pm European Central time. This class is FREE for those who have purchased the kit from me and $10 for everyone else. Click on the PayPal link below to register.
Hello stampers and happy Tuesday to you. Today I am sharing a gorgeous vintage Abigail Rose card with you. Vintage cards usually have lots of layers and more muted colours as well as distressing, torn and curled edges as well as linen thread or lace trim. My card uses the lovely Abigail Rose paper. For a complete list of the products used just scroll to the bottom of this post to the product list.
More than just a product list
Here is a closeup of the vintage Abigail Rose card. You can see the background stamps in crumb cake. I spritzed the paper with rubbing alcohol and then scrunched it up into a ball. Carefully unscrunch it and then let it dry. You can do the same thing with water but the alcohol will evaporate more quickly. Use your blending brush and crumb cake ink to distress the paper. The ink will gather in all the creases for a great vintage look.
Back to that product list. Did you know that it not only a convenient list for you to see what I have used? If you are a Canadian you can click on these links and you will be automatically transported into my online store. Of course I would be thrilled if you did order from me and then I would send you at least one free tutorial bundle as a thank you.
Free Tutorial Bundles?
Which free tutorial bundles do you get with a purchase? Good question. I am a member of three tutorial teams. The first is the International Create With Us tutorial bundle team. This group has demonstrators from around the world, many of whom have been Artisan team members. These tutorials are free with a $60 purchase but also free to team members. The second team is the Demo Design Dream Team which is mostly Americans with two token Canadians, also free with a $60 purchase. The last one is the Bundle Bonus group which is free with a $35 purchase. Let me know which one you want if your order is close to $60. If it is over $120 you get all three!
Video Tutorial
Here is the video I did showing you how to make this fun card. For your information, the Bundle Bonus group has a tutorial bundle on this bundle for this month! Happy stamping!
Have you subscribed?
If you haven’t subscribed to my channel yet, be sure to do so! If you subscribe, please let me know in the comments here and comment on your favourite video. You will then be entered into a draw for the Eden’s Garden bundle. When I get to 5400 subscribers I will do the draw. Thanks so much for joining me today and have a super day.
Way to Grow caught my eye right away when I saw the new mini catalog. I love it when you can combine stamps to make a complete image. In this stamp set you can combine stamps to make different people but you can also combine stamps to make different potted plants. It really is just so much fun!!
Card Ideas
Here are some of the cards that I came up with while playing with this stamp set. I found that it combined very well with the Enjoy the Journey paper. For this first card I stamped the sentiment from Way to Grow in Versamark on Evening Evergreen and white embossed. The die is from Beautiful Shapes dies.
Secret Ingredient
The secret ingredient on the two last cards is the Eden dies. You can find them on page 171 of the annual catalog. Maybe you were lucky enough to get them for free during saleabration? I know that is what I did and it made me so happy. My job as a Stampin’Up! demonstrator is to let you know about all the amazing deals that Stampin’Up! offers.
The best one is available all year long and it is the starter kit. Did you know that you can get the starter kit even if you don’t plan on making a business as a demonstrator? You can get it just for your own discount! Click here to get your kit in Europe, or here in Canada.
Thanks for joining me today and happy stamping! Have a super day.
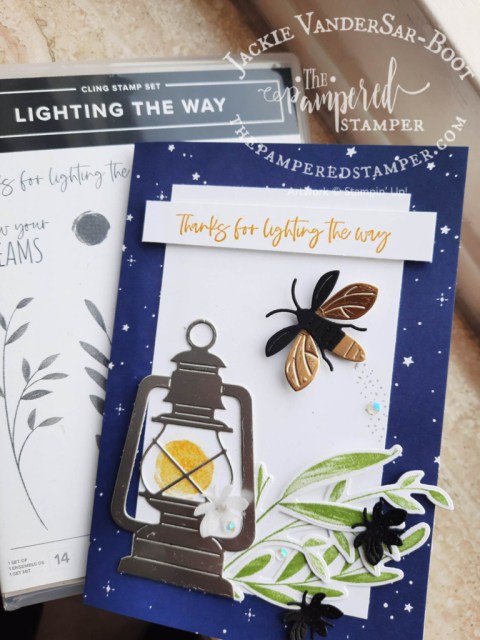
Hello stampers! Do you love surprises? If you buy this bundle you will definitely get one or two. There are dies in the Lighting the Way bundle that are not shown on the stamp set. First there is a large lantern die and then there is a large dragonfly die in three parts so that you can customize your dragonflies! There are three little embossed dragonflies and two open dies to cut out your stamped dragonfies. Dragonfly heaven!
A Jackie Original and some CASEd Cards
The card above is a “Jackie original” but the other two that I will be featuring are the genius work of other demonstrators that I have CASEd (copy and share everything).
The card on the far left was CASEd from Yvonne Spikmans and the card in the middle was from Natasa Steinke.
The sentiment on this card is from the saleabration set Sending Support. I die cut the lantern also in vellum and the little pieces for the “glass” in the lantern are the vellum pieces to give it a softer look.
Lighting the Way Video Tutorial
Do you want to see how I made my card? Take a look at my video and please consider subscribing to my channel. By subscribing you will not miss out on any of my video tutorials. If you enjoyed the video, please give me a thumbs up and leave a comment. I really do love connecting with you. If you really want to show me some love and help me out, then click on the share button below the video on YouTube and then you can share to either Facebook or Pinterest. Thanks so much!!
Shop with Me?
I have tried to make it easy for you to shop with me so that you can also make these fun cards at home. If you live in Canada you can simply click on the product list items. If you live in Europe you can click here. I really appreciate your business and I will send you a free tutorial bundle when you shop with me! Have a super day.


")
")
")


")
")
")


 Designer Series Paper")
")
")


")


 Designer Series Paper")


")


