Hello stampers and happy Monday to you. Today I have a fun technique with you that I call Blown Alcohol technique. I did something similar this summer but it was WAY more complicated. You can see that post here.
I was reminded of this technique by my European team leader Michelle Last and you can see her blog post here.
Thankfully I have also made a video for you to see how it is done. I also show you how NOT to do it and what happens when you mess up. Always fun to see someone else’s mistakes isn’t it?
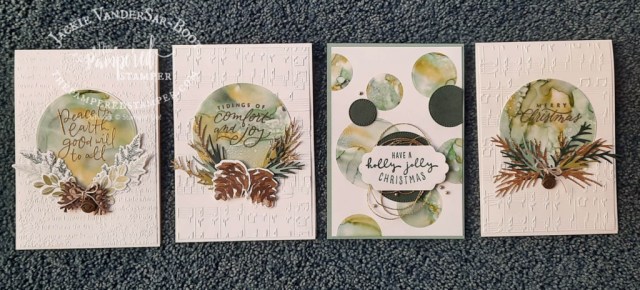
Blown Alcohol Technique Cards
To do this technique successfully you need vellum cardstock, 90% or above isopropyl alcohol (you might just know it as rubbing alcohol in North America) and Blends markers. It is helpful to have a stampin’ spritzer as well as these little bottles from Amazon.
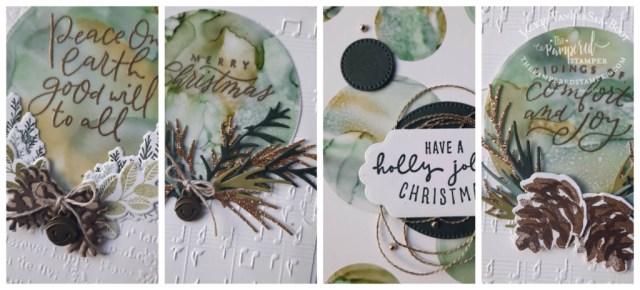
Here’s a close-up of the cards so you can see the detail:
Little Tip
What makes the blown alcohol focal point so vibrant is the use of adhesive sheets. When the blown alcohol technique is complete you put the entire sheet of vellum onto an adhesive sheet and then you can adhere it to a sheet of basic white cardstock. Use your layering circles dies to cut out circles and stamp your sentiment in versamark and emboss in gold. Remove the adhesive backing and add to your card front. Accessorize with die cuts, flat jingle bells or stamped and die cut pine cones.
Video Tutorial
Here is a video tutorial that I made. It is in typical Jackie fashion with some trial and error but I think it will make you feel totally at home. My wish is that when you watch my video you will be empowered to give it a try yourself. I used the following Blends colours: Soft Succulent, Old Olive, Just Jade and Evening Evergreen. Just Jade has been retired so if you don’t already have it you could try and substitute with a different shade of green.
Thanks!
Thanks for joining me today, I hope you were inspired. Please leave a comment so I know you were here and if you really want to show me some love, pin some of your favourite photos so more people will find my blog. Every little bit helps. The links to shop with me online in Canada are below.
Hello stampers and happy Monday to you! I thought it very fitting to write a blog post today called Many Happenings! Today is my dear mama’s 90th birthday. What a tremendous blessing to still have both of my parents, now 90 and 95 still living in their own home, still in love and still mentally sharp. Praise God!
Many Happenings
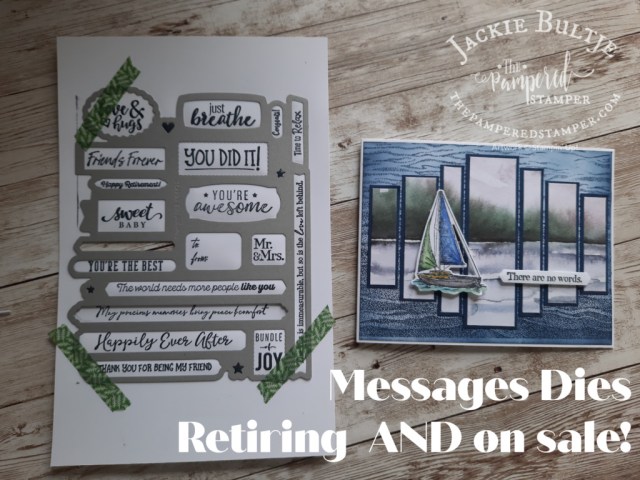
Many Happenings is a one piece stamp set that has many, many sayings on it. You stamp once and then you cut them all out using the coordinating Messages Dies. There is a second stamp set called Many Messages that also coordinates with this die. The dies are retiring AND on sale! The stamp sets are both retiring but they are not on sale. Get them before they disappear as retiring products are only available while supplies last.
I used this set to make my Prime Time cards last Thursday. These videos and instructions are exclusive for this private group, but YOU can join too for only $10 a month. Why so cheap? I wanted to make it accessible to all especially when COVID happened and we couldn’t do in person classes and I needed a way to keep my business afloat. Here is the link to join. As a thank you for your loyal support, you get a free pdf tutorial each month that is worth $20.
Clean and Simple Card
As much as I love the sailboat, I think the card is even nicer without it. Am I the only one craving a clean and simple look? Which is your preference?
Can you guess which stamp set I used for th background? I know, it looks just like patterned paper! Tip: you can find it in the product list at the bottom of this blog post.
There are no words
It’s true. Sometimes there are no words. Only feelings. Empathic silence. A hug. This card conveys just that. Perhaps it could have used a few birds stamped simply in the sky. You can find a great bird stamp in the On The Horizon stamp set.
Prime Time Cards
Here is a photo of all the cards I made for my Prime Time Group. It’s nice seeing them side by side so you can see the subtle differences.
Thanks!
Thanks so much for joining me today. Tomorrow I fly to be with my love again. I’m over the moon excited! Each time we are apart it gets harder. Looking forward to sharing my travels with you again. Let me know if I can meet any of your stamping needs. Have a super day!
Hello stampers and happy Wednesday to you. On Monday I was able to ink up this gorgeous set for the first time. I just happened to have a customer drop by and she had not yet seen this stamp set. When she saw me stamp it, her jaw dropped and she said “WOW”! The wildlife stamps just jump off the page because they are very realistic looking due to the distINKtive technology of the stamps.
Wildlife Wonder: Some “Beary” Good Tricks
When I get a new stamp I ink up all the stamps in a few different colours and strengths. This gives me a good idea as to the versatility of the stamps. I also wanted to try stamping directly on the New Horizons paper. At first this seemed like a bad idea. You could see the patterned paper right through the bear. Then the magic happened. I grabbed a blender pen and went all over the bear image with it. Worked like a charm!
The other great trick with the bear is to fussy cut him close to the stamped image. When you do this he or she blends in better with the scene on the paper.
Clever trick number three is to be sure to “ground” the bear. There is a long skinny stamp that looks a bit like a cirrus cloud; use that to make a base for your bear like I did in the first card.
Clever trick number four has nothing to do with the bear. This time the wolf is the star of the show. I used a scrap of leftover patterned paper and fussy cut the grass to make a bit of a hiding spot for our resident wolf. Don’t you think it worked well?
Clever trick number five. If you watch my video you will see that the owl used to have a prominent place on the wolf card. Trouble is, it was a bit TOO prominent. The owl was simply too large. Instead I made a focal point for the sentiment which I punched out with a 2″ circle punch. The owl was stamped off in Crumb Cake to the left of the sentiment. Very effective, I think! These cards were made “on the fly”. If I would do the wolf one again, I would not use a scrap, but I would make an entire border across the front to camouflage the wolf a bit.
Video Tutorial
When you watch this video, please click on the brown box that says “watch on YouTube”. That way you can give me a thumbs up, subscribe or perhaps even leave a comment. Trust me when I tell you that it really makes a difference in my day when I see you do any of these things. There is also a “share” button under the video and then you can choose whether to share to Pinterest or to Facebook. Yay!!!!
Thanks for joining me today. If you want to purchase any of the products I used for these Wildlife Wonder cards, the links are below in the Product List. Have a super day!
Hello stampers! I’ve missed you! I am finally home from the Greek Isles Incentive trip and ready to share my inspiration with you again. It is honestly one of the highlights of my year to go on the incentive trip and get spoiled by Stampin’Up! as well as reconnect with all my demonstrator friends around the world. I never take enough pictures of myself with other demos. I promise that will change next year when Gerard comes with me to Maui. This was also the first time I did not participate in the organized swap on the cruise. I did take pictures of some of the swap cards so that I could share them with you but the lighting in the Hospitality Suite on the ship was less than ideal. I think you would agree though that a lousy picture is better than no picture.
One of my favourite cards was this one that used the Pretty Pavilion bundle to make a Greek church that is so iconic on the islands. How creative is that! I don’t know who made it but if any of you readers do, please let me know in the comments. I just found out who made this card! It is Susan Smith from the USA. I also saw in her much better photo that the roof of the “church” is made from the Pretty Peacock foil run through the Subtle embossing folder. It just looks like glimmer paper in my photo.
Not only did the creator of this card use Pretty Pavilion to make the church, he or she also made the sea using High Tide. I love the addition of the copper trim in the background to mimic fishing nets. Did you know that this ribbon pulls apart to make it look like this? The blue glimmer paper was made using either silver or sparkle glimmer paper coloured with blends or reinkers. Very clever indeed and I knew you would want to see it. Do you know why the building on the Greek Isles are all blue and white? Our tour guide told us that during the several hundred years that Greece was occupied by Turkey they were forbidden to fly their own flags. They instead painted their houses in the colours of the flag: blue and white!
This photo was taken in Santorini. It is one of those moments when you want to pinch yourself to make sure that it is real. It is simply stunningly beautiful.
I have one other project that I would like to share with you. The picture quality is a little blurry but you will get the gist. I hope to recreate it in a class for you.
Isn’t that just the cutest thing? Great home decor item that would also make a perfect gift for someone. It uses the Come Sail Away suite as well as the Under the Seas framelits and Hand-Lettered prose dies. Here is the backside of it:
Do you see that the creator of this great art piece used our chipboard packaging that comes with our specialty designer series paper? The black circles that you see are just velcro circles used to adhere this project to the display board.
I’m so glad you stopped by today and I hope that you were inspired by these projects even if I didn’t make them myself! That is another reason the incentive trip is so much fun and so beneficial. We are surrounded by greatness and by inspiration and we learn so much from each other that makes it exciting to get back to work. Don’t forget about the amazing deal on the starter kit. Not only do you get $210 worth of product and pay only $135, you also get a $14 coupon to use on your order the month after you sign up.
I would absolutely love to have you join my team. They say that if you really love something, you want to share it. If you only get a very small part out of this starter kit than what I did it will be totally worth it. The possibilities are endless starting with your own discount but including finding new friends in your own town but also all over the world and creating a fun business if you want. I would love to show you how. My dream is to have a team that has representation from every province and territory in Canada. What are you waiting for? Here is the link if you are ready to start this amazing adventure.
July is also the month for Bonus Days. That means for every $60 you spend in July before shipping and tax you get a $6 coupon code to use in August. Every little bit helps!
That’s all for now! I hope to have more fun things to share with you tomorrow and I also know that I promised you some pdfs. One thing at a time, but I haven’t forgotten and I am looking forward to doing it. Have a super day and stay cool.
Hello stampers! I did some sponging and masking with Looking Up, a fabulous new card kit in our annual catalog. While the kit makes 15 cards you can make nine more gorgeous cards using the additional die cuts provided in the kit. All you need to do is make a simple background that is reminiscent of a sky. There are two ways to do this. One way is with a watercolour wash on shimmery white cardstock. The other way is a sponged background using a cloud formation mask. Sound difficult? Not if you hurry and get the rainbow builder dies that are on the clearance rack. There are two gems in that set: long thinlets in two different cloud formations as well as two other clouds and of course all the pieces to make a colourful rainbow.
Here you can see the two long thinlets and the acetate or window sheet masks I made with them. It is a good idea to write on them, not for you to remember what they are, but so that you can find them when they are laying on your table!! I absolutely love the background you can make so easily with them. Cheap, quick and artistic! It really is amazing what you can do with sponging and masking using just ink and paper. I kept it simple using only one colour of ink, but you could definitely take it up a notch and use more shades of blue and grey.
It is difficult covering up some of that beautiful sky with the die cuts, but doesn’t it look great? The white is 3 3/4″ by 5″ with a bermuda bay mat of 4″ by 5 1/4″. Only the raspberry balloon is popped up with dimensionals. Did I tell you that you get a lot of those included in the kit?
For this card I did a watercolour wash on shimmery white cardstock which measures 3 5/8″ by 4 7/8″. This precise measurement allows you to get five pieces from one 8 1/2 by 11 sheet of cardstock. Crucial information when it is more than $1 a sheet.
This card was supposed to be for the airplane die cut but I didn’t want to cover up the pretty wash. I will show you how to get this effect in a short video. It was easy to just add a swoosh of crumb cake ink to the bottom of the card to ground it! How do you like the crushed curry mat? I thought it gave it a nice cheerful look. Truthfully it was supposed to coordinate with the airplane but it works well with the trees too.
Here is the video showing how to make the beautiful backgrounds. If you click follow on the YouTube channel then you won’t miss out on any of my videos!
Everyone at class loved these alternative cards and they also enjoyed learning the new background techniques. It’s so much fun to see what you can do with just ink and paper. In my video I also show you how to cut your shimmery white cardstock most efficiently. Thanks so much for joining me, be sure to keep an eye on the clearance rack, I have heard that they will be adding a lot of new stuff very soon! If you choose to order online, I would love it if you also used the host code, that way free host credits do not go to waste. If you place your very own order of $200 you will qualify for your own host rewards. the current host code is YDZAPF6Y.


")


")
 Designer Series Paper")


")
")
")


