Hello stampers and happy Friday to you. Today I have a lot of fun ideas for you. First off are some adorable treat holders that you can use all year long to surprise and delight. This Merry Bold & Bright paper is super for a non-traditional Christmas but also for any fun occasion. I love versatile patterned paper! All you need is a 2 3/8″ circle punch and some strips of paper 3″ by 6″ scored at 2 3/4″ and 3 1/4″. Find some coordinating ribbon to make a fun handle and accessorize as desired.
Retro Christmas Lights Card
Not only is this set great for treat holders, it is also super fun for cards. I only had time to make one card, but I sure hope to make some more with the bright paper and fun dies.
I love that the words have white letters surrounded by a block of a colour. It’s almost like magic!! The bases for the Christmas lights are cut with dies. You can choose from an open die or a detailed die. Mine are made from adhesive backed silver and gold glimmer paper but I am afraid that it might be sold out at the moment. I sure hope it comes back in stock. The lesson in this is that when you see something super cute, order right away!!
Video Tutorial
Seeing is believing. Watch this video tutorial and learn not only how to make these adorable treat holders, but also a fun card with retro Christmas lights.
Fun Christmas Light Dies
I had a lot of fun stamping the retro Christmas light bulbs in various colours. It sure brought back memories of being a child and sorting through the replacement bulbs for just the right shade. My mom loved going to auction sales, so many of our strings of lights had a few missing bulbs. She also had lots of little boxes of replacement bulbs, with a mixture of clear and opaque bulbs. Oh the magic of Christmas lights!!
Inspired??
I hope I have inspired you with my creations. Some of these products are retiring soon and will only be available while supplies last. If you live in Canada, you can click on the items in the product list below to shop with me in my online store. Thanks for your business!! As a thank you, I will send you a pdf tutorial bundle for even more inspiration. Have a super day. Hugs from Holland.
Hello stampers and happy Monday to you. Today I have a Simple Emboss Resist card for you using the Circle Sayings stamp set. Find out how easy this technique is when you watch my YouTube video tutorial. The paper that I used for this card is an “online exclusive” called Simply Irresistibles. All the links for the products that I have used are found at the bottom of this blog post.
YouTube Video Tutorial for Simple Emboss Resist Card
Watch this video to see how this card was made. Emboss-resist is such a fun technique! If you haven’t already done so, please subscribe to my YouTube channel.
Free PDF Tutorial Bundle
If you spend $35 with me online or if you purchase the Circle Sayings stamp set, you will get a tutorial bundle featuring many cards using this stamp set. What a great way to get the most use out of your purchase!! If you want to see more emboss resist cards, click on this link. Happy stamping, and thanks so much for joining me today.
Hello stampers and happy Monday to you. Today I have an awesome “collage stamping” card using Ranunculus Romance. Wow, that is a hard word to type!! Did you know that a ranunculus is a bulb? You can read about them here and see how many beautiful colours they come in. Ranunculus Romance is great for vintage cards too. I was inspired to make this card by the talented Gail Ellis.
Ranunculus Romance Card
Here is my Ranunculus Romance card. I figured if I spell it often enough it will get easier! The ranunculus is also called a Persian Buttercup.
I did a video tutorial for this card as well and I fussy cut the flower. Someone watching the video reminded me that there are indeed dies to go with this stamp set, so I looked into it. Indeed, there are dies! The reason that I did not have the dies is not that I forgot. Collage stamping is the primary reason that I got this stamp set and I didn’t think I would utilize the dies enough to justify the cost. You can decide that for yourself!
Video Tutorial
Rather than type out how I made the card, you can just watch the video here. I would be most grateful if you clicked on the bottom right corner of the video where it says “watch on YouTube”. It would be even more awesome if you subscribe to my channel and comment and share the video. This is the modern version of “word of mouth” which is the best form of advertising. Thanks for being a part of my stamping community!!!
Supply List
Did you know that the supply list for my cards is always listed at the bottom of my blog? I also share it in my YouTube videos. There are two little words beneath the description of the video. “Show more”. If you click on that you get a LOT more information including the links to my Stampin’Up! store and to my favourite Amazon products. With this video I used a great little bow maker. Mine came from a friend in the States, but it is much easier for you to get them from Amazon (or find a handy carpenter to make you one, in that case you can use the Amazon image as inspiration!) Click here to see it.
Thanks!
Thanks again for joining me today, I really appreciate you “stopping by”. Happy stamping and have a super day!
Hello stampers and happy Monday to you. Today I am sharing the Double Wonder Technique. Using this sketch for a cutting pattern you can easily and quickly make a large stack of cards. What a fantastic way to showcase your favourite designer series paper! Let’s take a look.
Double Wonder Technique
The name Double Wonder is a bit of a spoof on One Sheet Wonder where you stamp an entire sheet of either 12 x 12 paper or 8 1/2″ by 11″ paper. You then cut this paper up into different sized strips and panels and make coordinating cards. With the Double Wonder Technique you use half sheets of 12 x 12 designer series paper. You can choose just two sheets, but I like a little more variety so I usually use three sheets. Here is the sketch provided by Julie Davison, a demonstrator from the USA.
Here you can see the easy directions for making these cards. I am going to be making a step by step pictorial tutorial guide as well, but that may be a little while. Gerard is coming on Thursday and as you well know, my focus will shift a little then!!
The Results of my Double Wonder Experience
I decided to take a picture of my Double Wonder cards. It always looks so impressive to see a large amount of coordinating cards!!
Double Wonder Video Tutorial
If you want to make these cards along with me, you can, for free!! Just watch this video and if you really want to make me happy, then click on the red subscribe button on the bottom right corner. Thanks!!
Stepping it up a Notch
You can make these cards even fancier by using embossing folders on your card base. I really do like how this one turned out. When the card was put together I thought there was just too much “vanilla”. I used one of the narrower embossing folders to emboss the card front and it turned out beautifully. What do you think?
A Few Sweet Talk Cards
Because it is Valentine’s Day today, I thought it would be fitting to make a few cards using the adorable Sweet Talk patterned paper. Here they are!
More “Double” Cards
I did a search of my blog for more Double Wonder cards, but I could not find any. Instead I found lots of other things involving the word “double”. Check out this link to be entertained!
Do YOU Want Free Daffodil Paper?
If you would like to get some free daffodil paper as well as another saleabration item, I know a way!! Simply spend $60 with an online order of Stampin’Up! products if you live in Canada OR spend that much in my tutorial store or with Prime Time or the Training Group and you will get a free half pack of Daffodil paper as well as a free Zoom class where we will make more of these cards together using different paper. To order online just click on the product links below. You can of course also add these items to your starter kit for the best deal of all! Just click here to do that. Enough clicking already, right??
Thanks!!
Thanks for joining me here today and also for joining in on my live video today. I really enjoyed interacting with you. I hope you had a good Valentine’s Day regardless of whether you received flowers or chocolate. You ARE loved!!
Hello stampers and happy Friday to you. Paper, ribbon and ink. It really is amazing what you can do when you combine some coordinating paper, ribbon and ink. I like it even better when the combination is a surprising one. Today we will see when we combine some Flowers for Every Season Memories & More cards and envelopes with in colour inks and ribbon AND the beautiful Flower & Field designer series paper that is free with a $60 saleabration purchase.
Paper, Ribbon and Ink
Did you notice that I didn’t mention cardstock? That’s right. No cardstock needed because the Memories & More cards are already the perfect card base for you. This is instant gratification at its best. Just cut your Field & Flower paper to 3″ by 4″ and mix and match them how you like. Huge thanks to Michele Jutrisa for her inspiration for these cards. You can see her blog post here.
For the sentiment I used the new double oval punch, the hostess set Punch Party and the everyday label punch. The oval punches were layered over top of a vellum everyday label punched out. A loop of in colour ribbon was adhered under the vellum and popped up with dimensionals.
Here are a few closeups so you can see the detail in the punches. They are very unforgiving!! You can see the little ink smears but do keep in mind that I made these cards during a Facebook live with a camera between me and my work! They still look great I think.
For the last two I used the Rectangular Postage Stamp punch which also coordinates with the Punch Party stamp set. This stamp set is free when you have a $375 workshop or order. Here is another favourite of mine using the Flower & Field paper.
Field & Flower Card Kit by Mail
I forgot to add in here that you can get a five card kit by mail in Canada for only $15 including postage. Let me know if you want one!
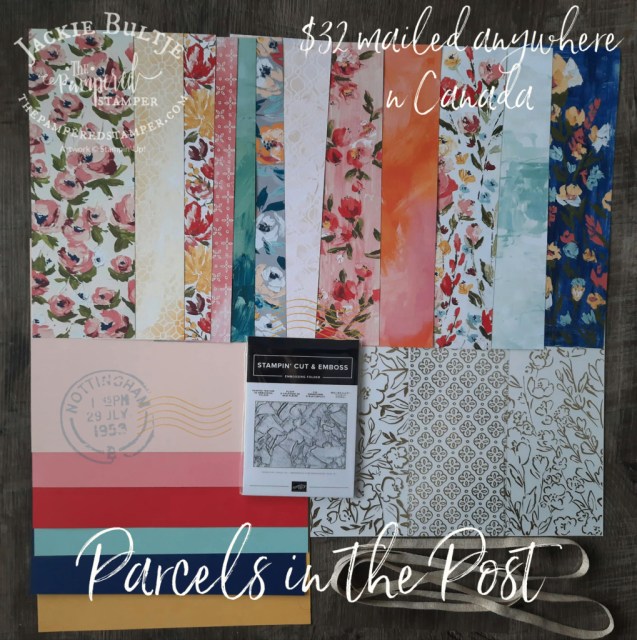
Parcels in the Post
My next Parcel in the Post is ready. There are still two left over from January which featured the Love You Always suite. This month the theme is Art Gallery. The parcels are $32 which includes shipping anywhere in Canada. They contain an assortment of products that will save you money and jump start your creativity. The pictures tell the story!
Here is the photo of the January/February Parcel in the Post, there are two left of this one.
My preferred payment for the Parcels in the Post is etransfer to [email protected]. If that doesn’t work for you, message me and we will figure something out.
Thanks!
You may have noticed that there was no blog post on Wednesday. I spent a couple of days with my parents again and they are my priority then. I did get some stamping time in with my mom and it is gratifying how much she loves it. She made some cards for the grandkids and great grandkids as well as some cute boxes with the Paper Pumpkin addon. The snails were right up her alley. “Deze slakjes zijn zo leuk” is what she said. Translation: those snails are so cute!
If you subscribe to Paper Pumpkin I am going to make a shocking suggestion. Stop or suspend your subscription. You can choose to skip a few months if you like. Then you can purchase a three month prepaid subscription and get a free saleabration item, the Flower and Field paper or the Darling Donkeys set. After the three months are up you can resume your subscription. Anyways, I digress. I was trying to say thank you for joining me today. I hope you have a super day!
Hello stampers! Those of you who know me will appreciate what a departure this is from the norm! Today I am going to show you how to make some easy boxes using the envelope punch board. Ironically I am way behind the eight ball since this product is now on the clearance rack. So get it while you can! Here is the link to go straight to my store if you are in Canada.
Why this is strange
The reason that I say it is a departure from the norm is that I very rarely make anything but cards. One of the reasons for this is that my customers prefer to simply make cards. Another reason is that I really do hate crafts. Most people cannot believe that about me. To me a card is useful and can really make a difference in someone’s life. Three dimensional things are lovely but I feel that they easily get thrown away. Besides, what do you do with all of them? I am coming to realize however that it really is nice to get a prettily packaged gift, it can really make a person feel special.
The Perfect Box
I am thrilled to finally discover how easy it is to make a box for your cards. To me this is the perfect 3D item. Giving cards away as a gift is a brilliant idea and to be able to present them in a coordinating box makes it even better. It is true that the box for the regular sized cards is easier to make than the one for the big square cards but I did manage to do it. The trick to figuring it out is to use this amazing tool from a British demonstrator, Joanne James called the Box Buster. You just punch in your measurements and check whether you want inches or centimetres and you are good to go. This is what it looks like:
Here you will see the measurements I needed to make a box big enough to hold my 6×6″ cards. The tricky part is when you go to the 5 5/8″ measure that extends 5/8″ beyond the envelope punch board measurements so you have to use a ruler to get it right. I did it though! If you want to make a box big enough for regular cards use a piece of cardstock 9 1/2 inch square and score at 3 1/2″ and 5″.
The Boxes
Let’s take a look at what I made using the envelope punch board. I used the stamps from this month’s Paper Pumpkin with night of navy, real red and Delicata silver ink pads. You can make a belly band or just use pretty ribbon to tie around your box.
This box was super easy to make, I just had to add a full piece of 6×6 paper to the front and then I tied coordinating purple posy ribbon around it. You can always add a tag when you know who you are going to give it to and why. Here is a close up co you can see how pretty the ribbon is.
The next boxes are all for regular sized cards that measure 4 1/4″ by 5 1/2″.
If you would like to see the live video I did yesterday showing how to make this box using the envelope punch board you can see it here. Despite my many mistakes the end result was still a lovely box. It will become very clear to you that if I can do it, you most certainly can as well. It ended abruptly because of an internet issue, so if you want to see me do the finishing touches with the belly band (with another hilarious mishap!) you can find part two here.
Of course the envelope punch board is also perfect for its intended purpose, to make envelopes! There is a handy chart right on the board that tells you what size paper you need for the size card that you have and where to score and punch. Stampin’Up! has made a video showing you how to use it. It is really helpful to watch so you get it right the first time and avoid frustration.
Thanks for yesterday!
It was so very gratifying and humbling to read all the comments on my blog post yesterday. God definitely had a plan when He whispered to me to go outside and spend some time with him to restore my soul. The pictures weren’t amazing but they adequately conveyed the stories I needed to share. Thanks for joining me. Take time to slow down and to also give yourself grace. God really doesn’t want us to be in a rat race or in a continual state of near panic. Let go and let God. This is a lesson I also need to tell myself over and over.
If you need anything or have any questions, please let me know. It brings me great joy to share what I love. I often tell you about the shopping opportunity and also about the amazing deal on the starter kit, but tomorrow I am going to share my story about how I started as a demonstrator and how it has changed my life. The starter kit really is such a fantastic opportunity that I would love to open your eyes to the possibilities it might have for you! Have a super day.


")
 Metallic Woven Ribbon")

 Metallic Woven Ribbon")


 Foil Sheets")
 Designer Series Paper")
 Circle Punch")

")


 Designer Series Paper")


")


")


 Crinkled Seam Binding Ribbon")


")
")
")
")


 Open Weave Ribbon")


 Gingham Ribbon")


 Designer Series Paper")

 2020–2022 In Color Ribbon")

 2020–2022 In Color Ribbon")

 2020–2022 In Color Ribbon")

")


 Scalloped Linen Ribbon")
 Designer Series Paper")
 Ruched Ribbon")

 Cardstock")

