Hello stampers. A few weeks ago I came across a super cute fancy fold card that I like to call a criss cross fancy fold. That card was made to look like either a basket full of apples or pumpkins and was made by Whispers in Ink. I had none of the supplies with me here in Holland to make that card so I decided to improvise. The important thing is that this is wonderful fancy fold, now called criss cross AND it is really easy to make.
The Card
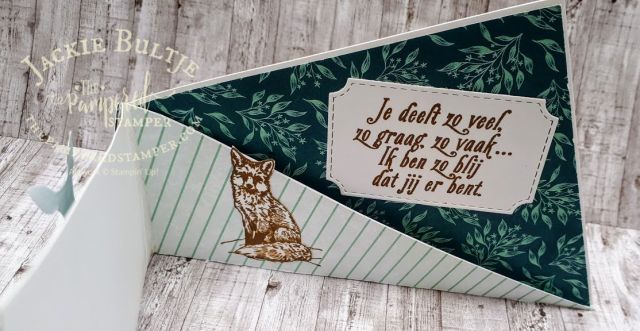
I made this criss cross card for my Facebook live and the original was in Dutch to honour the country that I am visiting. I made a second one using some English stamps. Here they are.
Here is the inside of the card. I used the stamparatus and the silicone mat to make a reversible rabbit; it’s such fun to have him looking the other way!
The framelit from Feels Like Frost was used for the sentiment and I used it twice to cut it down to the right size.
If you want to see how this fold was made you can see it in my Facebook live video here. Here is the Dutch card.
The Measurements
The card base is 4 1/4″by 11″. You score it from corner to corner diagonally and then fold along the long score line. While it is still folded you measure to 5 7/8″ and score again. Fold in half along that score line and then you have your card. That is why I call this fold criss cross! Take a piece of patterned paper also cut to 4 1/4″ by 11″ and also scored it from corner to corner diagonally. Cut along the score lines and you will get all the odd shapes. If you trim the shapes down on two sides by about an 1/8″ then they will fit on the various panels. If this is not clear, then the best option is to watch the Facebook live. You can also check out the link that I shared at the top of the page to the original card that caught my eye. Whispers in Ink also has a video!
How to Shop
Just in case you didn’t know, you can shop with me online if you live in Canada. Simply click on the images below and you will land in my online store. If you have never shopped online with me before then you need to create an account. You only need to do this once, after that you can simply log into your account whenever you need anything. If you are ordering less than $200 I would appreciate it if you use the current host code. If your order is $200 or more then you qualify for host rewards and please no NOT use a host code. I made a video to show you how to create an online account, you can see it here.
The current host code is UWHQR3YM. When everyone uses the host code then host benefits don’t go to waste. I use these host benefits to keep my operating costs down and I pass these savings on to you. I am hoping that with more regular blogging and with a regularly scheduled Facebook live video that more people will be exposed to my business and will then also order online from me. That is why I need help from my tribe! Every time you share something I post whether from pinning my creations to Pinterest or sharing things on Facebook, it all helps to grow my business. The challenge is to keep my business thriving even when I spend time in Holland deepening my relationship with Gerard and figuring out my life!
Hello stampers! Many of you know that I am in the Netherlands for four weeks. Today I wanted to share some insights with you that I have gleaned over the weekend. It all comes down to the power of community. I had four totally different experience of gathering but all showed the need for and power of community.
A Funeral
On Saturday morning I had a family funeral. Of course it was a sad event, but in this case there was more joy than sadness. My Tante Irene had lived much longer than expected and she died both pain free and with the full assurance of salvation. She knew she was going to heaven! The beautiful thing for me was gathering with family members, some of whom I had not seen since I was a young teenager. One of my cousins is battling cancer, one of my aunts is in the early stages of Alzheimer’s, many more are dealing the regular vicissitudes of life, but all together there was just such a beautiful power of community. Together we are strong. Together we are weak, together we are sad or joyful. I was so thankful that I could be a part of this. To be in such a big group of my mom’s family in the “old country” was meaningful and powerful for this immigrant’s daughter. Our extended family in Canada was small. I had one uncle on my dad’s side and one aunt on my mom’s side, that’s it. Eight cousins in all. When you have so much family so far away it really is beyond words to finally be part of this tribe in a very real way.
A Community Race
On Saturday afternoon Gerard had a community race. There were two options, either a 5km or a “ten English miles” which is 16km. Normally he runs a 10k but that was not an option. He wasn’t feeling great and a 5km is not a real challenge for him so I was curious as to why he would still want to run. Turns out it was all about community, about gathering with all the runners before the race and after the race and with running together in a big group. It was the energy of the group that was the big factor. It was not running a 5km. It was being connected with the power of community. How awesome is that?
A Retirement Party
Saturday night there was a retirement party for two brothers who are in the same business as Gerard; they are amaryllis growers. They sold their business and they wanted to celebrate with all their colleagues, friends and family. The amazing thing is that I met total strangers who had unknown connections to me. One man told me that his mother and my oldest aunt were best friends. Another man told me that his oma was a good friend of my mother’s!! Another man asked me where I was from so I said southern Ontario. Where he persisted. Somewhat impatiently I said Chatham. He then tells me that he has nephews there. Do I know the VanderEndes? Well, yes I do. Crazy small world. Even though the music was so loud that we had to shout in each other’s ears (boy was I feeling old!!) it was still wonderful to connect with all these people and to feel the power of community. Together we could celebrate with these two amaryllis growers and be happy for their success and also for the coming time where they can enjoy the fruits of their labour. With the power of community our joys are doubled and our sorrows are made less.
The Connection
Now what on earth does this all have to do with card making? Well, now I am going to tell you about the fourth event. I was invited to go to a good friend’s team gathering on Sunday afternoon. What a delightful group of women. I learned from them that also here in Holland, they get great satisfaction of gathering together as a team. They just love to meet in person once in a while and create together, to touch base and catch up with each other’s lives. Inspiration and energy is derived from these gatherings. I know that I certainly left inspired by their creativity and enthusiasm! Once again I was witness to the power of community. My friend told me that without these gatherings she would have stopped with Stampin’Up! when the going got tough. It was the power of community that kept her strong and motivated. Wondering who this friend is? It is the lovely and talented Caroline van der Straaten. You can check out her blog here.
How very fitting that the cards I am going to share today are made with the Come to Gather suite of products. Gathering with these ladies was so lovely. Even though I was still feeling under the weather with a bad cold, I am so very glad that I went. Believe it or not for the first five or ten minutes I was feeling a little overwhelmed and almost decided not to make a card. I was just going to take all the pieces back home and make them quietly alone later. It is a very enlightening experience for me to be on the other side of the creative experience. Does this surprise you?
I absolutely love this card that Annette Koolmees designed. While I love the Come to Gather paper, I have to admit that this particular sheet didn’t at first appeal to me. After seeing and making this card, I changed my mind. The tipping point was that Annette chose to stamp the pumpkin and the leaf on crumb cake card stock and then use an aqua painter to colour it. The result is an entirely different effect. My cajun craze leaf didn’t quite turn out the way it should have because I was using a brand new Wink of Stella and I squeezed a little too aggressively!! This led to a little heavier application of what should have been a subtle touch of bling.
A better surprise with this card is in the inside when you open it. It is a fancy fold with a tea light inside! The picture definitely doesn’t do it justice. Do go on over and check out Annette’s blog here. I see that she has already blogged about our wonderful afternoon together!
I used this card to participate in a tic-tac-toe challenge with The Joy Of Sets. You can check that out here!
Annette had more cards using this suite of products but I will share just one more with you. I might share some more of them tomorrow if I run out of time to create myself!
Here is a closeup of this fantastic card. the leaves have been blinged up with a bit of wink of stella.
The Power of Community for You
If you are feeling like you could use a little more “power of community” you may want to consider coming to a card making class. Maybe you are not into cards and scrapbooking is your thing. Perhaps neither of those things make your heart sing, but you really do love home decor. Well, paper, stamps and ink can be used to make some pretty amazing things and making them together with other people is simply wonderful. No classes offered in your area? Then I challenge you to step outside your comfort zone, get the starter kit and start playing. There is so much information on this hobby online, so many videos and tutorials to watch that you will have no problem figuring out how to do it. Once you get a feel for it you will be ready to share the love of your new hobby with other people and YOU can create the power of community and bring joy to the world through paper crafting. Click here to get the starter kit. You can put anything you want into this kit. You pay only $135 but you get $165 worth of product with no shipping or tax. It really is wonderful thing. I’m happy for you. I’m hazarding a guess that if you are here you are already either hooked into this lovely hobby or intrigued by it. Happy stamping and thanks for dropping by!
Hello stampers. Unexpected kindness is always such a lovely surprise. People who are prepared in advance to be ready for such opportunities inspire me. Kay used Butterfly Wishes to make this lovely card and she had it ready just in case it would be needed! Let me tell you a story about what happened one evening on the ship.
Every evening we would go to the formal dining room at 8:30 for our assigned seating. We had a lovely group of people to sit with and we looked forward to sharing stories of the days adventures. I had also noticed that the ship’s crew would often sing with great enthusiasm at different tables for someone’s birthday. All the tables around us were also populated by Stampin’Up! people. About four or five tables away I saw someone being celebrated one night, so after supper was over and I saw this group of people congregated outside the dining room I also offered my congratulations. There was an eruption of mirth! It turns out that it really wasn’t anyone’s birthday at all,but there was a fun American prankster who thought it would add some life to the party to just celebrate someone each night. He came up to me on the pool deck the following day and suggested that we should celebrate my daughter Rachel that night. Why not?
Sure enough, he talked to our head waiter, and at the end of another lovely meal, there came a piece of chocolate cake with a candle burning brightly and a group of ship staff from many different countries all singing happy birthday with their adorable accents. Rachel was shocked but she went along with it. The song was barely over and there comes the lovely Kay Smith from Newfoundland who was sitting at the table next to us with a birthday card for Rachel!!! Rachel whispered that it wasn’t really her birthday that day but the card was already signed, sealed and delivered. I thought it deserved it’s very own blog post! Thanks Kay for being such a wonderful inspiration! I always want to be that person who has cards at the ready to hand out to people but most often that is not the case. This is a habit I want to cultivate because spreading joy is contagious. Here is Kay’s card:
I love how Kay used basic gray for the branch and because Butterfly Wishes is a DistINKtive stamp it comes out two-toned! This card was a blessing to Rachel, but also for me since it gave me the raw material for a blog post! I have been struggling with chronic nose bleeds so my energy level is down and my stress level is up, so this was a real God send. Yes, I have a doctor’s appointment and I picked up a new bottle of liquid iron so I am doing what I can to stay healthy. It is a genetic thing for sure, my Pap had terrible nose bleeds as a child and also as a senior. We used to think it would kill him in his eighties, but he is still alive and well at 92 and doesn’t have them very often any more.
What do you think about the unusual combination of Terracotta Tile and Seaside Spray on this card? I really like it a lot. Like I said in my blog post on Saturday, the easiest source of inspiration for colour combinations is looking at the list of colours that are found in our designer series paper. You really can’t go wrong!
Would you like the dimensions of this fun card? I know I always appreciate when I get the dimensions and don’t have to struggle to figure it out. The card base is 11″ by 4 1/4″ scored at 2 1/2″ and 5 1/2″. The smaller “Z” is 3″ by 9″ scored at 3″ and 6″. Kay’s card actually looks amazing considering it traveled across the ocean for 10 hours by plane, several hours on a train and also in a cab and then our own car! Only the front panel was run through the embossing folder. On the inside back panel Kay used a piece of patterned paper from Woven Threads that is 4″ by 5 1/4″. Hopefully I will have time some time this week to do a video showing you how to put this card together. If I run out of time which is entirely possible, then I will feature it in my Facebook live next week Tuesday at 7pm. Every Tuesday starting tomorrow I am committed to doing a Facebook live with the theme “Coffee and a Card Revisited”. I hope you tune in!
Now my goal is to have in my purse at all time a thank you card, a birthday card and a thinking of you card. That should cover the basics don’t you think? I think I will keep them in a clear stamp case so that they don’t get dinged up too badly. If you have any random acts of kindness stories to share that involve cards, I would love for you to share in the comments below. I will choose one lucky winner to get a Paper Pumpkin stamp set from me. Thanks so much for dropping by, I appreciate each and every one of you. If you need any of the supplies below and you live in Canada, then please do click on the images and you will go straight to my online store. Please use the current host code as it helps me keep my costs down and be able to offer blog candy now and then. Host code: XBTQ47UR
Hello stampers. I decided to make a second twisted pop-up card with the Come Sail Away Suite as I needed to show you how I made it. It was time for an updated version, but the jury is still out whether or not it is an improved version or not. The first one was quite effective I am told. While the video is uploading I will write this blog post and show you some pictures of the actual card. For the card front I used a card from the Come Sail Away Memories and More card pack.
There are five different items from the Come Sail Away suite on this card: the baker’s twine, the sail away trinkets, the Come Sail Away Memories and More card, the Smooth Sailing dies and the Come Sail Away designer series paper. Suites make it a dream to coordinate and create a great card.
I really love how this card turned out in the inside. I stamped the sailboats in Memento Black and coloured them with Blends. In yesterday’s card I had them stamped just in one solid colour and that works too, but this is definitely a step up.
Here you can see the panels up close. Each panel has a piece of designer series paper measuring 2 1/2″ by 3 1/2″ as well as a stitched oval framelit (the second largest one) The sailboats, the anchor and the banner are all popped up with mini dimensionals. In this last shot you get a glimpse of the inner mechanism of the card fold.
Finally, here is the video that I made to show you how to put this card together. I hope you find it useful and that you feel inspired to make one of these beauties yourself. Thanks for stopping by, but before you leave, can I ask a favour? Please pin your favourite card as that really helps me get more traffic to my blog and that eventually will also help to grow my business. I really appreciate you! Have a super day.
Hello stampers. My most popular video on YouTube is a twisted pop-up card tutorial but it is already a few years old so I thought it was high time to make another one. Meet my Sailing Home Twisted Pop-Up card. This is such an impressive technique card and when you are shown the proper way of doing it, it really isn’t that difficult. The outside of the card looks completely normal, the surprise happens when you open the card. The effect is very satisfying to you the card maker! I decided to use Sailing Home because I love the suite so much. Let’s first take a look at the mechanics of this card.
After you have your standard card base of 4 1/4″ by 11″ scored at 5 1/2″, you will need this piece. In the video tutorial I will show you how to fold it. Basically the two triangles you see in the diagram stay intact. You fold it in half down the long scoreline in the middle, and then you tuck the middle in behind the triangle. Clear as mud? No worries, in the video it will make sense. If you take a look at the next diagram you will see the shape it needs to be. Before adhering this to the inside, I adhered two 4″ squares of designer series paper to the top and bottom inside of the card.
Once this first piece is inside you are ready to also adhere to the bottom of the inside of the card (the triangle you see will have sturdy adhesive put on it and then you close the card so that it will stick to the bottom as well)
This part will become the focal point of the Sailing Home twisted pop-up card. It is easiest to completely decorate this part before putting it inside the card. For this stage of the card a video is the easiest way to show the procedure. A twisted pop-up card is very difficult to photograph, so I decided to pin it to my card “clothesline” so you could see it properly. First we will take a look at the very ordinary front of the card. I did use one of the gorgeous laser cut pieces from the Sailing Home Memories and More card pack to use as a stencil and I am really happy with how it turned out.
I have to confess that I went for a walk with my girls after supper and when I was almost home I remembered that I had invited people over for a visit!!! They were waiting for me when I got home, so I ended up taking these pictures in “night” light, not natural light, but they aren’t too bad.
I love how these papers and stamps just work so well together. I used night of navy, mossy meadow, real red, crumb cake and balmy blue.
Here you can see all the stamps and framelits I used for the inside of this card. I can’t wait to make another one of these with a different combination of patterned papers. I did use the water stamp from High Tide on the first and last panel. You could also stamp the sailboats in memento ink and use Blends to colour them for a stepped-up version of this card. Here is a very short video that shows you the card “in action”. Tomorrow I hope to do a lengthier video tutorial on how to make this card from scratch.
Thanks so much for stopping by today. I promise I will share the video tutorial on my next blog post. In the meantime, you can check out my original video here and that should help you get started on your very own Twisted Pop-Up card. I would love to hear how you make out. If you really love this bundle and can’t wait until June 4, you can add it to a starter kit right now. If you live in Canada, just click here to make that happen.
Hello stampers. I have a fun card for you today that is simply called a Double Point Card. I am using all new supplies from the new catalog to get you all excited for what is coming. That might be a bad idea since it takes your focus off of our Occasions catalog and all the amazing things in our current annual catalog, but we always like sneak peeks don’t we? If your catalog is anything like mine, it is getting a little worn around the edges! I used the Perennial Essence suite for this card. The product that most captured my heart in this suite is definitely the Perennial Essence paper, it is simply stunning!!
Double Point Card
Here you can see what I used to make this card. The picture doesn’t show you the beautiful paper or the coordinating vellum but that will come later! It is really nice that there are two coordinating punches with this stamp set, the new perennial flower punch and our current leaf punch.
Perennial Flower Punch and Leaf Punch
I love the soft colours of this card. The muted tones of the patterned paper are well suited to combining with a vellum flower. Let’s take a look at how I made the points out of the Perennial Essence paper.
Measurements for the Points
The points are just a 3″ by 4″ piece of patterned paper, scored at 1″ along the long side. You then fold the corners down to meet just above the score line. The 1″ by 4″ piece then gets adhered under the 4″ by 5 1/4″ piece of whisper white cardstock (see the video).
These new stitched nested labels are a dream to work with. They pop out of the framelits with ease, absolutely no poking necessary. There are 9 dies in the set.
Floral Centres
Here you can see a closeup of the stitched nested labels. Do you see how pretty the floral essence centers are? (yes, I know I am spelling that word the American way, but if people want to google for them it won’t show up if I spell it the Canadian way)
There are lots of little surprises in this card. You get to lift the stitched nested labels to see this sentiment and then you get to open the actual card to find another one!! Someone will definitely be feeling the love when they get this card from you.
Paper Pumpkin
The sentiment here is from the March Paper Pumpkin that featured the succulents. That kit is totally sold out. Don’t you hate it when you miss out on a fabulous Paper Pumpkin? There is a super easy way to have that not happen. Subscribe and get a monthly delight in the mail. Instant gratification! Just like ordering takeout so that you don’t have to cook and clean up. Next month’s Paper Pumpkin is a very special vintage one designed by Shelli Gardner the cofounder of Stampin’Up! Click here if you are interested.
Clearance Rack
I hope you enjoyed this fun card today. I hope to get the new catalogs in some time in May. Don’t forget to check out the clearance rack for some fabulous deals. Once again, the list of products at the end of my post will be small since most of the products are not yet available. I have to say that one of the things I really enjoy about being a demonstrator is getting my hands on brand new products before anyone else!! At the end of this post is a video showing you how I put the card together. It cuts off at the end because I ran out of space on my phone. There was no way I was going to redo the whole thing and we didn’t miss much at the end.


")
")


