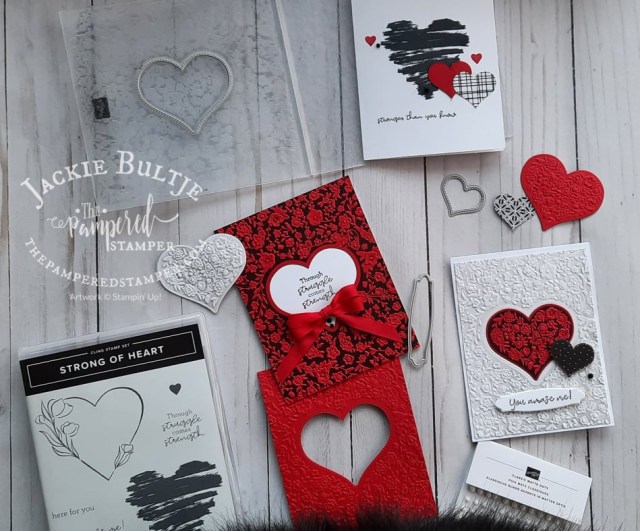
Hello stampers and happy Wednesday to you. Hybrid Embossing Folder. Do you know what this is? Have you tried them? At first I was a little mystified myself, but these beauties cut and emboss at the same time. The die fits inside the embossing folder and with one run through the die cutting machine you accomplish two things. Yesterday I tried it with a brand new one from the 2022 mini catalog.
Hybrid Embossing Folder: Almost Ruined!
Well, I wanted to take this hybrid embossing folder to a new level. I had a baroque theme in mind for my heart card. Originally I was trying to combine the Strong of Heart fundraiser stamp set, but then I went off on a tangent. You see, I love castles and brocade and rich colours. The colours I was using were Real Red and Basic Black. Why not go bold? Guess what I did?
Yes, I inked up the folder in black ink, laid the heart die inside, added my red cardstock and put it through my die cutting machine. Wow! It turned out even better than I thought. Such rich depth of colour and texture, it was beautiful. But there was a definite problem. I could smell the distinct smell of almond extract. I knew right away that I had used Stazon instead of Memento black.
If any of you know about Stazon ink, it stays on!! It is meant to be a permanent ink on fabric, plastic, metal, you name it. I tried rinsing it off. Nope. Tried Stazon cleaner. That worked minimally. Then I got out the big guns: GooGone. That stuff stinks like the dickens, but it worked. I had to use a dish brush and some elbow grease, but my embossing folder is clean again!
Embossing With White Velvet
While we are on a regal, baroque theme, why not add velvet paper into the mix. Now be forewarned, you will never quite get the look that I got on this card. Why? Because no matter how hard I scrubbed and cleaned my embossing folder, there was still some GooGone residue and this transferred to the white velvet paper giving it an authentic vintage look!
Here you can see the lovely detail up close. I am really, really impressed with this hybrid embossing folder.
Video Tutorial
I can’t believe that my original post didn’t include this video!! With a technique like this, seeing a video is simply the best inspiration. Enjoy!!
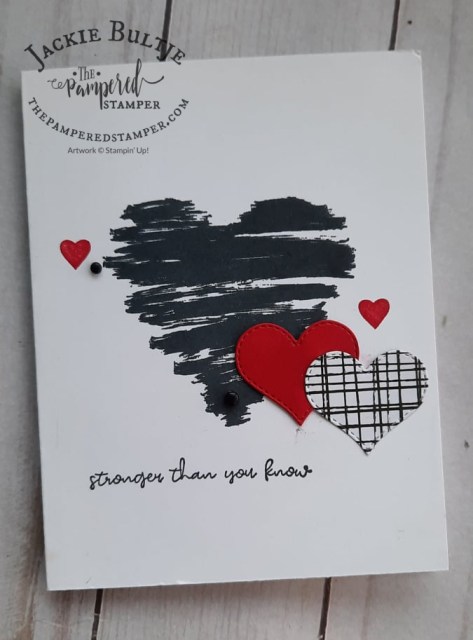
Strong of Heart Fundraiser Stamp Set
Did you know that Stampin’Up! is donating $4 to heart health for each Strong of Heart stamp set sold? In Canada these funds are going to our very own London Health Sciences Centre. The reason behind this is the tragic story of Anne Granger who lost her husband at the age of 40 to a rare heart condition. You can read about it here.
One More Peek
Can you believe that this was once plain red cardstock? I am just so very impressed with how beautifully this turned out. Ink up your embossing folder with black ink and wowsers!!
The sayings on all of these cards come from the Strong of Heart stamp set. I really hope that you are inspired to purchase this set and help raise money for heart health. It is so wonderful that Stampin’Up! keeps the money that is raised in each country in the same country. Support local!! Thanks for joining me today, as always the links to shop with me are at the end of the blog post. Have a super day.
Hello stampers and happy Wednesday to you. Today I am sharing my new Arctic Bears card series with you. I will be making one of these cards each Tuesday in November at 10am on YouTube and Facebook. You can purchase the card kit including shipping for only $25. If you order the bundle from me then you get the card kit for only $10 plus shipping. Let’s take a look.
Arctic Bears Card Series
What I love about these cards is that they are “all occasion”. They can be used as Christmas cards but they don’t have to be. Polar bears evoke a sense of calm and peace and of caring which is sort of ironic because you certainly wouldn’t want to cross their path in the wild!
Arctic Bears Watercolour
We made the watercolour card that I cased from the catalog at my in person coffee and a card class today. With the shimmery white cardstock base and a water painter, the results were so lovely! I hope you can join me as I make this card in my Virtual Coffee and a Card series next Tuesday at 10am on YouTube. You can check out my playlist here.
Creating a scene with the stamp set is so gratifying. The watercolour technique on shimmery white cardstock is quite simple with a few tips and tricks that I will share on Tuesday. I hope to see you there too!
Have You Chosen Your Christmas Card Design Yet?
I am curious. When you make your Christmas cards, do you choose a single design or a single stamp set or suite? Do you send cards only to very special people or do you have a long mailing list? I do not like making multiples of cards so I have a broad assortment of Christmas cards. This can get me into a bit of a sticky wicket. Sometimes I am plagued by indecision. Who should get which card? So many choices. The most important thing is that you enjoy the process, so be sure to start on time. I hope that I have been inspiring you. As always, the product list is at the bottom of the blog. Simply click on the photos and you will be in my online store. Wonderful, isn’t it?
Thank you for joining me today and have a super day.
Hello stampers and happy Friday to you. Today I am going to share with you the Split Front Card technique. I have been meaning to try this for a while, but Janis’ card in the mail for my happy mail in Holland contest prompted me to no longer procrastinate. First I will show you Janis’ card which uses Timeless Tropical.
Janis’ Card
Janis became my customer years ago when she attended my Hearts for Haiti fundraiser with her friend Brenda. Both of them were public health nurses in Chatham-Kent. Janis has since become a team member and friend and we also play a mean game of pickleball together. I’m sure we are a sight to behold. Janis is my “little friend” at barely five feet and she has an amazing serve. We have had some pretty great times beating our male opponents!
Here is the inside of the card. I love the sentiment and the great tropical colours: calypso coral, mango melody and old olive. It also looks like Janis used one of our awesome new punches.
It’s always an exciting moment for me when I spy happy mail in the mailbox. Gerard’s flap on the mailbox doesn’t always stay closed so I can peak in as I drive by either in the car or on the bike. Those extra happy stamps on the outside of the envelope are also a harbinger of more good things to come!
My Split Front Cards
For these cards I used a piece of whisper white measuring 5 1/8″ by 7 3/4″. You can choose to cut it in half first before you stamp, or do it later. My eye was off so I found it super helpful to cut it in half first at 3 7/8″ and then butt them up against each other to stamp. You can see the video to understand this technique. Colours: night of navy, mossy meadow and soft sea foam. Stamp sets: Here’s A Card, Forever Fern and Tasteful Touches. Here is another blog post featuring Forever Fern.
Video Tutorial
An Afternoon in Delft
One of my cousins in Holland takes me for lunch or dinner in Delft every time I come to Holland. It is such a wonderful tradition. We catch up on each other’s families and just enjoy this beautiful old city. It is not only the origin of the famous Delfts Blauw pottery, it is also where William of Orange was shot in the church and where many of the royal family are buried. Here are a few shots of my time in Delft including a super cute bag that looks just like some of our Playful Pets paper.
Happy Mail in Holland Contest
If you would like to have your card featured on my blog AND get a chance to win a stamp set of your choice (up to $30) then please send me a card in Holland. The address is Jackie Bultje, Bloemenlaan 6, 2691 JC, -s’Gravenzande, the Netherlands.
Edited: I am not able to post any more pictures in this post due to technical issues with the computer so I am going to abruptly end this blog post and will add to it later when things are working again. I was hoping to share a photo of the cards that I made in my live video using this technique as well as some fun shots from Delft. Oh well. Stuff happens and it is Friday afternoon here and the sun is shining. I am going to head to the market and buy some fish for supper. Then I am going to bike into town for a visit with some friends. Life is good. I am blessed. Thanks so much for joining me today.
As you can see, the computer was cooperating today and I could add the rest of my pictures! Happy squirrel.
Hello stampers and happy Monday to you! Today I am going to share with you my original “toilet paper” card using Forever Fern. Forever Fern is a stunning “DistInktive” stamp set in the new annual catalog which goes live on Wednesday. Let’s take a look at this great card.
Forever Fern Toilet Paper Embossing Card
I made this card on my Facebook live video on Thursday and I shared this video in my blog post on Friday but now you get to see the finished card. I made a few little changes. Can you see them? I added another gold foil element from the Forever Gold Laser Cut Specialty paper on page 152 of the new annual catalog. The finishing touch was a few little gems from the Flowers for Every Season gems which come in clear and Just Jade.
Here is a close up of the card so that you can see how pretty the gems are and how lovely the ribbon combo is! I am going to be making this card for one of my clubs on Tuesday and I am going to switch it up again with different ribbon. I will be sure to share a picture on my Facebook and Instagram accounts.
Embossed Toilet Paper
I thought you might like to see what the embossed toilet paper looks like before I trim it down. If you want the step by step instructions, be sure to check out my blog post from Friday. You can see it here.
It is surprising how well this embossed toilet paper holds up to sponging with a sponge dauber! The embossing folders are all from the new catalog except for the one at the bottom, it is Parisian Flourish. If you want to see the products used in my card, check out the images in the product list below.
Online Bingo
Did you see that I am offering my first ever online Bingo? This fun event will be on Friday June 26 at 7pm EST. It is open to demonstrators and if you already have the stamp set that I am including in the fee then you can tell me which one you would like instead as long as it is the same value or less. Check out the details here.
Thanks for joining me! There will not be a regular Facebook live today as I am visiting my parents again. Now that I am home for a bit I want to take advantage of it and visit them more often. Time is of the essence! Have a super day. See you on Wednesday when the new catalog goes live!! What fun, I can’t wait because there are so many wonderful things to be ordered.
Hello stampers and happy Friday. I just couldn’t help declaring toilet paper essential for cards! Isn’t it just the perfect title for these COVID times? Truly, toilet paper is an essential component for the card that I am going to show you today.
Embossing With Toilet Paper
Yesterday for my daily Facebook live video I showed you how to emboss with toilet paper. I will include the video here but let me start by sharing a few simple instructions.
Use two ply white toilet paper.
You need four layers to make this work, you can just fold the toilet paper, no need to separate and tear the sheets.
Spritz the toilet paper lightly with a fine mist of water. You do NOT want to saturate the paper.
Place the toilet paper in your embossing folder, but not right up to the “hinge”, you don’t want it to bunch up.
Run through the die cutting machine and prepare to be impressed!
Allow your embossed toilet paper to dry for about fifteen minutes before altering it.
Do NOT use a regular paper trimmer to cut your embossed toilet paper, it will tear. Use a guillotine cutter or a rotary cutter or even a pair of scissors with long blades.
My Card
I thought it would be fun to share a card that I did not make during the video yesterday. On Monday I will share the cards from the video. This cards uses a beautiful new suite from the annual catalog that will go live on June 3. It is called World of Good. The coordinating embossing folder is called Old World Paper. There is brass foil sheets but they were not available when I ordered so I used copper on my card. I can’t wait to see the brass foil sheets!
This card base is the new Misty Moonlight as is the globe image. The words and the sponging were done in crumb cake. Do you see the nice detail beside the patterned paper strip? That is a die from the World Map dies. Isn’t it amazing how textured the toilet paper became? This is such an impressive technique, I can’t wait for you to try and let me know how it turned out.
Close-up of Embossed Toilet Paper
This picture really shows the depth of the embossing with toilet paper. I sponged crumb cake ink over it with a sponge dauber being sure to “land lightly” and use a circular motion.
This technique is not my original idea, it has been around for a while, but I was recently inspired by British demonstrator Terri Pocock. You can check out her blog here. Thanks so much Terri for your inspiration.
Technique Video
Here is the Facebook live video that I did showing you how to do this technique. Seeing is believing! I try to post most of my videos to YouTube, so feel free to subscribe to my channel so you don’t miss any.
New Catalog Goes Live June 3
You will be able to get these products on June 3 when the catalog goes live. There are two great things happening to make this even more special.
If you host a workshop, and yes, you can host a virtual workshop, you will get $30 extra host dollars if you have a $300 workshop.
If you choose to get the awesome deal on the starter kit you get to choose a bonus bundle. That means any stamp set with a coordinating punch or any stamp set with the coordinating dies. Wow!
Both of these deals are available until June 30.
Thanks so much for joining me today, I hope to see you for my Facebook live video at 1pm. Before I sign off, I thought it would be fun to share my most popular blog post. It features the Birthday Memories cards that I made for my first ever OnStage presentation the day after my first grandchild Leo was born. You can see it here.
Hello stampers and happy Thursday. Today I am sharing with you my Floating Heart Card that I made for the Design Dream Team Tutorial. If you order from me in February you will get this sixteen project tutorial for free! I made this card while in Holland and had to make do with what I had. Ideally you would use rectangle stitched framelits for the opening, but I had to use a square die twice instead.
Floating Heart Card
I promise that I will do a video on how to make this card when I am back home in my studio. As you are reading this I am probably having coffee with my parents. It will be so, so good to see Mom and Pap after a seven week absence, especially with how sick Pap has been. He is slowly improving, but this shingles disease has really knocked the starch out of him.
Here you can see the card open with the floating heart in the middle. I must admit, I was pleased as punch with this design as it was entirely my own idea and it came together so quickly in the first try!
Facebook Live Next Week
Just a heads up that my Facebook live videos will once again be at 7pmEST now that I am back in Canada. We’ll see how well this time does for me. If I find that something different will work better, I will let you know. As always, your feedback is appreciated and essential. I do this for YOU, so let me know what you like and don’t like.
I’m not going to go into all the details of how I made this card, they are in the tutorial that you get for free if you are on my team, in my training group or order from me. I will however show you how it is done in a video. Have a super day and happy stamping!


")
 Velvet Sheets")


")


 Host Designer Series Paper")


")


")


")
")


")

")


 Double-Stitched Satin Ribbon")
 Crinkled Seam Binding Ribbon")
