Hello stampers and happy Monday to you. Today I have a fun technique with you that I call Blown Alcohol technique. I did something similar this summer but it was WAY more complicated. You can see that post here.
I was reminded of this technique by my European team leader Michelle Last and you can see her blog post here.
Thankfully I have also made a video for you to see how it is done. I also show you how NOT to do it and what happens when you mess up. Always fun to see someone else’s mistakes isn’t it?
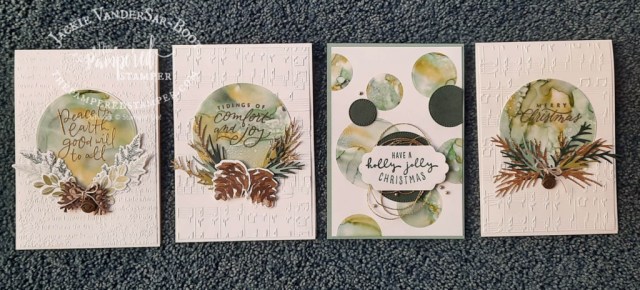
Blown Alcohol Technique Cards
To do this technique successfully you need vellum cardstock, 90% or above isopropyl alcohol (you might just know it as rubbing alcohol in North America) and Blends markers. It is helpful to have a stampin’ spritzer as well as these little bottles from Amazon.
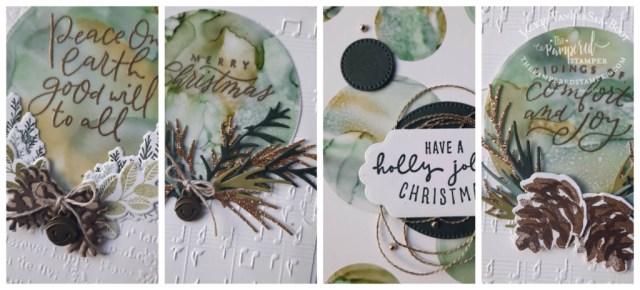
Here’s a close-up of the cards so you can see the detail:
Little Tip
What makes the blown alcohol focal point so vibrant is the use of adhesive sheets. When the blown alcohol technique is complete you put the entire sheet of vellum onto an adhesive sheet and then you can adhere it to a sheet of basic white cardstock. Use your layering circles dies to cut out circles and stamp your sentiment in versamark and emboss in gold. Remove the adhesive backing and add to your card front. Accessorize with die cuts, flat jingle bells or stamped and die cut pine cones.
Video Tutorial
Here is a video tutorial that I made. It is in typical Jackie fashion with some trial and error but I think it will make you feel totally at home. My wish is that when you watch my video you will be empowered to give it a try yourself. I used the following Blends colours: Soft Succulent, Old Olive, Just Jade and Evening Evergreen. Just Jade has been retired so if you don’t already have it you could try and substitute with a different shade of green.
Thanks!
Thanks for joining me today, I hope you were inspired. Please leave a comment so I know you were here and if you really want to show me some love, pin some of your favourite photos so more people will find my blog. Every little bit helps. The links to shop with me online in Canada are below.
Hello stampers and happy Monday to you. Today I am featuring a Torn Paper Strip peekaboo card. Sadly the patterned paper that I used for these cards is no longer available. I would say that the lesson in this is to get what you really want when you see it. That is not always economically feasible but do let me know as I will always try to help you out as much as I can!
Torn Paper Strip Peekaboo Card
The premise behind this card style is to do a controlled tear in the panel on the front of your card to expose some pretty patterned paper tucked in behind. If you don’t have this pretty paper you could also create a stamped scene. I have made a video tutorial so you can see exactly how it is done. The only drawback with this card is that it is not really easy to mail. This one should be given in person!!
Do you see the difference in the two cards? The main difference is that I sponged the edges of the torn strip on the card on the left with soft suede ink. There is also a larger margin showing on this card (1/4″ instead of 1/8″) The card on the right has some ink spatters from the Deep shade of Blends.
Take the Party Inside
I finished off the inside of the card using the Grassy Grove bundle. Sponge daubers were used to add some garden green ink to the image that was stamped in soft suede. I’m really happy with how that turned out. If you want to see more cards made using this Grassy Grove bundle, check out my older blog post here.
Video Tutorial
If you are like me, it is so nice to actually see a technique in action. Here you go!! I hope you enjoy it and that you also subscribe to my channel on YouTube. Don’t forget the thumbs up!! Thanks so much. I hope that you know how much of a difference you can make to my business, even if you can’t purchase Stampin’Up! supplies from me. Simply by sharing my work you help me reach a broader audience.
Thanks!
Thanks so much for joining me today. I hope that you have a super day and that you were inspired to do some stamping of your own.
Hello stampers and happy Friday to you. As promised here is the second half of the cards that I have gathered from the uber talented Chay Wright. These cards also use the Natural Tones Blends, but this time they are used to make flowers instead of humans!
Gorgeous Flowers with Blends and Alcohol
I finally have what I need to try and imitate this gorgeous technique. In the meantime, it is much easier to share Chay Wright’s amazing work. Be sure to subscribe to her channel on YouTube which you can find here.
I did an Blends and Alcohol card back in the fall and you can check out the video tutorial in this blog post.
As Chay herself says, sometimes when you are trying to make alcohol roses, they don’t turn out exactly as you would like. Don’t throw those attempts out! You can use them to make a card just like the one below! The trick to making these roses is this little tool that you can buy on Amazon. I tried with a cheapie from the dollar store but the results were disastrous.
Link To Chay’s Video Tutorial
Chay first did this Blends and Alcohol technique last summer. You can see her blog post with step by step instructions here. You can also find her on Instagram here.
Edited: Chay just posted the video tutorial for these cards here. Enjoy!!
I think I will probably have to wait until I get to Holland before I can try this Blends and Alcohol technique. Life is busy at 81 Delaware with my kids and grandkids living with me temporarily. I wouldn’t trade it for anything, these are precious moments. There will always be time to stamp and play later. Now it’s oma time!!
I hope that you have fantastic success with this technique. Be sure to set your calendar on your phone to May 4 with a reminder that this suite will once again be available to purchase! Have a super day and happy stamping.
Hello stampers and happy Monday to you. Today I am sharing some Waves of the Ocean suite cards with you. I have been noticeably absent this past week, or at least I hope it was noticed! My oldest daughter and her family moved in with me temporarily until they get possession of their new house. I was in full mom and oma mode and it has been wonderful! Now it is a new week, March break is over, school has begun and so has their regular work routine. Let’s take a look at my Waves of the Ocean cards.
Waves of the Ocean Cards
For the month of March I have been doing a video tutorial each Tuesday on YouTube and Facebook at 10am EST. I pair this with something I call “Parcels in the Post”. This is a collection of cardstock, patterned paper, embellishments and ribbon that gives you enough to play with but doesn’t break the bank. If you want one, click here.
When you read this, I will still have two of these cards to share in my Tuesday tutorials. I hope that you will find me on YouTube and subscribe to my channel! It really is one of the best ways to see what I am doing quite literally.
Embossing on Blue Foils
Yes, you CAN emboss on our foil paper. You have to be careful to stop as soon as all the powder is “set”. If you “cook” it too long, then the foil will start to bubble or delaminate. Embossing in white on those gorgeous blues is really quite stunning. The wave image is really a gorgeous stamp.
Bejeweled Waves
Magic happens when you layer the stamped wave with the die cut waves. One wave is cut from our blue foils paper and the other is cut from our Supple Shimmer paper. The wave was stamped twice and spritzed to get this great effect. You can see it all in action in my video tutorials.
Masked Cloudy Skies
For this card I used the Basic Borders dies to make a mask which I then moved around after sponging on ink with my Blending Brushes. Both the wave and the pelican stamps were inked and spritzed to get a softer look.
Crazy Times!
I don’t quite know whether I am coming or going these days. My household has grown from one person to five people, including two littles and a dog! Last week was also March break which meant no school and no daycare, but it also meant lots of oma snuggles and precious memories. I pre-recorded some of the videos for these Waves of the Ocean cards, so some are already up on my YouTube channel and some will be going up in the next two weeks. Please follow me on YouTube and subscribe to my channel. Videos are going to be the main way that I connect with my stamping audience, all other things are secondary.
Just Until the end of the Month
Please be aware that a lot of the products in the Waves of the Ocean suite are only available until March 31. Only the stamp set and dies will carry over into the new annual catalog. The rhinestone waves gems are stunning and the patterned paper is beautiful too. It’s all fabulous!!
Thanks for joining me today, I hope you have a fabulous day. See you here on Wednesday again.
Hello stampers and happy Monday to you. This morning I did a very fun Stack and Shuffle technique video. I’ll share the video a little later. What a great way to not only use your pretty patterned paper, but also to create a stack of cards without getting bored. Let’s take a look!
Stack and Shuffle
Now it is a very good thing that is not normal shuffling, because I am a terrible card shuffler. This is quite easy and straightforward. However, if you watch to the end of the video you will see that it CAN go wrong if you try and do it too quickly. No worries, I got it solved after the video ended and I was no longer in a rush.
Here is the graphic that you need for the measurements.
Friendly Hello Stack & Shuffle Cards
Here is a shot of all the Friendly Hello stack and shuffle cards.
In The Moment Stack and Shuffle Cards
I thought I would try this technique with the In The Moment paper as well. Turned out quite nicely I think!
Look how fun they look all together in a little stack!
Individual Cards
Here are some closeups of the individual cards, they look so nice!
I forgot to show you the inside of the cards, that is where you use the 3/4″ strip that you cut off from the 4″ by 6″ piece. Simple but effective. Take the party to the inside!
Video Tutorial
Here is the video tutorial that I did this morning. Please watch it on YouTube as that will really be of benefit to me. If you leave a comment there and share my video, then you have a chance to win a gorgeous Stampin’Up! floral logo mousepad.
Thanks!
That’s it for today, thanks so much for joining me today and thanks in advance for your comments and for sharing my video. I would love to see what you make with this technique. Have a super day.
Hello stampers and happy Friday to you. Today’s cards feature the beautiful “Simply Marbleous” paper that you can get for FREE during saleabration which goes until February 28, 2022. One of side of the lovely paper has a delicate marble look and the other has a bolder marble streak in it. I think that you will find that this paper is particularly suited to monochromatic cards. Let’s take a look.
Simply Marbleous Paper
Marbleous is not actually a word, but Stampin’Up! seems to like using interesting adjectives in their product descriptions. Nonetheless, the paper is fabulous!! I paired it with another wonderful saleabration stamp set called Calming Camelia. This is a host exclusive set which you can get for free is you have a $375 workshop. If you think about it, all you need is four people each spending less than $100 and then one of you will get this set. With a $60 order you can also get the Simply Marbleous paper for free as well.
Chance to Win
COVID makes it difficult if not impossible to have in person classes and clubs, but that doesn’t mean that we can’t have stamping fun. If you place an online order this week you could win the Calming Camelia stamp set. Each person that orders will also get a Simply Marbleous paper sampler in the mail as well. Just use the host code below.
Simply Marbleous Cards
Here you can see two of the Simply Marbleous cards that I have made this week. One is with Bumblebee and the other with Gorgeous Grape and Highland Heather. I totally cased the Bumblebee card from my team member Kathy Burke. The Ornate Layers dies were also specially ordered so that I could make this card. No other die would do.
Here is a look at the inside of the card.
I did a video tutorial yesterday with this card in my exclusive Prime Time With the Pampered Stamper group. Curious as to how you can be.a part of this group? Click here and see what it entails.
Gorgeous Grape and White Craft Ink Refill Card
This Gorgeous Grape card has a slight twist. I used the white craft ink refill to colour my Calming Camelia flowers. On February 2 I will do a video showing this technique in my Global Monthly Video Hop Group. Perhaps you can join me?
If you have a sharp eye you will notice that the dimensions for this card seem different. They are!! This is a European sized card using A4 cardstock. It is longer and narrower than our cardstock in North America. This card is 29.7cm by 10.5 cm scored at 14.9cm. The Gorgeous Grape layer is 13.9 cm by 9.5cm and the Simply Marbleous Paper is 13.6cm by 9.2cm. I was hoping to make this card with my Dutch girls at Koffie en één Kaart Klas today. That couldn’t happen because I tested positive for COVID19. Thankfully I am not super sick, I am writing this blog post after all and will do a video this afternoon for my Training Group.
Next Monday
Next Monday I will be featuring more Happy Mail in Holland with a beautiful card from Chris Margrie. She used the Faux Chalkboard technique that I shared a few years ago on YouTube and also in this blog post. You might want to try it to before Monday!
If you would like to purchase any of the supplies I used today AND get in on the draw for Calming Camelia, then just click on the links below. If you live in Europe you can shop with me here.


")


 Designer Series Paper")
")


")


")


")


 Specialty Paper")


")
")

 Designer Series Paper")
 Open Weave Ribbon")
 Open Weave Ribbon")


")


 Designer Series Paper")
")
