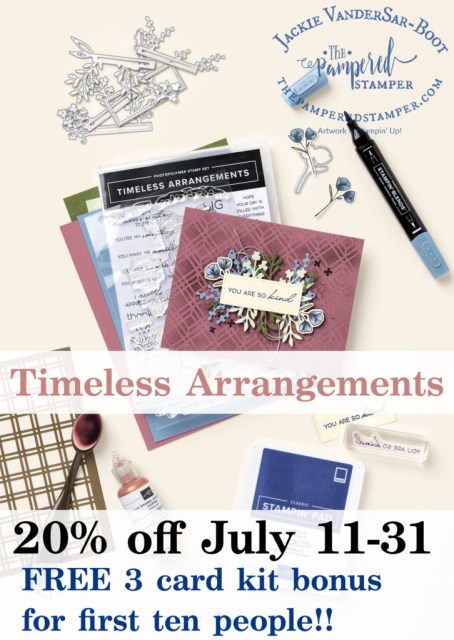
Hello stampers and happy Monday to you! Today I am sharing some Timeless Arrangements cards with you. I adore this bundle because it makes it SO easy to make “timeless arrangements”. The name of this stamp set is so fitting, because the cleverly designed dies make it so easy to make beautiful arrangements that are indeed “timeless”. They can be used for any occasion, at any time of the year. Let’s take a look!
Timeless Arrangements Cards
Truth be told, I went a little bit crazy when I started creating with this bundle. Not all the cards fit the colour scheme, but I think you will agree that they are pretty special!
Try something new! Click on the photo above and see what happens. If I did it right, and you live in Canada, then you should be “in” my webshop with all the products listed that I used for these cards. Let me know if it works!!
Great Deal in July!
Summer is often a slow month for stamping sales and I really, really want to earn the Mexico incentive trip, mostly for Gerard because he loves to scuba dive and hasn’t done it for years, but also because it is the hallmark for knowing that you are running your business well. I very much appreciate every order that comes my way!! Timeless Arrangements is my deal for July and you get 20% cash back of the catalog price if you order through me. If you would rather get a different incentive, you can also choose a package of embellishments sent to you in a pretty card, or a mystery box from my stash!!
More Inspiration
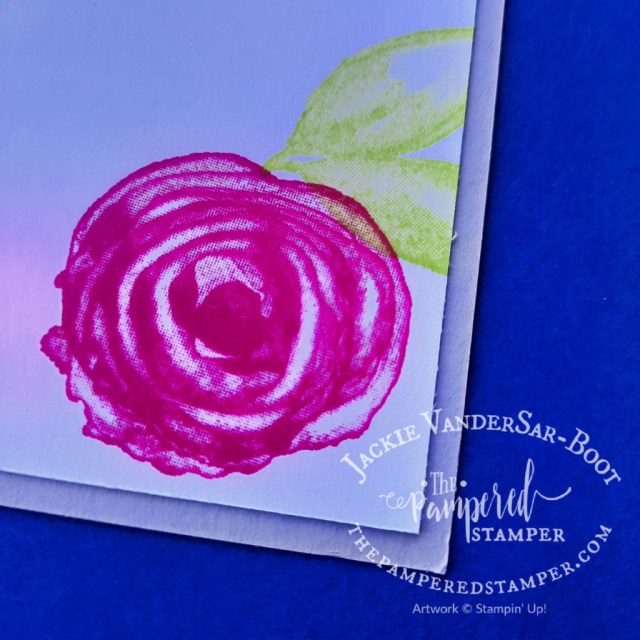
This is a monochromatic card that I made showing how versatile this bundle is.
Here is another favourite which was inspired by Amy Cook.
Video Tutorial
I always enjoy seeing a stamp set in action, so maybe you do too! Check out my video from last week and remember, each Tuesday in July will feature another Timeless Arrangements card. Live in Canada or Europe? Order your bundle today and get 20% cash back from the catalog price!!
Thanks!
Thanks for joining me today. If you enjoyed this post, please share on social media, that really helps me!! If you live in Canada, you can click on the images below if you want to order them through me. I appreciate you!! Have a super day.
Hello stampers and happy Saturday to you. I know! A blog post on Saturday? This free split sponging technique Zoom class is so exciting to me that I just couldn’t wait to share it with you. While you are reading this blog, I am sharing this card with the 25 Dutch demonstrators that came to my High Tea and Paper Pumpkin event. When demos get together we usually like to swap. That means that I will be sharing my swap cards with you in the next little while.
Free Zoom Class with the Split Sponging Technique
Why do a free Zoom class? I’ll be totally honest. The truth is that running my business online can get a bit lonely. With the fact of living in two countries and traveling a lot back and forth, it is difficult to hold consistent in person classes. While I love creating video tutorials, I thought it would be a nice change to be able to see you as well. Creating a lively stamping community is dear to my heart. Here is the link to the event where you can also get the Zoom link to join in on this free class which will be on Tuesday May 9 at 4pm CET which is 10am EST. You can google what time that is in your time zone.
Split Sponging Technique Cards
Here you can see what we are going to be creating. It’s really so simple, yet so striking. Huge thanks to Jay Soriano for sharing this technique and layout. If you want to see more cards made with Artistically Inked, check out this blog post.
Of course I couldn’t leave the inside of the card blank, so I stamped the small flower from Artistically Inked in the inside using Melon Mambo and Parakeet Party for the leaves. You can really see the distINKtive design of this stamp. Basically this means that you get a variegated colour with just one simple stamp. I love how artistic this makes me look and feel!
What to do before the free Zoom class
First of all you are going to want to put the date and time into your calendar on your phone so that you get a reminder. Then click “going” on my event page so that I know I won’t be stamping alone. Be sure to check out the supply list below to make sure you have what you need to play along. Questions? Message me; I love to help.
Zoom Recording
Did you miss the free Zoom class? Here is the recording for you. Enjoy!!
More Resources
If you already have the Artistically Inked stamp set you might want to get this pdf tutorial bundle which is now half price!
Thanks for joining me today. If you like what you see, please share either on Facebook or Pinterest. Comments are always appreciated too! Have a super day.
Hello stampers and happy Wednesday to you. Today I have a Pansy Patch Easel-Fold card for you. Do you want to hear the story of how this card came to be? Maybe you already know because you joined me for my YouTube and Facebook live at 10am yesterday. Let me tell you the story.
When Bad Things Happen
Here is a glimpse behind the scenes. Yesterday was my youngest daughter Rachel’s birthday. I am in Holland and she is in Canada and there is a 6 hour time difference. She misses Mama Bear so of course she called me when she woke up at 9am. That means it was 3pm here, one hour before my live video. We chatted for 45 minutes and then I said, I have to go, to get ready for my live video.
Upstairs I go, quite confident in my ManyCam abilities now. I already had my card materials ready, so it was just a matter of setting up the live stream. This all went really well and I could see that my microphone was working. I had my laptop off to the side so that I could see your comments. That didn’t work so well this time but since I could see my microphone working just fine, I thought I would catch up with the comments later. Big mistake.
Apparently the sound conked out after you were treated to the sound of the frogs copulating in the pond outside!! You should have heard me when I saw the first comments after the video had ended!! I said something like this: “You mean they could hear those blasted frogs and not me!! Arggghhhh!!” Then my screen also froze. Gerard did a speed test and apparently the internet connection was fine. Must have been the technology gremlins having fun.
The Response
The reason I was so upset that it didn’t work is that I was in such a good flow. While the card was being made ever so nicely I had a great dialogue going, telling you all about how the virtual coffee and a card class started and how a demo’s brain works when they are planning events. Then it was all for nought!!!
Gerard says, don’t give up, just make it again. I moaned, I can’t!! I don’t have any more Sweet Ice Cream supplies. You see, I only took the card kits with me just like the ones my subscribers get. Deep breaths. There must be a solution. There was. I cased my own card using different stamps and paper and this was the result.
Why Does This Make Me Happy?
The biggest win in this situation is that people can see that they can participate in my video tutorials even if they don’t have any of the supplies that I am using. As long as you have some basic cardstock and patterned paper and some stamps you CAN create along with me. My advice is to first watch the video and then watch again with your supplies ready to go. You can pause me whenever you want and catch up with your own card making. I would love to see what you make!!
A Few More Pictures
Pansy Patch is really a lovely suite. The patterned paper has both florals and gingham as well as some leaves and pansy bouquets that you can cut out. I used the dies to cut out the individual pansies. Gorgeous!! The new in colour gems are a perfect match too. They are currently on back order so you will have to wait a while to get them.
If you want to subscribe to my virtual coffee and a card class, you can do so here.
The Original Card
Do you want to see what the original card was from my Sweet Ice Cream Virtual Coffee and a Card class? I had to steal the ribbon from it to finish the pansy card! That reminds me of what I sometimes had to do when I was first a demonstrator and did workshops in people’s homes! No matter how hard I tried to be organized I would always forget some product. To improvise and make the class possible I sometimes had to take apart my card samples to glean enough supplies!!
Unfortunately the Sweet Ice Cream bundle is back ordered until the end of May. I would strongly advise getting the paper before it is gone. The mini catalog is supposed to be “live” until the end of June but supplies are only available while supplies last. We can be upset about that, but it happens all the time in the real world. I had found an amazing pair of shoes but alas, no longer available in my size.
Thank You!!!
Once again I want to thank you for all your support and encouragement. What a wonderful stamping community we have. Just like the card says, I truly appreciate all the little things you do.
Join My Team!
My heart is with my Beyond Pampered Team. What a wonderful group of stampers we have and it is growing across the country. There has never been a better time to join. From now until the end of May there is significant added value to the starter kit and by getting the kit you also get your own personal 20% discount.
The kit is $135 with no shipping or tax. You can put any products you want in it except for host sets. The best part is that you get to choose a whopping $208 worth of products. I have to admit, I got the starter kit myself in the Netherlands so that I could get the ink pads and the in colour ribbon that I didn’t have here. If you want to join, just click here.
Hello stampers from a warm and sunny Chatham, Ontario!! Yes, the sun is shining and I’m so happy. Today I want to share with you the faux chalkboard technique, at least that is what I am calling it. This technique involves white craft ink and an aquapainter. I used Magnolia Lane stamp set, versamark, gold embossing powder and crumb cake cardstock. Thanks to Marion Greenlund who came to our twin team gathering yesterday and inspired me with her cards.
Here is another one of Marion’s cards.
After embossing the flowers in gold you daub craft white ink onto an acrylic block and then make a wash with your aqua painter and paint your flowers. When this has dried you go in with a sponge dauber and petal pink ink to colour the middle of the flowers. So simple and so pretty. I decided to step it up a notch and do some more layering for a very special lady.
I took the party to the inside with this card and embossed both the sentiment and the flower in gold on shimmery white cardstock. I really love how it turned out. Isn’t the ribbon so pretty? All part of the Magnolia Lane suite.
I love shimmery white cardstock for watercolouring. It holds up well to the water and the shimmer shines through. At over $1 a sheet I save this for special people!!
I had so much fun making this card. I love it when a technique is easy but impressive. It makes me feel so artistic!!! Can’t wait to do this in a class with my people. I did a live video on Facebook showing how to make this card, you can check it out here.
Thanks so much for stopping by. Remember there is a last minute sale on right now on selected retiring products from 10 to 30% off. Click here to see the deals. If you want to shop with me just click on the links below. The Good Morning Magnolia set will not be available until June 4 unless you put it in a starter kit. Have a super day!


")
 Designer Series Paper")


 Metallic Edge Cotton Ribbon")


 Polka Dot Tulle Ribbon")

")
")
 Designer Series Paper")


 Organdy Striped Ribbon")
