Hello stampers and happy Wednesday to you. On Monday I was able to ink up this gorgeous set for the first time. I just happened to have a customer drop by and she had not yet seen this stamp set. When she saw me stamp it, her jaw dropped and she said “WOW”! The wildlife stamps just jump off the page because they are very realistic looking due to the distINKtive technology of the stamps.
Wildlife Wonder: Some “Beary” Good Tricks
When I get a new stamp I ink up all the stamps in a few different colours and strengths. This gives me a good idea as to the versatility of the stamps. I also wanted to try stamping directly on the New Horizons paper. At first this seemed like a bad idea. You could see the patterned paper right through the bear. Then the magic happened. I grabbed a blender pen and went all over the bear image with it. Worked like a charm!
The other great trick with the bear is to fussy cut him close to the stamped image. When you do this he or she blends in better with the scene on the paper.
Clever trick number three is to be sure to “ground” the bear. There is a long skinny stamp that looks a bit like a cirrus cloud; use that to make a base for your bear like I did in the first card.
Clever trick number four has nothing to do with the bear. This time the wolf is the star of the show. I used a scrap of leftover patterned paper and fussy cut the grass to make a bit of a hiding spot for our resident wolf. Don’t you think it worked well?
Clever trick number five. If you watch my video you will see that the owl used to have a prominent place on the wolf card. Trouble is, it was a bit TOO prominent. The owl was simply too large. Instead I made a focal point for the sentiment which I punched out with a 2″ circle punch. The owl was stamped off in Crumb Cake to the left of the sentiment. Very effective, I think! These cards were made “on the fly”. If I would do the wolf one again, I would not use a scrap, but I would make an entire border across the front to camouflage the wolf a bit.
Video Tutorial
When you watch this video, please click on the brown box that says “watch on YouTube”. That way you can give me a thumbs up, subscribe or perhaps even leave a comment. Trust me when I tell you that it really makes a difference in my day when I see you do any of these things. There is also a “share” button under the video and then you can choose whether to share to Pinterest or to Facebook. Yay!!!!
Thanks for joining me today. If you want to purchase any of the products I used for these Wildlife Wonder cards, the links are below in the Product List. Have a super day!
Hello stampers and happy Monday to you. Today I am sharing some Waves of the Ocean suite cards with you. I have been noticeably absent this past week, or at least I hope it was noticed! My oldest daughter and her family moved in with me temporarily until they get possession of their new house. I was in full mom and oma mode and it has been wonderful! Now it is a new week, March break is over, school has begun and so has their regular work routine. Let’s take a look at my Waves of the Ocean cards.
Waves of the Ocean Cards
For the month of March I have been doing a video tutorial each Tuesday on YouTube and Facebook at 10am EST. I pair this with something I call “Parcels in the Post”. This is a collection of cardstock, patterned paper, embellishments and ribbon that gives you enough to play with but doesn’t break the bank. If you want one, click here.
When you read this, I will still have two of these cards to share in my Tuesday tutorials. I hope that you will find me on YouTube and subscribe to my channel! It really is one of the best ways to see what I am doing quite literally.
Embossing on Blue Foils
Yes, you CAN emboss on our foil paper. You have to be careful to stop as soon as all the powder is “set”. If you “cook” it too long, then the foil will start to bubble or delaminate. Embossing in white on those gorgeous blues is really quite stunning. The wave image is really a gorgeous stamp.
Bejeweled Waves
Magic happens when you layer the stamped wave with the die cut waves. One wave is cut from our blue foils paper and the other is cut from our Supple Shimmer paper. The wave was stamped twice and spritzed to get this great effect. You can see it all in action in my video tutorials.
Masked Cloudy Skies
For this card I used the Basic Borders dies to make a mask which I then moved around after sponging on ink with my Blending Brushes. Both the wave and the pelican stamps were inked and spritzed to get a softer look.
Crazy Times!
I don’t quite know whether I am coming or going these days. My household has grown from one person to five people, including two littles and a dog! Last week was also March break which meant no school and no daycare, but it also meant lots of oma snuggles and precious memories. I pre-recorded some of the videos for these Waves of the Ocean cards, so some are already up on my YouTube channel and some will be going up in the next two weeks. Please follow me on YouTube and subscribe to my channel. Videos are going to be the main way that I connect with my stamping audience, all other things are secondary.
Just Until the end of the Month
Please be aware that a lot of the products in the Waves of the Ocean suite are only available until March 31. Only the stamp set and dies will carry over into the new annual catalog. The rhinestone waves gems are stunning and the patterned paper is beautiful too. It’s all fabulous!!
Thanks for joining me today, I hope you have a fabulous day. See you here on Wednesday again.
Hello stampers and happy Monday to you. Today I am sharing a card that I call Dragonfly Garden: The Magic of Mist. Truth be told there was a reason this stamp set had not seen ink for almost a year! I didn’t love it, largely because of the patterned paper that was included in the suite. It didn’t appeal to me, so this bundle sat on the shelf. Today it has been transformed and I like a lot more!! Simply by adding a little mist, these stamps were softened and transformed into a work of art that I love. Let’s take a look.
Dragonfly Dreams
For this card I used two very important products: the stamparatus and shimmery white cardstock. Without those two things you will have limited success. I Inked up the floral image with retiring In Colour Stampin’ Write Markers: Just Jade, Misty Moonlight, Bumblebee, Cinnamon Cider and Magenta Madness. Before stamping I would lightly mist or spritz the inked stamp. Be sure to wipe off with your shammy in between inking up again and stamping multiple times.
I did end up using the grass stamp from Wildflower Path to fill in the bottom of my scene. Did you notice that I used all the retiring In Colours? This was a happy coincidence but also a timely reminder to check your supplies in these colours. Make sure you have enough cardstock and ink refills and of course the markers!
Video Tutorial
I love watching a video to see how a card is made, it is much easier than reading a written description. Be sure to click on the left hand corner of the video that says “watch on YouTube”.
No Blog on Monday!
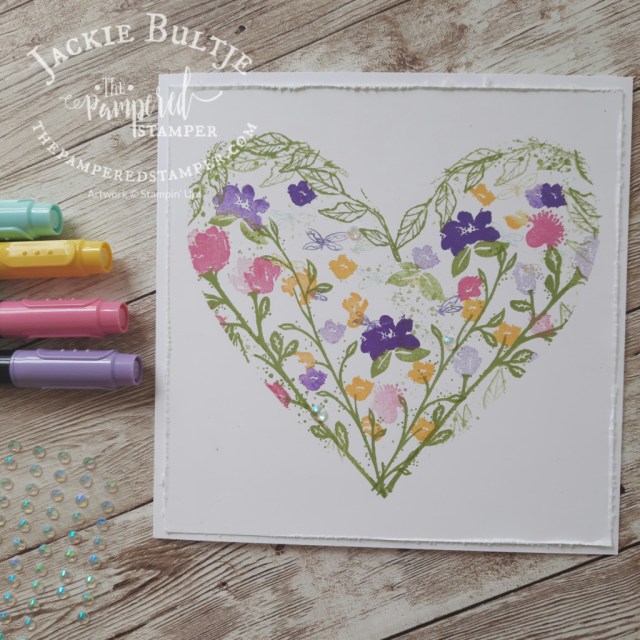
Since I will not be blogging on Monday as it is March Break and the littles will have moved in with me, I am going to make this an extra long blog post. I want to share some similar cards also using Wildflower Path. For these cards I did not use “the magic of mist” but I did use my stamparatus!! I used grid paper to create a heart mask. My exclusive video tutorial for these cards is on my Prime Time group. This is a very affordable private group that you are welcome to join! It’s only $10 a month, the price of a fancy drink and a treat. You also get a free monthly 16 project pdf tutorial that is worth $20 so you are getting double the value and then some for your investment. I must be crazy!! Click here to join.
Heart Mask Collage Stamping
For my flowers I used the following markers: highland heather, daffodil delight, polished pink and gorgeous grape. The leaves and stems were stamped in pear pizzazz. The question is, do we like it better plain or with a sentiment?
Here you can see the card with two different sentiments. The long skinny one is from Waves of the Ocean. The die from the other card is also from Waves of the Ocean bundle.
Here you can see the gorgeous detail in this closeup of the heart collage card.
A Little Addicted!
I think I may be a little addicted to this technique. A special thanks to Gez Carpenter for sharing this on the Demonstrator Planning Place on Facebook. You can find her blog here.
I made this last card using a very beloved stamp, Free as a Bird. What do you think? This time I used Pool Party and Balmy Blue Blends to colour the birds.
Thank you!
That’s it for today, it should give you lots of ideas for inspiration. I hope you have a super day and don’t forget to get the great deal on the mini die cutting machine! I used it last night to do some embossing and it was such a pleasure to work with. (just a heads up the natural tones Blends are backordered until April 4- bummer!)
Hello stampers and happy Wednesday to you. Creating with Waves of the Ocean gives a feeling of peace. That is definitely something we need more of these days. Blue and yellow are the colours for the Ukraine and both of these colours are found in my card today. I made this card on Tuesday for my weekly Parcels in the Post tutorial.
This card was NOT my original idea. I totally cased it from the talented Australian demonstrator Linda Dalke who is also a fellow design team member for the International Create With Us Team. You can find Linda’s blog post here to see her gorgeous work.
Waves of the Ocean
What is your favourite part of creating? I love what happens when you play with colours and I really get into the feeling that a card evokes. Each card is different. Some are cheerful and bubbly. Other times it is really serene. This one takes me to beautiful beaches that I have been too as well as the deck of a cruise ship. The beautiful blues of the Caribbean, or the azure of the Aegean Sea by Greece. Sometimes my cards take me back to my childhood.
‘Nuff said. Let’s take a look at this great card. I was going to take a picture of all three of the cards that I made, but I gave one away spontaneously to my postwoman. She was heavily laden with mail and I thought, I’ll bet she feels unappreciated!
After looking at these cards I realize that I did indeed give my favourite card away. It is the one that I made in my video, so that is good news. That means you can check it out and see it for yourself. In that card I perfected the blending brushes for the sky and I remembered to sponge the so saffron on the water BEFORE adding the blue, so there is no hint of green. It’s the little details!!
Video Tutorial
Here is my video tutorial. I am on a relentless pursuit of growing my YouTube following and I truly hope that you will also help me out. Click the red subscribe button on the bottom right corner of my video and if you feel like I deserve it you can also give me a thumbs up. For the video below, click on the box on the left side that says “watch on YouTube”. Yay!! Thank you so much.
Never A Dull Moment
I am writing this blog post at 8pm because I got an SOS call from my son late this afternoon. He, his wife and their daughter all have a nasty flu bug. They say they haven’t been this sick to their stomachs since childhood! So I am on “oma duty” for the littlest one. We had lots of snuggles since he was not happy to be alone at oma’s house. So happy that I am here to be able to help since that is not always the case!
It was a beautiful sunny afternoon, so I did go outside for a walk in a nearby conservation area. I met a lovely old gentleman who personally showed me where the male great horned owl was roosting in the upper branches keeping an eye on his mate who was sitting on their eggs. Apparently great horned owls mate for life. Be still my heart!
Deal on the Mini Die Cutting Machine
Did you know that there is 20% off our adorable mini die cutting machine? This little gem is great for taking along when you are crafting away from home. There is also a great selection of stamp and die bundles on sale. See the images below. I really do hope that if you are Canadian and you follow my work that you will shop with me! I appreciate you very much.
Please note that the above images are just screenshots, so you cannot click on them and be taken to my online store. Those links are below for your convenience. Just click on the images in the product list and you will end up in my online store, it really is so wonderfully simple.
Thanks!
Thanks for joining me today. I am grateful to be a part of such a wonderful, creative community. Have a super day!
Hello stampers and happy Monday to you. This morning I did a very fun Stack and Shuffle technique video. I’ll share the video a little later. What a great way to not only use your pretty patterned paper, but also to create a stack of cards without getting bored. Let’s take a look!
Stack and Shuffle
Now it is a very good thing that is not normal shuffling, because I am a terrible card shuffler. This is quite easy and straightforward. However, if you watch to the end of the video you will see that it CAN go wrong if you try and do it too quickly. No worries, I got it solved after the video ended and I was no longer in a rush.
Here is the graphic that you need for the measurements.
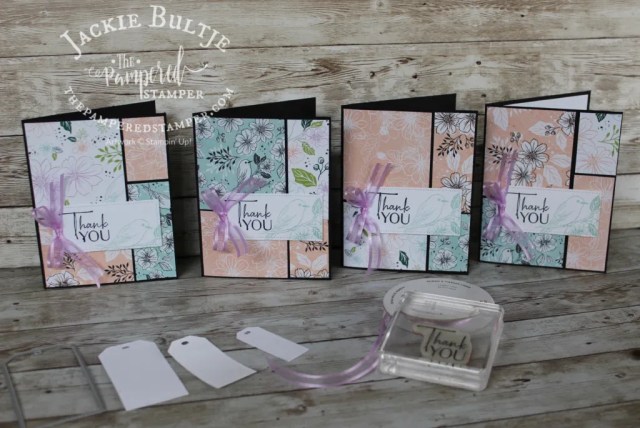
Friendly Hello Stack & Shuffle Cards
Here is a shot of all the Friendly Hello stack and shuffle cards.
In The Moment Stack and Shuffle Cards
I thought I would try this technique with the In The Moment paper as well. Turned out quite nicely I think!
Look how fun they look all together in a little stack!
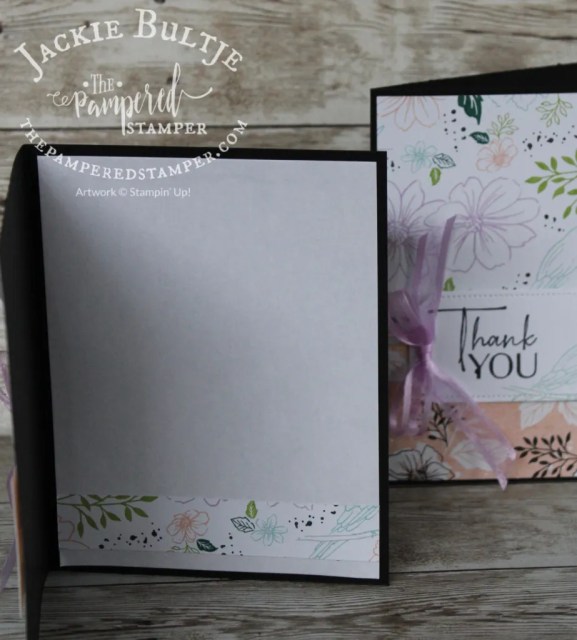
Individual Cards
Here are some closeups of the individual cards, they look so nice!
I forgot to show you the inside of the cards, that is where you use the 3/4″ strip that you cut off from the 4″ by 6″ piece. Simple but effective. Take the party to the inside!
Video Tutorial
Here is the video tutorial that I did this morning. Please watch it on YouTube as that will really be of benefit to me. If you leave a comment there and share my video, then you have a chance to win a gorgeous Stampin’Up! floral logo mousepad.
Thanks!
That’s it for today, thanks so much for joining me today and thanks in advance for your comments and for sharing my video. I would love to see what you make with this technique. Have a super day.


")
")
")
 Designer Series Paper")


")


")


 Specialty Paper")


")
")


 Designer Series Paper")


")


")
")

 Designer Series Paper")
 Open Weave Ribbon")
 Open Weave Ribbon")


")
