Hello stampers and happy Wednesday to you. This is the first Wednesday of the month and that means it is the Monthly Global video hop. The theme is Anything but a Card. I chose to do a home decor piece. Aren’t you supposed to do something everyday that scares you? I chose to make a watercolour painting with stamps. Let’s take a look.
Anything but a card
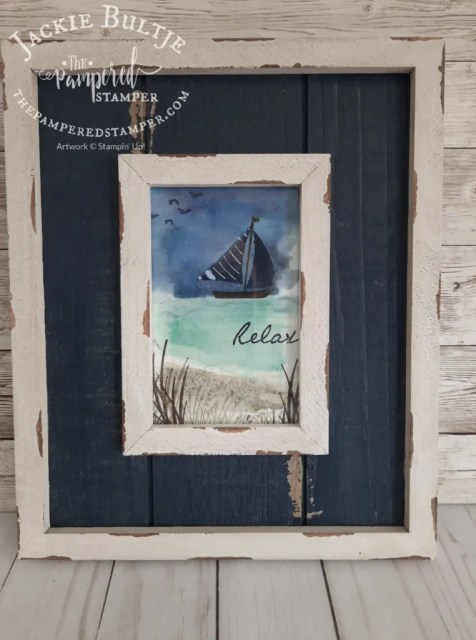
Did you know that Stampin’Up! carries watercolour paper? It comes in 5″ by 7″ pieces but I had to cut it down to 4″ by 6″ to fit the opening in my frame. Don’t throw those extra strips away! They are perfect for practicing different techniques and for trying different amounts of water saturation.
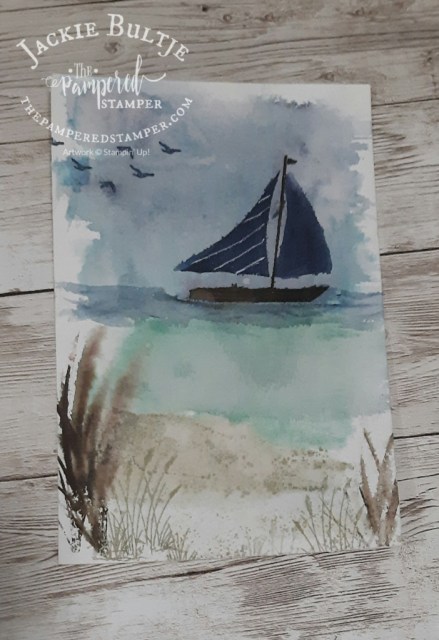
Here you can see it unframed.
My First Attempt
This was the first watercolour I did and then I forgot to take a picture of it in natural light. These photos were taken at night so they’re not the best, but they will have to do. I like this version too. You will notice that I had a little too much water on my reeds.
I’m Curious!
Which watercolour do you prefer? The one with or without words? When you tackle a project like this each one of your attempts will be different. It is so much fun and your pack of watercolour paper comes with ten sheets! What are you waiting for?
Video Tutorial
Here is my video showing you how I did it.
Hugs from Holland
By the time you are reading this I am spending my fourth day in Holland already! I am so excited to share pictures of Holland in the spring. This is the first time that I am in Holland for early April. It is also my shortest stay in quite a while, just a month this time. Thanks for joining me today and happy stamping!
Hello stampers and happy Monday to you! I thought it very fitting to write a blog post today called Many Happenings! Today is my dear mama’s 90th birthday. What a tremendous blessing to still have both of my parents, now 90 and 95 still living in their own home, still in love and still mentally sharp. Praise God!
Many Happenings
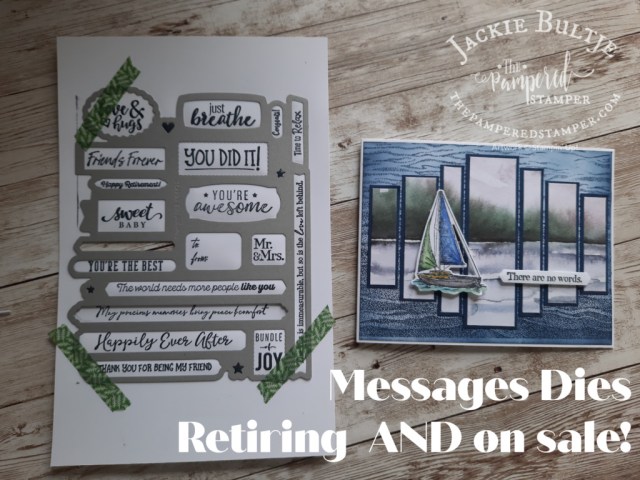
Many Happenings is a one piece stamp set that has many, many sayings on it. You stamp once and then you cut them all out using the coordinating Messages Dies. There is a second stamp set called Many Messages that also coordinates with this die. The dies are retiring AND on sale! The stamp sets are both retiring but they are not on sale. Get them before they disappear as retiring products are only available while supplies last.
I used this set to make my Prime Time cards last Thursday. These videos and instructions are exclusive for this private group, but YOU can join too for only $10 a month. Why so cheap? I wanted to make it accessible to all especially when COVID happened and we couldn’t do in person classes and I needed a way to keep my business afloat. Here is the link to join. As a thank you for your loyal support, you get a free pdf tutorial each month that is worth $20.
Clean and Simple Card
As much as I love the sailboat, I think the card is even nicer without it. Am I the only one craving a clean and simple look? Which is your preference?
Can you guess which stamp set I used for th background? I know, it looks just like patterned paper! Tip: you can find it in the product list at the bottom of this blog post.
There are no words
It’s true. Sometimes there are no words. Only feelings. Empathic silence. A hug. This card conveys just that. Perhaps it could have used a few birds stamped simply in the sky. You can find a great bird stamp in the On The Horizon stamp set.
Prime Time Cards
Here is a photo of all the cards I made for my Prime Time Group. It’s nice seeing them side by side so you can see the subtle differences.
Thanks!
Thanks so much for joining me today. Tomorrow I fly to be with my love again. I’m over the moon excited! Each time we are apart it gets harder. Looking forward to sharing my travels with you again. Let me know if I can meet any of your stamping needs. Have a super day!
Hello stampers and happy Friday to you. As promised here is the second half of the cards that I have gathered from the uber talented Chay Wright. These cards also use the Natural Tones Blends, but this time they are used to make flowers instead of humans!
Gorgeous Flowers with Blends and Alcohol
I finally have what I need to try and imitate this gorgeous technique. In the meantime, it is much easier to share Chay Wright’s amazing work. Be sure to subscribe to her channel on YouTube which you can find here.
I did an Blends and Alcohol card back in the fall and you can check out the video tutorial in this blog post.
As Chay herself says, sometimes when you are trying to make alcohol roses, they don’t turn out exactly as you would like. Don’t throw those attempts out! You can use them to make a card just like the one below! The trick to making these roses is this little tool that you can buy on Amazon. I tried with a cheapie from the dollar store but the results were disastrous.
Link To Chay’s Video Tutorial
Chay first did this Blends and Alcohol technique last summer. You can see her blog post with step by step instructions here. You can also find her on Instagram here.
Edited: Chay just posted the video tutorial for these cards here. Enjoy!!
I think I will probably have to wait until I get to Holland before I can try this Blends and Alcohol technique. Life is busy at 81 Delaware with my kids and grandkids living with me temporarily. I wouldn’t trade it for anything, these are precious moments. There will always be time to stamp and play later. Now it’s oma time!!
I hope that you have fantastic success with this technique. Be sure to set your calendar on your phone to May 4 with a reminder that this suite will once again be available to purchase! Have a super day and happy stamping.
Hello stampers and happy Wednesday to you. Today I am introducing Chay Wright and the All Together Suite. It will be an unusual post since it is all about the work of someone I admire. When I saw Chay’s gorgeous cards I knew that it just couldn’t get any better than this! I contacted her and asked if I could share her creations on my blog. These cards are a work of art and they really show how gorgeous this suite is. I hope you think so too!
The All Together Suite
The All Together suite has a stamp set, dies, patterned paper and perhaps most importantly of all, a set of ten Naturals Blends. I’m pretty sure that the Blends were designed for skin tones. We were seriously missing enough selection to capture all the skin tones of the world! The coordinating stamp set shows some iconic images that bring us together instead of dividing us. I can certainly get behind that concept!
Chay’s Beautiful Work
Here I am going to share with you the gorgeous cards that Chay has shared already with her fellow demonstrators. I am so thankful that she was pleased to have me share them here with you.
All Together Suite Back-Ordered!
Even though the suite is now back-ordered until May 2 rather than April 6, I thought I would share these cards anyways. Do you know why? It is because the dies are also retiring! If you want to make that stunning card above, you will need the Playful Alphabet dies. They are now also on sale for only $36.80.
More of Chay’s Work To Come
Chay has also done some beautiful work with the Blends and alcohol on vellum for a gorgeous effect. They deserve their own blog post don’t you think? The All Together Suite was so popular that it was backordered until May 2, 2022. That is the reason I waited with posting this blog post until now.
Video Tutorial
Here is Chay’s video tutorial so you can see first hand how to do that amazing colouring. Put a reminder in your phone for May 2 so that you can order your All Together Suite as soon as possible!
Thanks!
Thanks for joining me today. I am sure that you are just as impressed with Chay’s work as I am. Too bad you have to wait with getting the suite, but it will be worth the wait! Be sure to check out the Last Chance List here for all the retiring products and the deals. There are also two more days to save 20% on the Mini Stampin’ Cut & Emboss Machine and ten assorted stamp sets and dies. Check that selection out here. Have a super day!
Hello stampers and happy Monday to you. Today I have an awesome “collage stamping” card using Ranunculus Romance. Wow, that is a hard word to type!! Did you know that a ranunculus is a bulb? You can read about them here and see how many beautiful colours they come in. Ranunculus Romance is great for vintage cards too. I was inspired to make this card by the talented Gail Ellis.
Ranunculus Romance Card
Here is my Ranunculus Romance card. I figured if I spell it often enough it will get easier! The ranunculus is also called a Persian Buttercup.
I did a video tutorial for this card as well and I fussy cut the flower. Someone watching the video reminded me that there are indeed dies to go with this stamp set, so I looked into it. Indeed, there are dies! The reason that I did not have the dies is not that I forgot. Collage stamping is the primary reason that I got this stamp set and I didn’t think I would utilize the dies enough to justify the cost. You can decide that for yourself!
Video Tutorial
Rather than type out how I made the card, you can just watch the video here. I would be most grateful if you clicked on the bottom right corner of the video where it says “watch on YouTube”. It would be even more awesome if you subscribe to my channel and comment and share the video. This is the modern version of “word of mouth” which is the best form of advertising. Thanks for being a part of my stamping community!!!
Supply List
Did you know that the supply list for my cards is always listed at the bottom of my blog? I also share it in my YouTube videos. There are two little words beneath the description of the video. “Show more”. If you click on that you get a LOT more information including the links to my Stampin’Up! store and to my favourite Amazon products. With this video I used a great little bow maker. Mine came from a friend in the States, but it is much easier for you to get them from Amazon (or find a handy carpenter to make you one, in that case you can use the Amazon image as inspiration!) Click here to see it.
Thanks!
Thanks again for joining me today, I really appreciate you “stopping by”. Happy stamping and have a super day!


")


 Designer Series Paper")


")


")


 Crinkled Seam Binding Ribbon")


