by Jackie Bultje | Oct 18, 2019 | Christmas, Paper Pumpkin |
Hello stampers. I think it is fitting that my topic today is Winter Woods Paper Pumpkin. There was a little frost on the roofs this morning and there is a nip in the air. My gas fireplace is on and it is cozy! The Winter Woods Paper Pumpkin is gorgeous with sparkly white birch trees in the foreground and a lush evergreen in the background. Shall we take a look?
The Card

This is the card made exactly according to the instructions. Paper Pumpkin has included suggestions for two alternative projects, one is a card and the other is a 3D shadowbox. I was planning to make one of the alternative cards but my Woodland embossing folder is missing in action!

In this closeup shot of the Winter Woods Paper Pumpkin card you can see the beautiful sparkle in the birch trees and the silver accents on the banner and on the coordinating envelope. It really is all in the details! The pretty snowflake sequins add just the right finishing touch and they are included in the kit as well.
What Makes Paper Pumpkin Special?
What I really love about this kit is that it coordinates with products in both the annual and holiday catalogs making it super versatile. Paper Pumpkin is great for beginning crafters but it also offers instant gratification and portability for seasoned stampers. I know that it brought me joy when it came in the mail yesterday. If you would like to order it for yourself or as a gift for a teacher, friend, coworker or relative, here is the link.
Paper Pumpkin allows you to experience this great hobby without a big investment of space or money. You can make beautiful cards and other projects easily and without stress. No need to figure out what to make, instructions are included and there is also a link for videos as well as several online Facebook groups that share all kinds of alternative projects to inspire you.
Next month is a continuation of this kit but you will make 24 sensational Christmas tags that will coordinate with these cards. As a Paper Pumpkin subscriber you also have access to past kits and refill kits if they become available. You also have the option of skipping a month or adding an extra kit if you want more than one in a given month. It really is wonderful to have that kind of flexibility. You can also cancel at any time with no penalty.
A Video Tutorial
Sometimes it is nice to see first hand what is in a Paper Pumpkin and how easy it is to make a beautiful card. As a new subscriber you will also get a clear acrylic block in your first kit. If you want to see the live video that I did yesterday showing how to make the card, you can see it here.
Thanks!
I’m so happy that you dropped by today. It is great to connect with you and to share what I love and what I am making every day. If you have any questions or need help with your paper crafting, or if you have topics you would like me to address, please let me know. Have a super day.
Product List
by Jackie Bultje | Oct 17, 2019 | embossing, fall, Framelits, Halloween, Uncategorized |
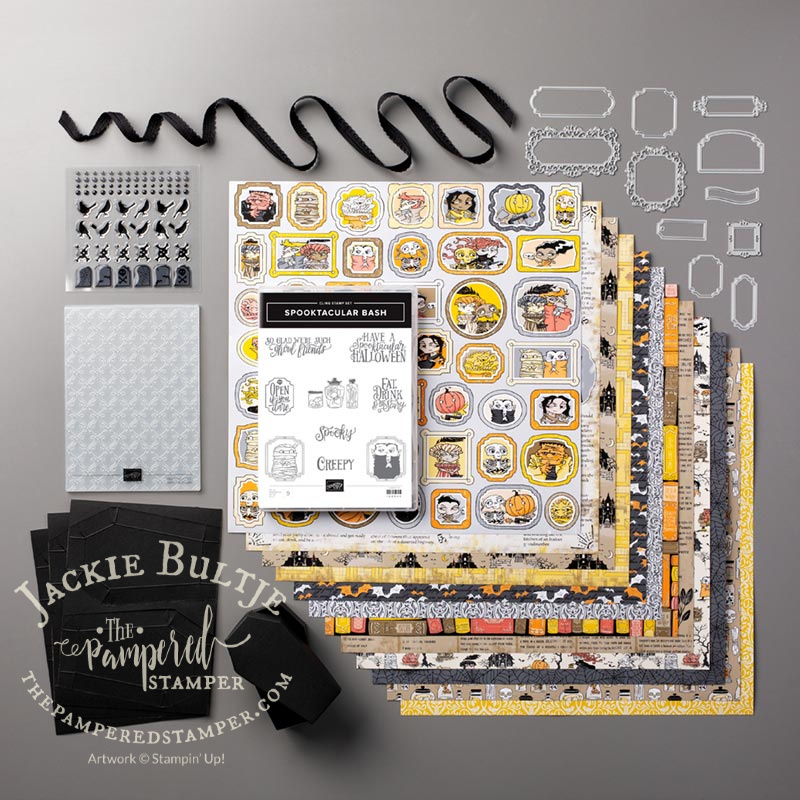
Hello stampers. I love words and I love puns so it is only natural that I love the saying “Ghoul Friends”. This saying is part of the stamp set Spooktacular Bash which is part of the Monster Bash suite. You can find it on page 54 of the holiday catalog.
The Card
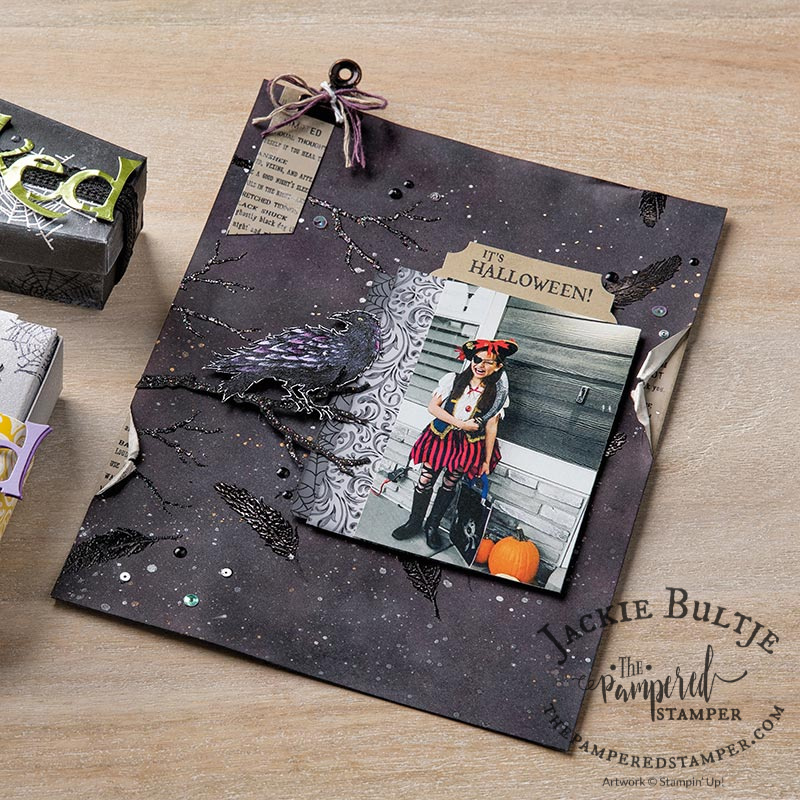
I don’t send out Halloween cards but I do love dressing up and handing out candy. Someday I hope to throw an epic Halloween party complete with fantastic ghoulish treats and fun costumes and of course scary games. This lovely card was a swap card that I received from Christina Walker.

Do you see all the lovely details on this card? The gorgeous ornate frames die and the Stylish Scroll embossing background? The glittered black organdy ribbon is the perfect finishing touch for this card. Here is a closeup picture so you can see it even better.

More Time
Do you ever wish that you had more time? I sure do!! Maybe it could also be a matter or prioritizing things. I know that I absolutely love Christmas so I often jump right into Christmas card making and I forget about fall cards or Halloween. If I would make a point of making all kinds of fun things for Halloween then perhaps I would host a big Halloween party and we could use all the fun stuff I had made. There’s always next year, but maybe I have inspired you to get creative for Halloween.
Share Your Story
If you have fun Halloween traditions, I would love to hear about them. Share your stories in the comments below and I will choose someone to get this fun card in the mail. Blogs are more fun when they are interactive don’t you think? If you do have a fun tradition, maybe you want to scrapbook it too. There was a fun sample in the holiday catalog and I’m going to share it here too.
Thanks!
I’m so glad you stopped by today. I hope you have fun decorating for Halloween, even if it is just a few pumpkins on the porch. Celebrating death is not my thing at all, but dressing up and sharing candy, well that is something quite different. Enjoy the little things and remember, #itsallaboutthetreats.
Product List
by Jackie Bultje | Oct 16, 2019 | Christmas, Snowman Season, Vintage |
Hello stampers! This crazy squirrel has landed back in Canada and I am happy to share with you a vintage snowman card. The card that I am going to share with you is a swap card that I received from the talented Jackie Topa. I have admired Jackie for a long time. She first caught my eye with her fantastic punch art.
The Card
Jackie’s vintage snowman card is real red and crumb cake. She used the snowflake stamp in Snowman Season to repeated stamp and make a wreath using mossy meadow. A hole punch was used to punch holes throughout the wreath so that the real red would show through and look like holly berries. So clever! A little slit was cut in the wreath so that the snowman could be tucked inside.

If you look closely you can see that the Merry Christmas was embossed with our new shimmer black embossing powder. Jackie also brushed Wink of Stella on the wreath to add some subtle sparkle.

The inside is also finished up nicely using real red and pool party.

The Joy of Swaps
It was so nice to come home to a pile of happy mail. There were actually more handmade cards in my stack of mail than bills! The reason for that is because I was involved with two swaps. One of the swaps was a Canadian Business Leaders swap and the other one was a Pampered Stamper Training Group swap. I am so thankful for this vintage snowman card by Jackie Topa. It really is wonderful to have the support and involvement of the broader Stampin’Up! community of demonstrators.
I had a lot to do today so it was a Godsend to have this beautiful vintage snowman card to feature in my blog post. This morning I played pickleball and I made 6 cards for my Feels Like Frost class on Thursday night. I also have to make some beautiful things with brand new product that Stampin’Up! sent me from their head office for my presentation at OnStage in Toronto. Enough to make your head spin, but thankfully I got a great night’s sleep last night. I was in bed at 8:30pm and slept till 7:15am! Tonight I will probably go to bed early again and after that jet lag should be behind me.
A Funny Story
My daughter Katrina picked me up at the airport yesterday, but she is dog sitting for a friend in Oakville, so we first headed back there and then I drove home alone. It was lovely to drive through our beautiful province with the sun shining on all the beautifully coloured trees. Using the great bluetooth technology I was able to call some of my family on my drive, but that ended up biting me in the butt!
I was just entering Chatham-Kent when Rachel called me. She reminded me to slow down since Chatham-Kent is notorious for its police presence on the 401, so keep that nugget of information in mind. After that we were in such deep discussion that I was not paying attention to my surroundings. In my defense, there was also construction going on BUT I ended up missing BOTH of the Chatham exits so I had to drive all the way to Tilbury before I could get off and drive back to Chatham. You would think that 285 km was a long enough trip not to want to add another 25 kilometers to my journey.
Thanks
Thanks again for joining this crazy squirrel! I appreciate each and every one of you. It is so nice when you take the time to comment, when you pin my creations to Pinterest and when you share on Facebook. All those things make such an impact on my business, but they also provide crucial emotional support. Owning your own business is not for the faint of heart! I was just talking with Katrina about that yesterday. Sometimes it can be daunting but I am happy to be able to do what I love and to share it with you.
If you live in Canada and want to shop with me, just click on the images below and you will be in my store! If you use the host code then nothing will go to waste. If you order $200, then you will get 10% in host benefits and can also get exclusive host sets. Do NOT use the host code if you are ordering that much. Of course, you also know that if you are placing an order for more than $110, then your best deal is really the starter kit. Let me know if you have any questions! Have a super day.
Product List
by Jackie Bultje | Oct 14, 2019 | Christmas, fancy fold, Feels Like Frost, reverse stamping, Stamparatus, Toile Christmas |
Hello stampers! Today I would like to tell you a cardinal love story. I love feeding and watching birds in my backyard, and cardinals are my favourite. The reason for this is not only their vivid colouring, it is the way they love each other. Did you know that cardinals mate for life? If you spend some time watching them you will inevitably see the male cardinal feeding the female berries or seeds. Now that is the most beautiful thing to witness! They also take turns sitting on the eggs and feeding their young.
That is why I wanted to make a card with a male and a female cardinal looking at each other. Their romance deserves to be celebrated and the stamparatus and the silicone mat make it easy to make a reverse facing cardinal. Would you like to see my card?
The Card

When you open the card then you get a lovely surprise with the female cardinal inside looking back at the love of her life! This is made possible through the reverse stamping technique. You can see a video on how to do that here.

How do you like the colours of the cardinals? I am thrilled with how they turned out and I will tell you all about it very soon.

I will show you a couple of pictures to try and do justice to the z-fold construction of this card. I shared the measurements in a previous post. This basic card design was inspired by Rachel Tessman. You can find the measurements for this card in a previous blog post here.

You can see that my cardinals are enjoying hanging out in the amaryllis greenhouse. The light in there is perfect for photographing my cards and I have to use the resources I have on hand! Today is my last day here with Gerard, I fly home very early tomorrow morning so there will be no blog post tomorrow.

The Colouring Trick
Do you remember that I told you that I had no cherry cobbler or real red ink? My Blends collection is also still in Canada, so I had to get creative with what I did have and I am so very pleased with how it turned out. It really is amazing what can happen when you layer colours. I started with shimmery white cardstock. The cardinals were stamped with Tuxedo Black Memento ink and left to dry for a little while. The reason I let them dry for a while is because I was going to be colouring them with an aqua painter and ink. Water can make memento ink run if it hasn’t had time to set.

For the male cardinal I started with colouring him totally in Poppy Parade. This colour really lives up to its name, it really is exactly the colour of those large poppies in my garden, a beautiful orange-red. However, this is not the right colour for a cardinal. I decided to layer on some Lovely Lipstick. What a difference! After that I decided to add just a little more depth by adding a touch of Merry Merlot. Bingo!! It was just the right shade for my proud male cardinal. For his beak I first used Pineapple Punch and then coloured over with Flirty Flamingo.
The female cardinal was going to be a little more challenging because of her muted colouring. Mrs. Cardinal has a lot less red because she has to blend into her surroundings when sitting on the nest protecting her eggs and later her chicks. You have to remember that I used to question my talent as an artist, so this is a big deal for me! I started with a little Gray Granite around the edges and then filled in with Soft Suede that was really diluted with the aqua painter for a softer effect. I left a little white space which I then filled in with a little Poppy Parade also watered down significantly and then a touch of Flirty Flamingo. Her beak was done the same as for the male.
I no longer doubt my artistic abilities. Creating this pair of love birds was a lot of fun. I am so very happy with how they turned out. This card and this cardinal love story simply brings me joy and I hope it does the same for you.
Personal Reflections
Today is my last day in Holland. I wanted to do a blog post even though it is Thanksgiving Day in Canada. Here it is a regular work day. Thanksgiving Day is a “new world” holiday. Tomorrow my plane flies out of Amsterdam at 9:45am, that means I need to leave home at 6am, so there will be no blog post tomorrow!
My four weeks here have flown by. I am thankful that I was able to blog almost every week day and that I was able to do my weekly Facebook live videos both on my business Facebook page and also on my Pampered Stamper training group page. Many visits were made with my family here both over coffee and meals in their homes and also in fun restaurants and for this I am so very thankful. What an amazing opportunity to reconnect with my roots and also to hear stories about my parents that I had never heard before.
Gerard and I went to see a famous Dutch comedian and he was impressed that I was able to understand almost all of it. I met my cousin that night as well whom I hadn’t seen in twelve years! Last Friday we went to see a musical called Soldat van Oranje which is the longest running Dutch musical ever. It is in its 9th year and is a story about a student in World War 2 who flees to England to start an undercover operation with the help of Queen Wilhelmina. If you are interested in reading more about this, here is the link. I am sure there is a translate button so that you can read it in English too.
We only went out for supper three times in four weeks, the rest of the time we cooked together or we were at relatives. For the first time I had a taste of what it would be like to actually live here. Next time I will drive more myself and do some solo exploring. I was unable to unlock my phone so that means I had no GPS and having that would make me a lot more comfortable driving here.
It was interesting to work here with limited supplies. I have learned how to improvise and it has also stretched my creativity. My desire to share the opportunity of the starter kit has only grown through this experience. I am a firm believer that every new stamper should really start with this kit. Crafting is so much more rewarding, fun and easy when you have a few more supplies to work with. You may as well do that on a discount don’t you think?
Thank You
Thanks again for dropping by and for being a part of my journey. There is always room for you on my team if you live in Canada and I am always thrilled to help new customers get just what they need. I am looking forward to evolving my business to better serve my long distance customers. If you haven’t done so yet, please take the time to introduce yourself in the comments below. Have a super day and I will be back here when I am in Canada again.
Product List
by Jackie Bultje | Oct 11, 2019 | Christmas, fancy fold, shimmery white cardstock, Toile Christmas |
Hello stampers! Today I want to share with you a Toile Christmas blue jay. There was a card I was planning to recreate that I had seen at our Twin Teams gathering made by the talented Marion Greenlund. When I was finally ready to make this card I realized I was missing some key components, the most crucial of which was the Peaceful Boughs Bundle. That is how the card for today has come to be!
Toile Christmas
Do you know the meaning of the word toile? It is actually a fabric and is derived from the French word meaning “linen cloth” or “canvas”, particularly cloth or canvas for painting on. In this case it refers to a type of repeated surface decoration traditionally printed on the same fabric. If you look at our Toile Tidings designer series paper you will see just that. Old Victorian wallpaper also looked just like that with a repeated picture or design.
The bird image in Toile Christmas is a cardinal which is a very popular bird in North America, but it can also be interpreted to be a blue jay. I don’t have any cherry cobbler or real red ink pads with me here in Holland, so I decided to make a blue jay. I combined it with the Feels Like Frost designer series paper for a look that I am really, really pleased with if I do say so myself.
The Card
Once again I really wanted to showcase the beauty of this paper without having to cut it down so I made a big 6 1/8″ square card. Of course that means that I will have to custom make an envelope to go with it but we have our envelope punch board to make that a relatively easy process.

Can you see why I am so happy with this card? The card itself is basic black and the panel on the right uses the full piece of 6″ by 6″ paper. I then cut a 2 3/8″ piece of the same paper (there are four sheets of each design in the pack) and I turned it upside down to get a bigger sky feeling. You can also see that it is a Z-fold card which allows the branches to overhang the one panel.

Here you can get a good look at the sentiment. This was also a stroke of genius inspired by necessity. I had no embossing powder so I used the Delicata copper ink pad and the stamparatus. That way I was able to ink up three times to get a nice bright image.

Two of the dies in Toile Christmas do not have coordinating stamps so I cut them out of shimmery white cardstock and coloured them with ink and an aqua painter. I added them to the stamped and coloured branch for some variety. After some close inspection I decided that something was missing. There was an extra branch laying on my stamp table just begging to be put to use, so I cut it up and added it in sprigs to the branches on the left. Do you like this version better as well?


I had more pictures of this version of the card but we had some major computer issues so these pictures are not currently available to me right now. It is imperative that I finish this blog post today so I don’t want to get bogged down into fixing computer issues, after all, here in Holland it is already late Friday afternoon.
To be totally honest, I am beyond thrilled with how this card turned out and I am also excited to share that I figured out how to paint a cardinal without using cherry cobbler or real red. He will be the feature of Monday’s blog post.
The Measurements
If you are like me, you find it most helpful to be given the dimensions so that you don’t have to guess and mess it up or waste paper, so here you go!
Card base: basic black 6 1/8″ by 11″ scored at 6 1/8″ and 8 5/8″
Feels Like Frost designer series paper: 6″ x 6″ and 2 3/8″ by 6″ (tow of these) one on the front of the card and one on the opposite side.
Thank You
Thanks again for stopping by to read my blog, I hope you were inspired by my creation for today. Stop by again on Monday to see how I made some beautiful cardinals. If you live in Canada and don’t already have a demonstrator, I would love for you to shop online with me or if you are local to Chatham, Ontario then come to a class some time. To stay connected you can subscribe to my newsletter, that is where I promote my classes as well as on my business Facebook page which you can find here.
Product List


 Glittered Organdy Ribbon")


")


")
 Designer Series Paper")


