Hello stampers and happy Friday to you! I am a hot drink lover, what about you? Today is about hot chocolate and coffee, but mostly about the whipping cream!! I made this fun card using the Nothing’s Better Than stamp set as well as the Cup of Tea bundle.
Hot Chocolate or Coffee?
There are two things that I really love about this card. The first is that I made a red polka dot cup and that is is a lot bigger than the tea cup die. Watch my video tutorial to see how I did that! The second thing is that I used our Snowfall Accents Puff Paint to make not only the whipped cream on the hot chocolate but also the steam from the coffee cup. It was such fun to play!
Be sure to take a close look at this card and comment below if you can spot the one mistake!! Not sure how I messed up? Look at the photo below where I have corrected my mistake. The people who comment and guess correctly will be in a draw to get this card in the mail.
Video Tutorial
In this video tutorial you will also see how I used paper piecing to make the cute cups. White craft ink and a sponge dauber were used to make the embossed cup a little more vintage. What do you think?
Subscribe on YouTube!
If you would like to see all of my videos and not miss a thing, be sure to subscribe to my YouTube channel. Just click on the red subscribe button on the bottom right hand corner, it’s that easy! Here is my YouTube channel.
Thanks for joining me today, have a super day!! (click on the photos below in the product list and you will be instantly in my online store, how awesome is that?)
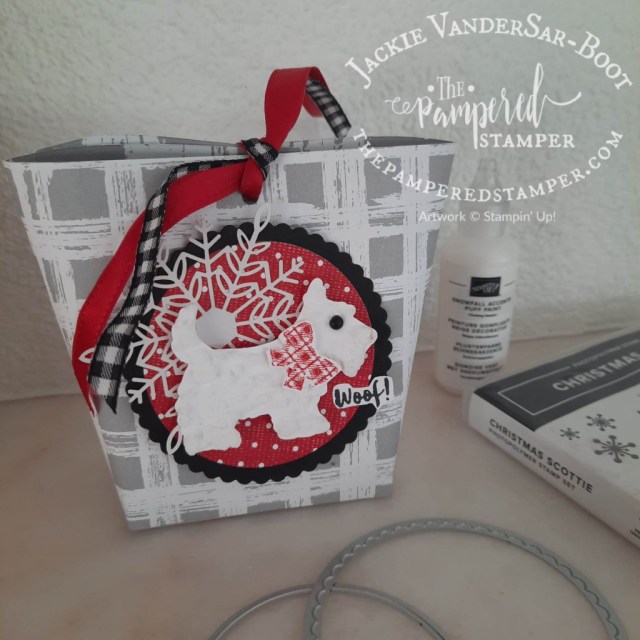
Hello stampers and happy Wednesday to you. This is such a fun and easy bag to make but sadly you will only be able to make it if you already have the Christmas Scottie bundle. It is now sold out. The Snowfall Accents puff paint is still available however for a steal of a deal at $2.40 Canadian. Let’s take a look at the Christmas Scotty Box in a bag.
Christmas Scottie Box in a Bag
The way that this box in a bag works is that you first make a small box for the bottom that has four sides and a base. Then you wrap your patterned paper around it, seal it with tear’n’tape along the bottom edge and the one seam. Pinch it together at the top, punch with a hole punch and tie a ribbon through with a tag if you like. If you want to step it up a notch you can add a stitched rectangle die cut, fold it in half and punch all the layers together. This one is a keeper!!
Video Tutorial
If you would like to make this Christmas Scottie box in a bag, check out my video tutorial here on YouTube. You will be amazed at how easy it is.
Shop With Me and Get a Free Tutorial!
Did you know that if you shop with me you can get up to three free tutorials? That will be enough inspiration to keep you crafting for months as each pdf tutorial has at least 14 projects in it. The links below are for my Canadian store but you can also shop with me in Europe by clicking here and choosing Jacomina Bultje as your demonstrator. My name has not yet officially been changed in the system but I do use my real Dutch first name over there. I was named after my oma on Pap’s side of the family.
Thanks so much for joining me today, I hope you have a super day!
Hello stampers and happy Monday to you. Today I have a fun technique with you that I call Blown Alcohol technique. I did something similar this summer but it was WAY more complicated. You can see that post here.
I was reminded of this technique by my European team leader Michelle Last and you can see her blog post here.
Thankfully I have also made a video for you to see how it is done. I also show you how NOT to do it and what happens when you mess up. Always fun to see someone else’s mistakes isn’t it?
Blown Alcohol Technique Cards
To do this technique successfully you need vellum cardstock, 90% or above isopropyl alcohol (you might just know it as rubbing alcohol in North America) and Blends markers. It is helpful to have a stampin’ spritzer as well as these little bottles from Amazon.
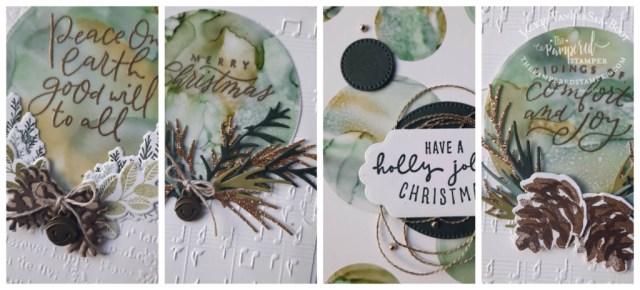
Here’s a close-up of the cards so you can see the detail:
Little Tip
What makes the blown alcohol focal point so vibrant is the use of adhesive sheets. When the blown alcohol technique is complete you put the entire sheet of vellum onto an adhesive sheet and then you can adhere it to a sheet of basic white cardstock. Use your layering circles dies to cut out circles and stamp your sentiment in versamark and emboss in gold. Remove the adhesive backing and add to your card front. Accessorize with die cuts, flat jingle bells or stamped and die cut pine cones.
Video Tutorial
Here is a video tutorial that I made. It is in typical Jackie fashion with some trial and error but I think it will make you feel totally at home. My wish is that when you watch my video you will be empowered to give it a try yourself. I used the following Blends colours: Soft Succulent, Old Olive, Just Jade and Evening Evergreen. Just Jade has been retired so if you don’t already have it you could try and substitute with a different shade of green.
Thanks!
Thanks for joining me today, I hope you were inspired. Please leave a comment so I know you were here and if you really want to show me some love, pin some of your favourite photos so more people will find my blog. Every little bit helps. The links to shop with me online in Canada are below.
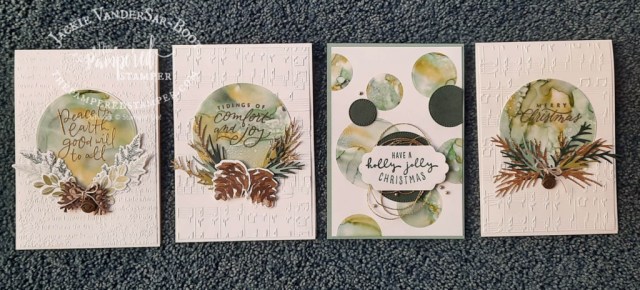
Hello stampers and happy Monday to you. Did you know that there is a hidden gem in the mini catalog? I am sure that you paged right by it. Go get your holiday catalog right now and flip to page 23 and you will see the Merriest Moments Hybrid Embossing Folder. Blink and you’ll miss it! This beautiful hybrid embossing folder is just what you need to make stunning Christmas cards or home decor, I used it as the focal point for these simple Christmas cards. Isn’t that what we all want? A gorgeous Christmas card that is easy to make and easy to replicate? Look no further!!
Stunning Hybrid Embossing Folder Cards
I made all these cards in very little time. The trick was to cut them out of various colours, stamp the stitched rectangle in a few different colours and then cut out some background pieces out of various patterned papers. Then mix and match and see what looks best. At the very end I decided to add some flat jingle bells tied with linen thread bows.
Here is the red polka dot card up close, so festive don’t you think?
Video Tutorial Tomorrow
Tomorrow I will be offering a video tutorial showing you my process on how I made the different combinations to make these cards. I also find it helpful to see exactly how this hybrid embossing folder works. The video will be posted in my Stories and Stamps playlist which you can find here.
Be sure to check out this blog post for more inspiration with this stunning hybrid embossing folder and coordinating stamp set Merriest Moments.
Thanks!
Thanks for joining me today. I hope you were inspired to either use this hybrid embossing folder if you already have it or that you will want to add it to your stash. If you live in Canada just click on the links below to shop with me. Have a super day!
Hello stampers and happy Friday to you. Some people think vanilla is boring but today I am going to share with you Very Classy Very Vanilla. I have made a very elegant monochromatic card combining the Festive Florets dies and the Merriest Moments Hybrid Embossing folder. Add in some gold embossing and the result is rather stunning if I do say so myself!
Very Classy Very Vanilla
Did you know that the oval dies in the Festive Florets collection layer together beautifully? The insides of the detailed ovals cut out for plain ovals on which to stamp your greeting and the detailed ovals can be layered as well with a stunning effect. I was inspired by Gail Ellis to layer these oval over the Merriest Moments Hybrid embossing folder. It’s a little counter intuitive since that folder has a rectangular opening in the middle but it works perfectly as you will see for yourself.
Tone on Tone Poinsettias
For this Very Classy Very Vanilla card I kept the poinsettias monochromatic as well. I stamped the poinsettias in Versamark on very vanilla cardstock and embossed with white embossing powder. A few pearls were added to the centre of the flower for a lovely effect.
Prime Time With the Pampered Stamper
When COVID started I began Prime Time as a way to keep my business afloat. Members pay ten dollars a month in three month increments and in exchange they get a weekly exclusive video tutorial and a monthly 16 project pdf tutorial. The videos are posted each Thursday and the supply list and measurements are posted on Wednesdays. Members tell me that this is like a weekly class and because they pay a small monthly fee, they take it seriously and it keeps them stamping and using their supplies. It makes me so happy to hear that! You are also most welcome to join! You can do it here. This was the card that we made this week.
Thanks!
Thanks for joining me today, it’s always nice to see how many people come and read my blog posts each day. Did you know that I also have a YouTube channel? Every Tuesday and Wednesday I post videos there at 10am EST. Teaching the joy of card making is what I love to do and I hope you join me and subscribe! Just click on the red subscribe button on the bottom right hand corner of the video.
Hello stampers. I am SO excited to share with yo the Festive Florets Collection. The collection includes two stamp sets, a set of dies, beautiful 12 x 12 paper and gold gems. What I like so much about it is that with this collection you can make cards for the whole year! as such it is a worthy investment that you will not tire of easily. Shall we take a look?
Festive Florets Card Assortment
Today I made three different cards using this collection. I will also share the video tutorial so you can be inspired to create as well. Two of the cards are Christmas cards and the third one is an all occasion thinking of you card. Together they use all the frames dies included in the set. There is so much more to explore with this collection.
I also made some Christmas cards last week with these stamps and dies. These cards will also be part of my Save Your Sanity Stamp Camp
on December 7, 2022.
Video Tutorial
More Inspiration from Other Demonstrators with Festive Florets
The following card is by Amy Koenders and you can check out her full blog post here.
This beauty is from Gail Ellis. Gail combined the Merriest Frames Hybrid bundle. You can check out more of her fabulous work here although this card is not featured on her blog just yet.
The last card I am sharing with you caught my eye because of the way she used a pop of red behind her frames. It’s such a simple thing but it makes a huge difference! I also like the addition of the die cut leaves. You can read about all the details on her blog post here.
Contest
I am offering a contest this week for two reasons. One is simply because it is a fun thing to do. The second reason is that I want to see if contests actually work as an incentive to buy. This is how it will work and unfortunately it is only open to Canadians. If you order the Festive Florets Collection AND if at least five people do so, then one lucky winner will get Many Marvelous Markers. That is a very significant prize so I hope that I get a bunch of orders. Everyone will get THREE free pdf tutorials if they order the Festive Florets Collection. That makes everyone a winner don’t you think? Contest closes on Friday November 4 at noon EST. Please use the current host code SBEEKQT when you place your order.
Official Photo of Festive Florets Collection
Thanks!
Thanks for joining me today, I appreciate it when you drop by and of course I would love your business. If you are NOT Canadian, you can still support be by purchasing my tutorials or by joining Prime Time or my Training Group. You can see all those things at the top of my blog under Services


")
")


")
 Designer Series Paper")


 Designer Series Paper")
")


 Gingham Ribbon")

 Ribbon Combo Pack")


")


 Specialty Paper")


 Designer Series Paper")


")


")
")


 Metallic Edge Cotton Ribbon")
 Shimmer Ribbon")


